In the back-end/CMS-Admin section you will come across the ‘Catalog’ section, here you will be able to add, manage and edit the following listed below.
Note: Not all areas will be available to you, depending on the subscription you have, if you have any questions or queries about specific areas please reach out to your Account Manager.
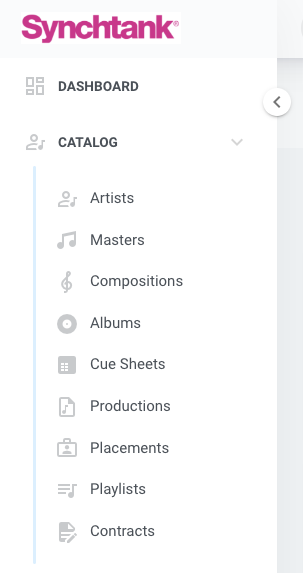
Artists
This section will explain the Artists section within the Catalog dropdown in the admin section of your site. The majority of the back-end functionality and details you will enter here, will be reflected within your front-end system. For details on Artists in the front-end please read this article.
Admin Settings:
To amend your admin settings and to hide/show fields please refer to this article.
- Entering, Editing and Managing Artists
- Bulk Upload
- Reporting
Artists Details:
The Artist page in Admin will list out all of the Artists known in your system, and you are able to amend the view by selecting the table edit button to show the columns that are most useful to you.
Entering, Editing and Managing Artists
How to add a new artist:
Within the Artist page, select the green ‘create’ button in the top right corner and this will open up a page similar to the below:
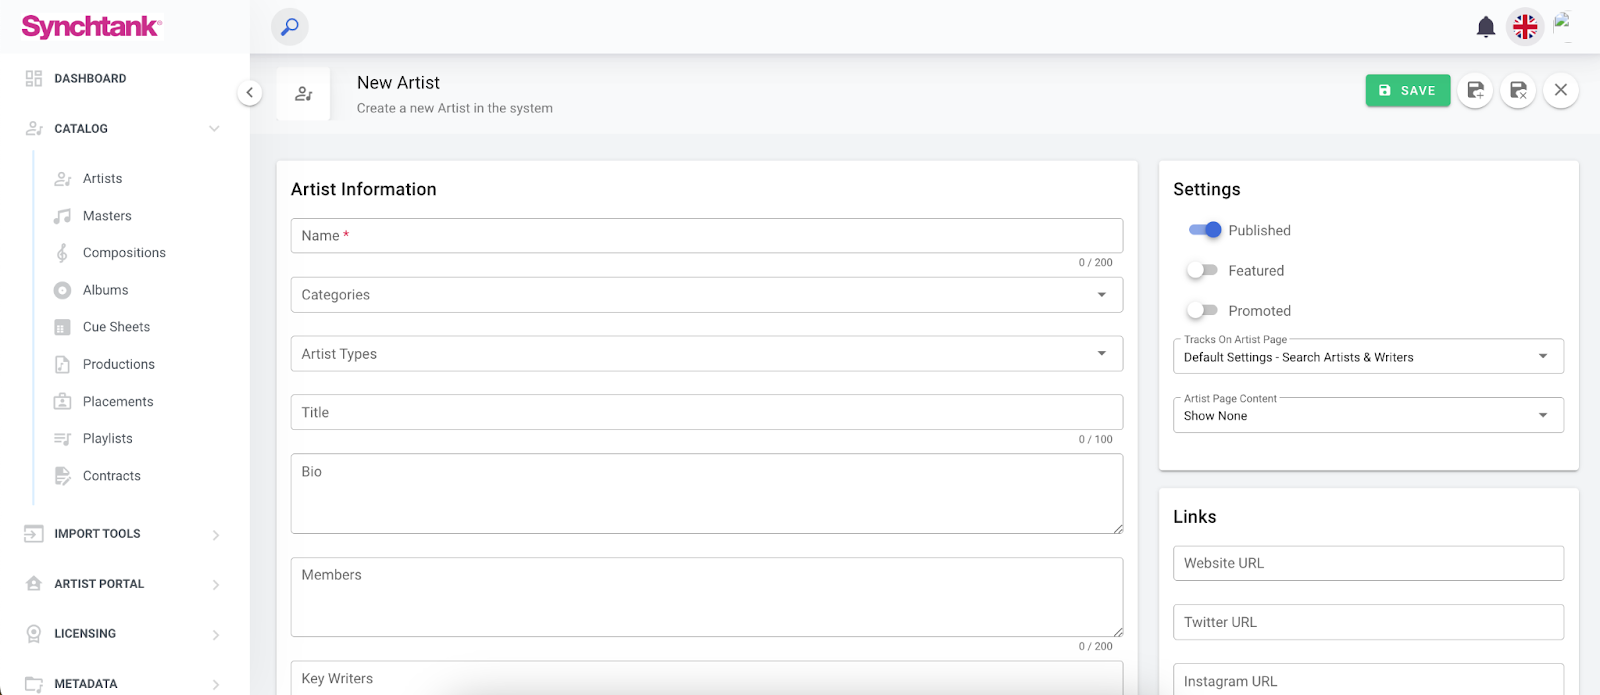
Here you can add all the details you have about your Artist. They range from but are not excluded to:
Artist Name, Image, and Bio
This is the name of your Artist, their main image and biography. An Artist's biography can be as long or as short as needed and can include any additional information you would like visitors to know about your artist such as their hometown, who they sound like, and where their music has been featured before.
Artist Social Media
Usually an Artist's social media will display below their main Artist Image on their Artist page. Currently Synchtank supports a range of links including an Artist's Instagram, Twitter, Spotify, Apple Music, and Bandcamp account. You can also use this section of the Artist Page to link to an Artist's external website.
Artist Tracks & Albums
An Artist's Tracks and Albums are tracks/albums in your system that are linked to your Artist. You can choose to show both an Artist's tracks and albums, or just their albums or tracks on the Artist Page.
Artist Photos and Videos
These are photos and videos associated with your Artist. These can be promotional shots, shots from live shows, music videos, or live performances that best showcase your Artist's work.
Artist Placements
These are Placements where your Artist's music has been used, for example in an advert or trailer. Placements can be linked to Artists from the Placements page of Synchtank Admin. To link a Placement to an Artist, click on the Placement you would like to link and then select the Artist to link it to from the Artist dropdown.
Settings
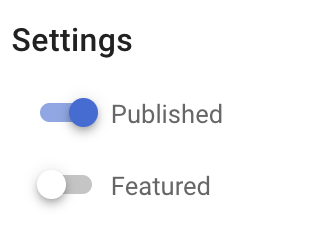
Within the settings section of creating an Artist,you have the option to publish the Artists, meaning they will appear on the front-end site, and also feature them, so they appear in your featured Artists list. All you need to do is toggle on or off.
How to edit an artist:
To edit an artist, simply select or search for the artist you would like to update and click into their page, next select the blue edit icon in the top right corner, this will allow you to edit all the fields located here. Then follow the same steps as creating’; edit or add any information that you wish.
How to link your artists to their masters:
For this process, you will need to navigate to the Masters section in the back-end Admin (more on Masters below). Find the track you would like to associate your Artist to, and select the Artists section.
Next, select edit and add Artist, start to type your artist name and it will search your Artist database to connect the two. Then select the role of your artist, you have the options of MainArtist, FeaturedArtist or Artist, as seen below. This will then add the Artist to the relevant Master.

Bulk Upload
Within the admin you have the ability to bulk import and edit your Artists, this will need to be in the correct Synchtank Format so we recommend creating a report (as detailed below), to get the right heading in your import spreadsheet.
Once exported you can use your export to update the relevant information or remove the data to give yourself a new template spreadsheet.
When you are ready to upload your spreadsheet, navigate to the Import Tools section and select the spreadsheet import option from the navigation menu. Next select the create button and follow the steps on the screen.
Reporting
To create a report on your Artists, navigate to the Report section within the Synchtank Admin, and select the green “create new” button in the top right corner.
Next you select the type of report you wish to run, in this instance it will be Artist. Once you have done that, you can select the items added between the start and end date, then press save.
Once completed you are able to download the report as a csv. file and open within Excel.
This will give you all details of Artists held in your Synchtank Admin
Masters
This section pertains to all customers with the Advanced Rights module (i.e, systems that differentiate Masters from Compositions).
Note: All customers will be migrating to a Master/Compositions split in due course and your Account Manager will be in contact with you to support this upgrade.
Admin Settings:
To amend your admin settings and to hide/show fields please refer to this article.
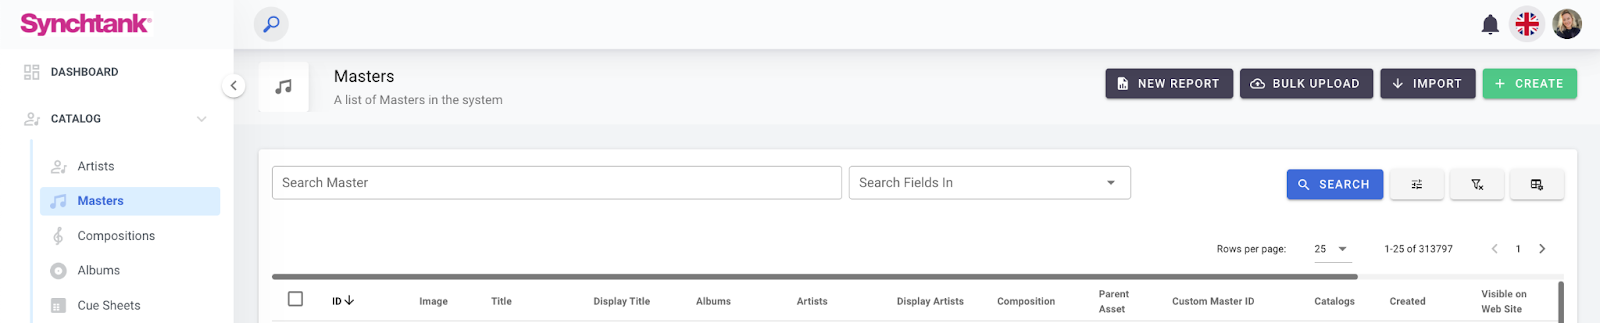
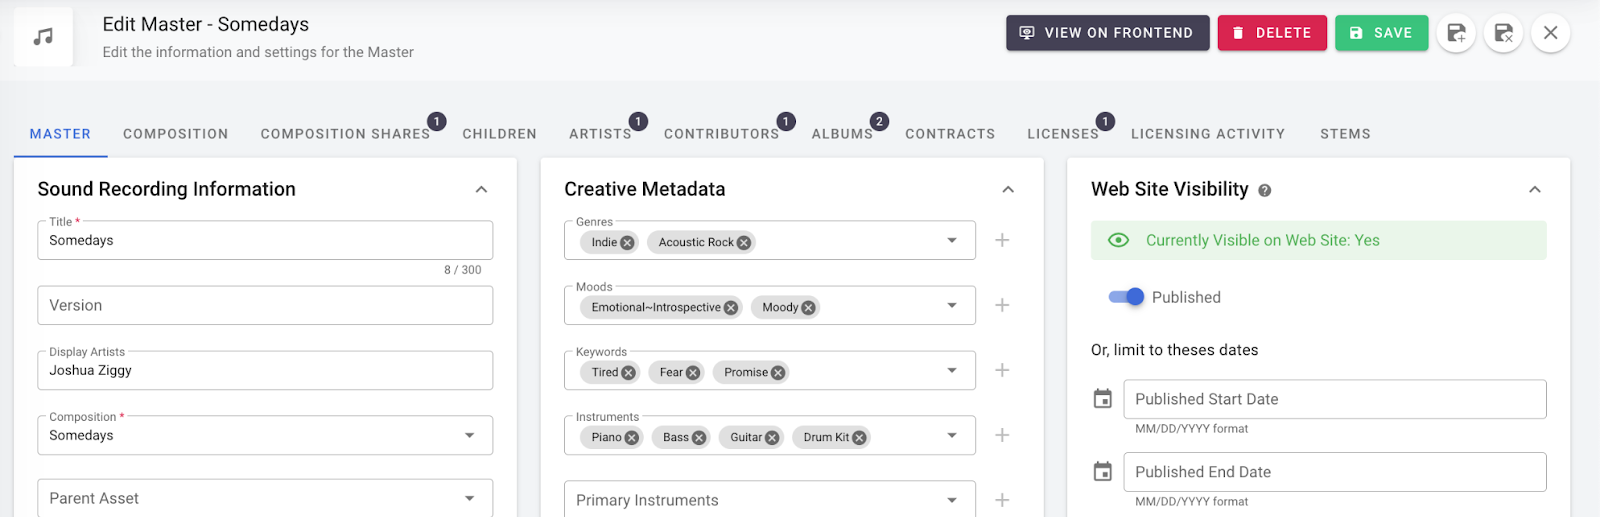
Master Details:
Masters can be found in the ‘Catalog’ section of Admin in the left sidebar
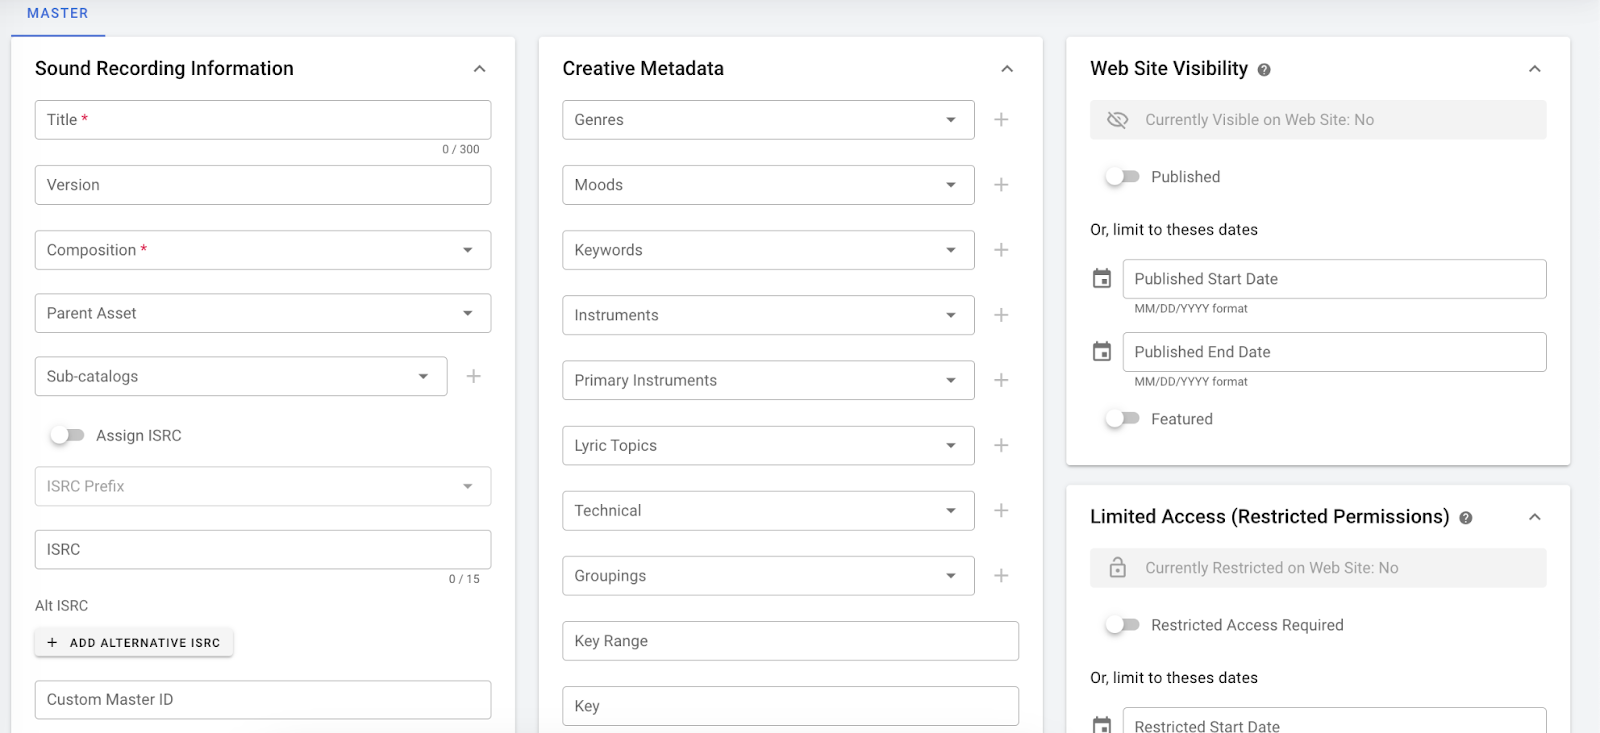
- Sound Recording Information: which contains the main details of your Master such as:
- The title of the Master,
- ISRC and alternative ISRC’s
- Custom and legacy ID’s if you require those,
- P line and P year
- Duration
- Contractual Rights: which allows you to enter rights and ownership information, showing:
- Ownership of the Master, the publishing or both
- A one-stop or easy clear
- Territory for where control it
- The owners of the recording
- Creative Metadata: which includes:
- Genres
- Moods
- Keywords
- Instruments
- Key
- Tempo
- Lyrics
- Automated Metadata Tags: these are the same as the above but are created by our automated metadata tagging systems
- Web Site Visibility and Limited Access (Restricted Permissions): allowing you to control whether this Master is shown on the front-end of your web site.
- Files: where you can add artwork, audio files such as mp3. and wav. files
Entering, Editing and Managing Masters
Note: If a Composition has a Master associated with it, it will need to have a separate data entry in admin. This follows the same rules as entering a ‘composition’ just with different entry points
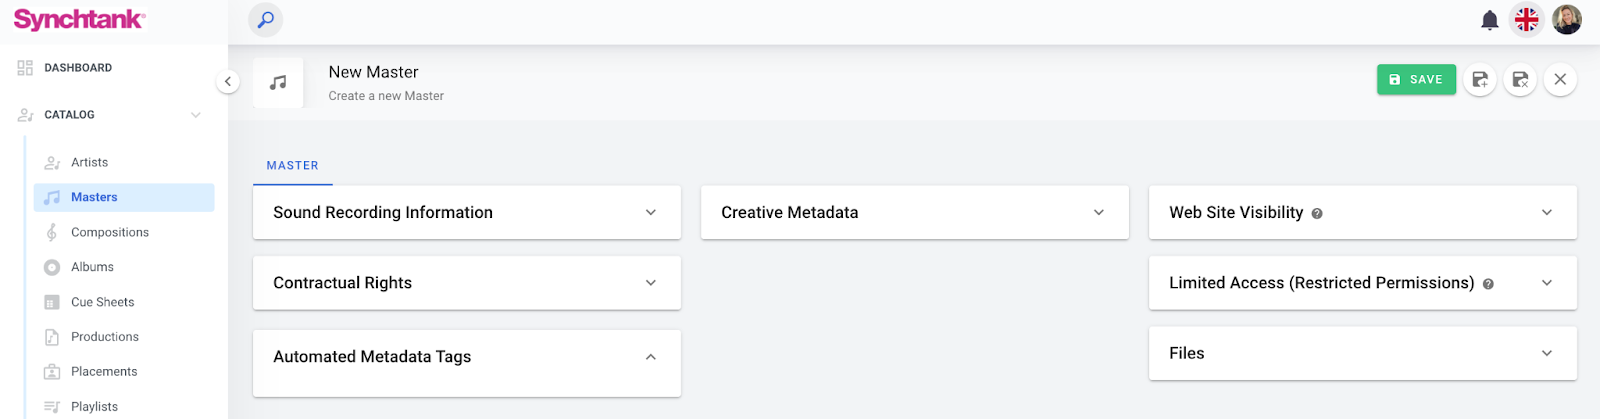
How to enter a Master:
- Navigate to the Masters section under Catalog and select the green ‘Create’ icon in the top right hand side corner to open up a new Master’s entry
- Fill in the relevant information as listed above under Master Details.
- Click save in the top right hand side corner
How to edit a Master:
- To edit your Master, simply select the Master you wish to edit and select the blue ‘Edit’ icon in the top right

- Make the edits you wish to make.
- Select the green ‘Save’ icon in the top right to make sure you save your changes.
Managing your Master
Once you have created your Master you will see the below tabs which gives you further information into your recording.

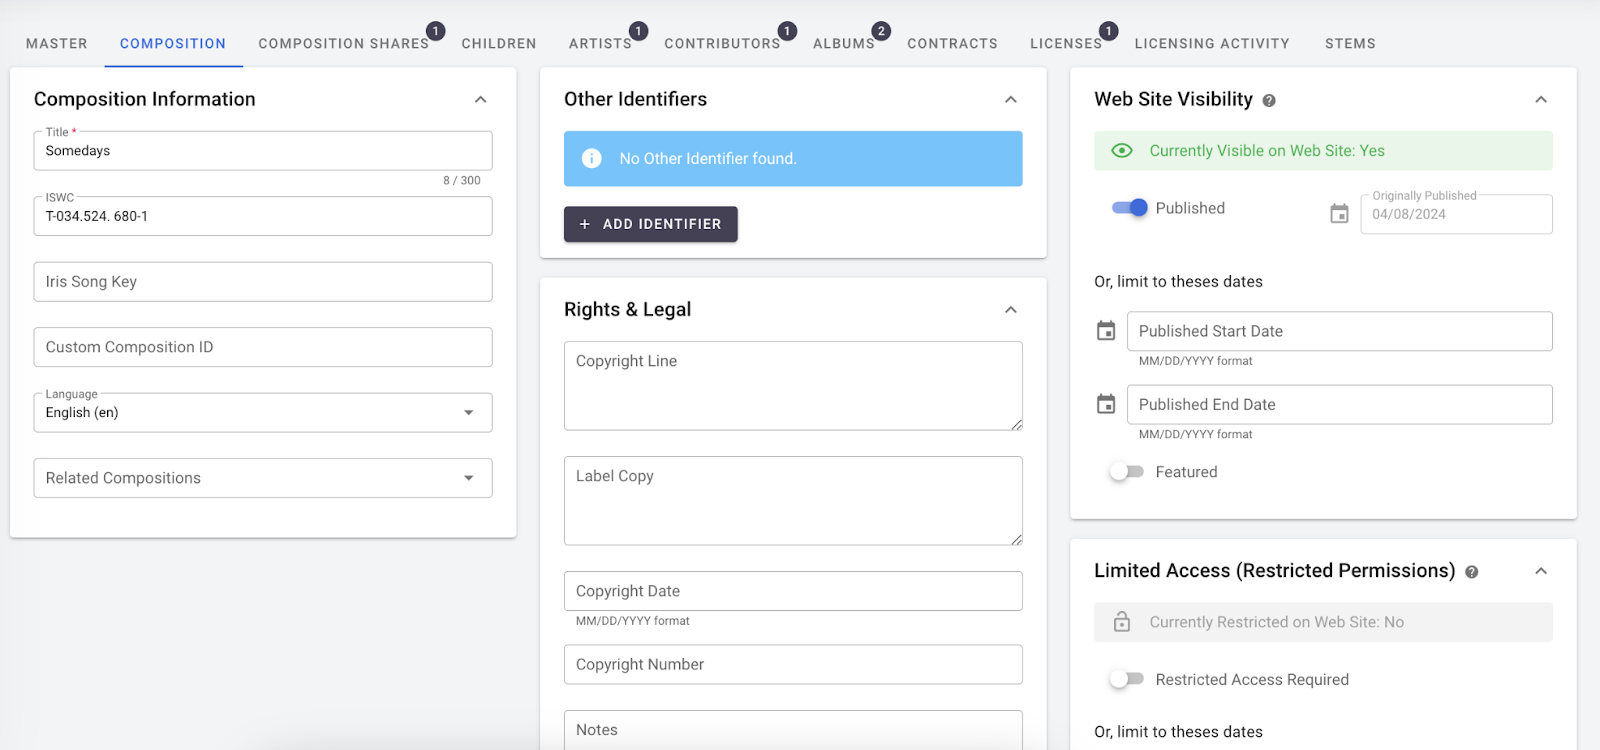
Composition
This section houses the information relating to the composition that has been recorded. It is mandatory to have a Composition related to a recording within the Synchtank system but if you don’t control the Composition it can be auto-generated for you.
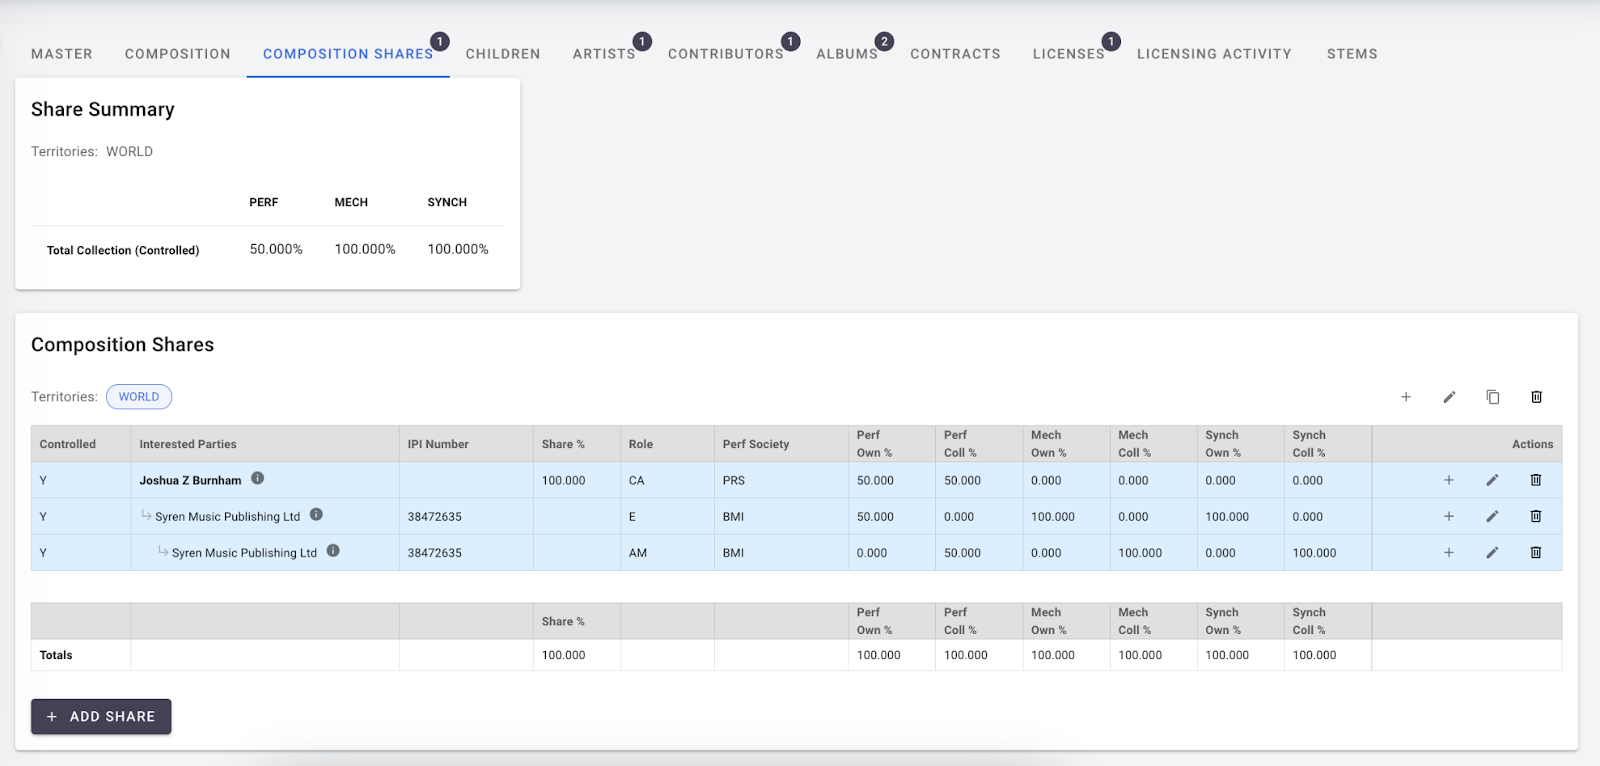
Composition Shares
Here you have the associated Composition Shares which shows you the writers and publishers of the song, along with the ownership and collection shares which will be useful for mechanical licensing.
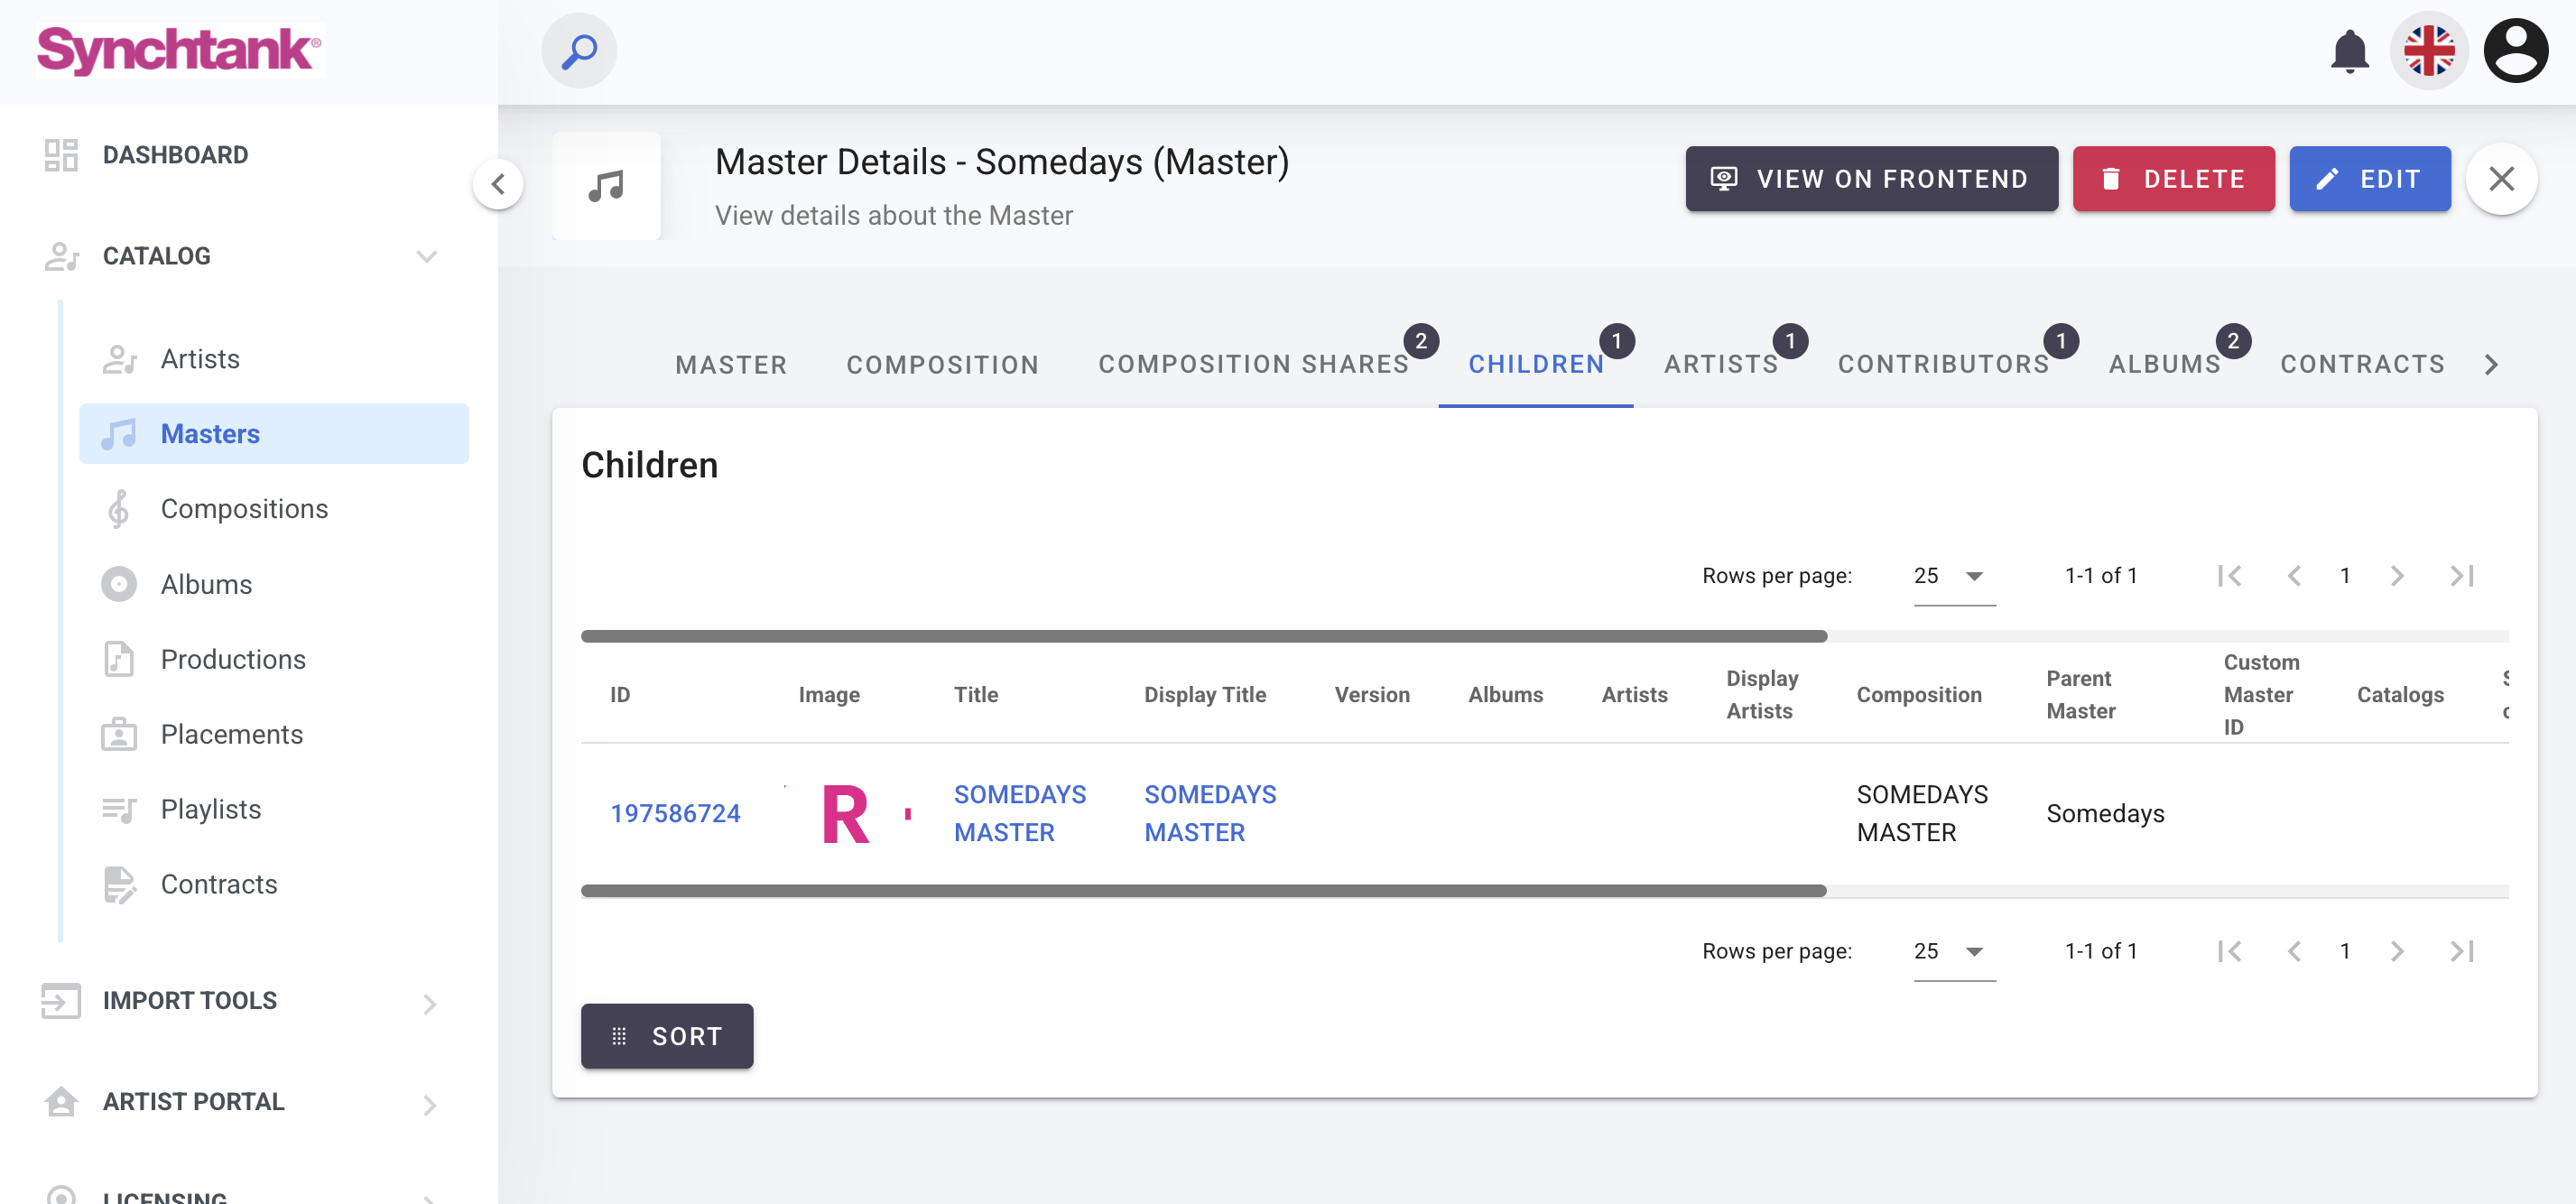
Children
The Children section shows all child masters linked to a parent track. Child masters are derivative versions of an original recording, such as Alternate versions, Cut-downs or edits, Instrumentals, or remixes.
Linking tracks using a parent–child relationship helps keep the catalog organized and ensures that all related versions of a song are grouped.
How to Add Child Masters to a Parent Track
- Go to Admin Dashboard
- Navigate to Catalog → Masters
- Use the search bar to find the tracks you want to link
- This usually includes the original track and its alternate versions
- Select the child masters you want to link
- You can select multiple tracks at once
- Click Edit to open the bulk edit view
- In the Sound Recording Information section, locate Parent Master
- Search for and select the original (parent) track
- Click Apply to all
- Save your changes
Confirming the Relationship
- Open the parent master
- Navigate to the Children section
Confirm that all linked child masters appear in the list
If the relationship is correct, all derivative versions will now be visible and grouped under the parent track.
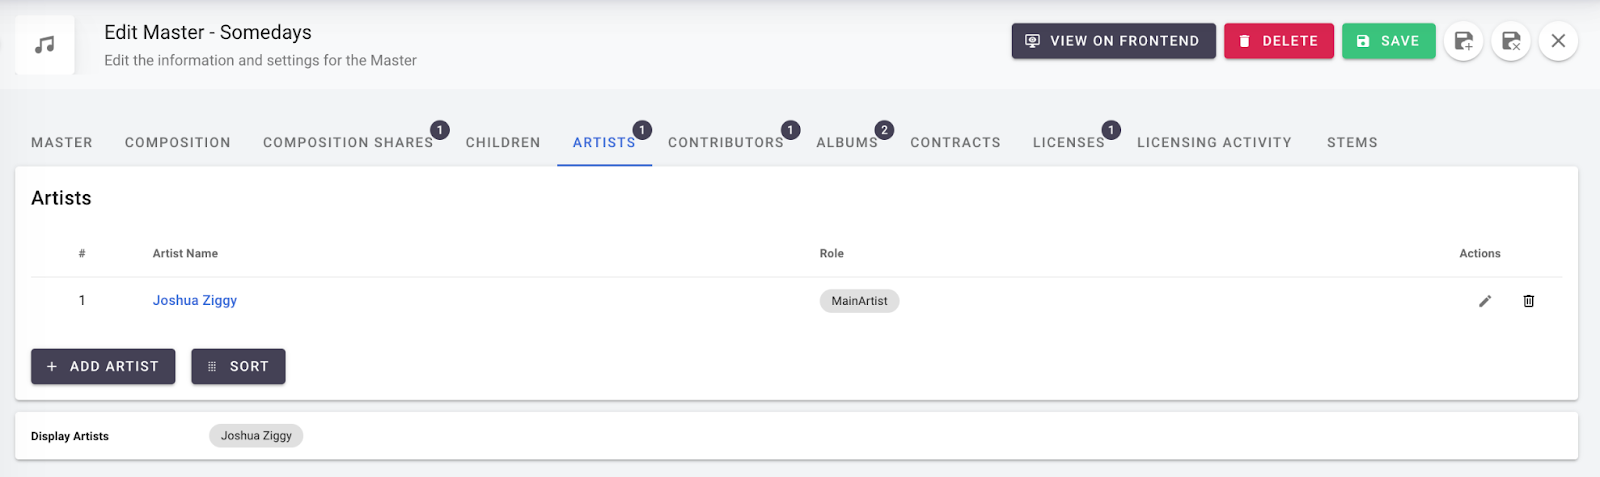
Artists
Within this tab you have the list of artists on the song, featured artists or side artists.
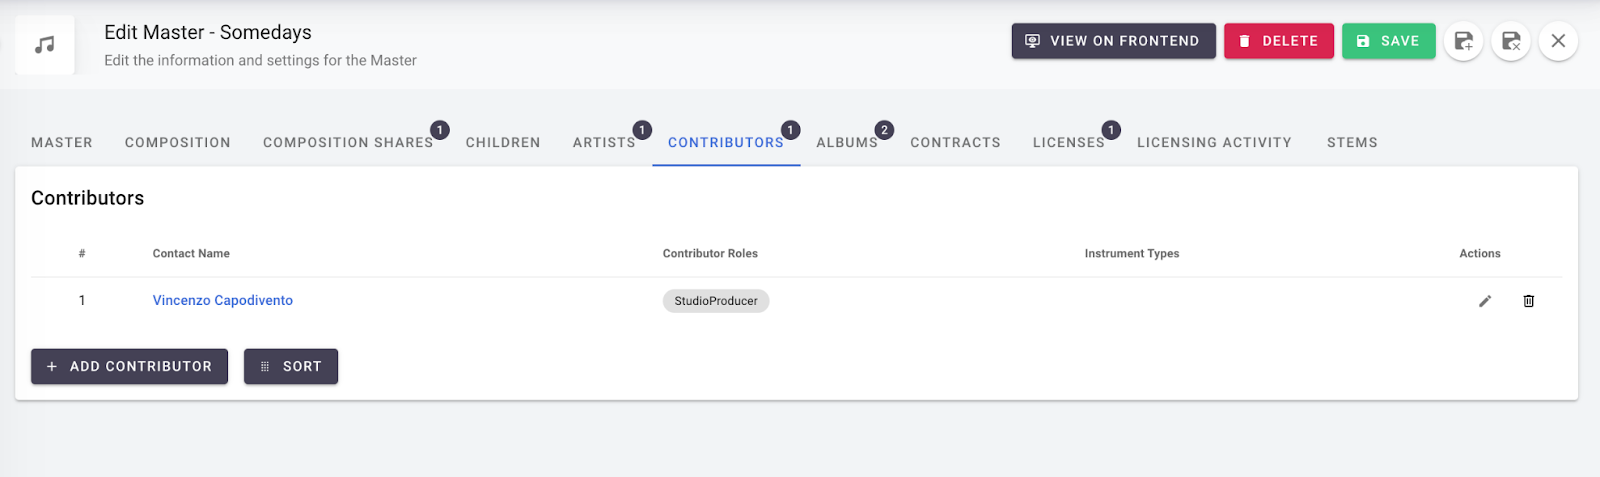
Contributors
Along with the artists there is a contributors tab, which shows other parties which contributed to the song, such as producers or session musicians - of which will be needed for the DDEX messaging.
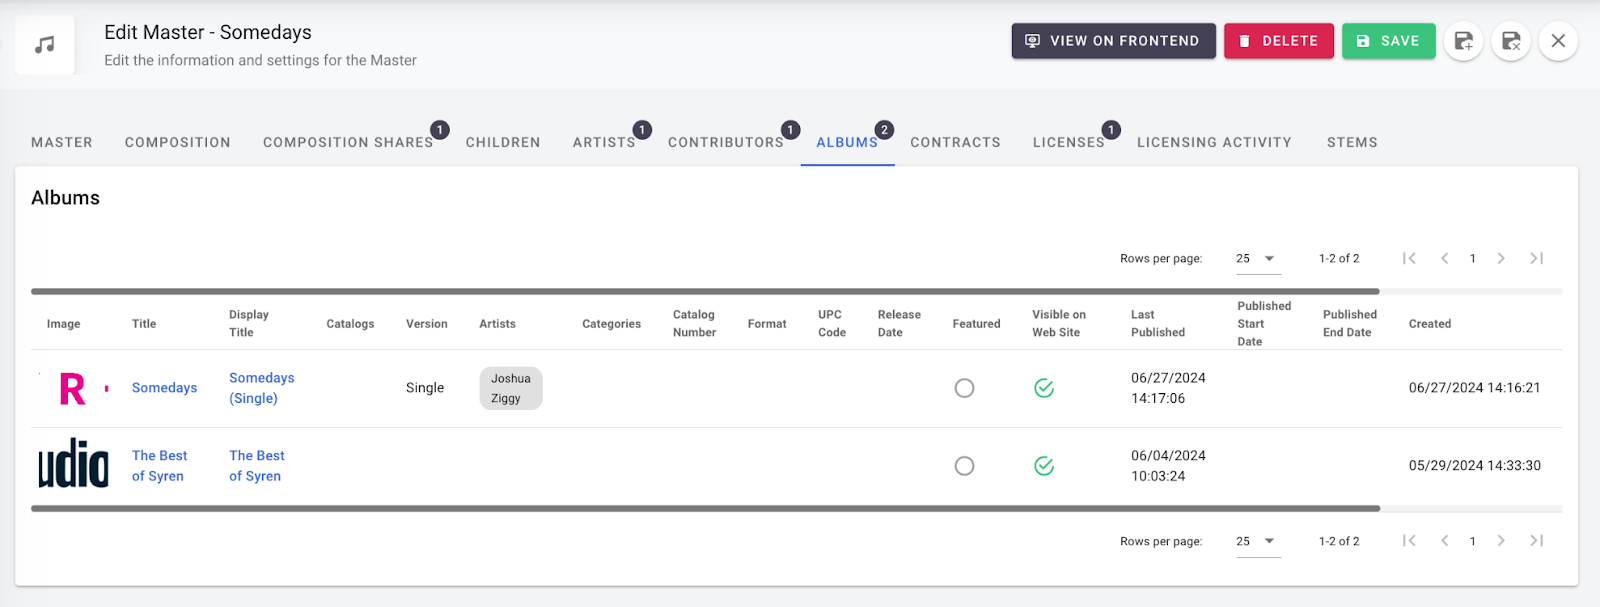
Albums
Here you will see the albums which the recording features on.
Licenses
This section holds your mechanical licenses.

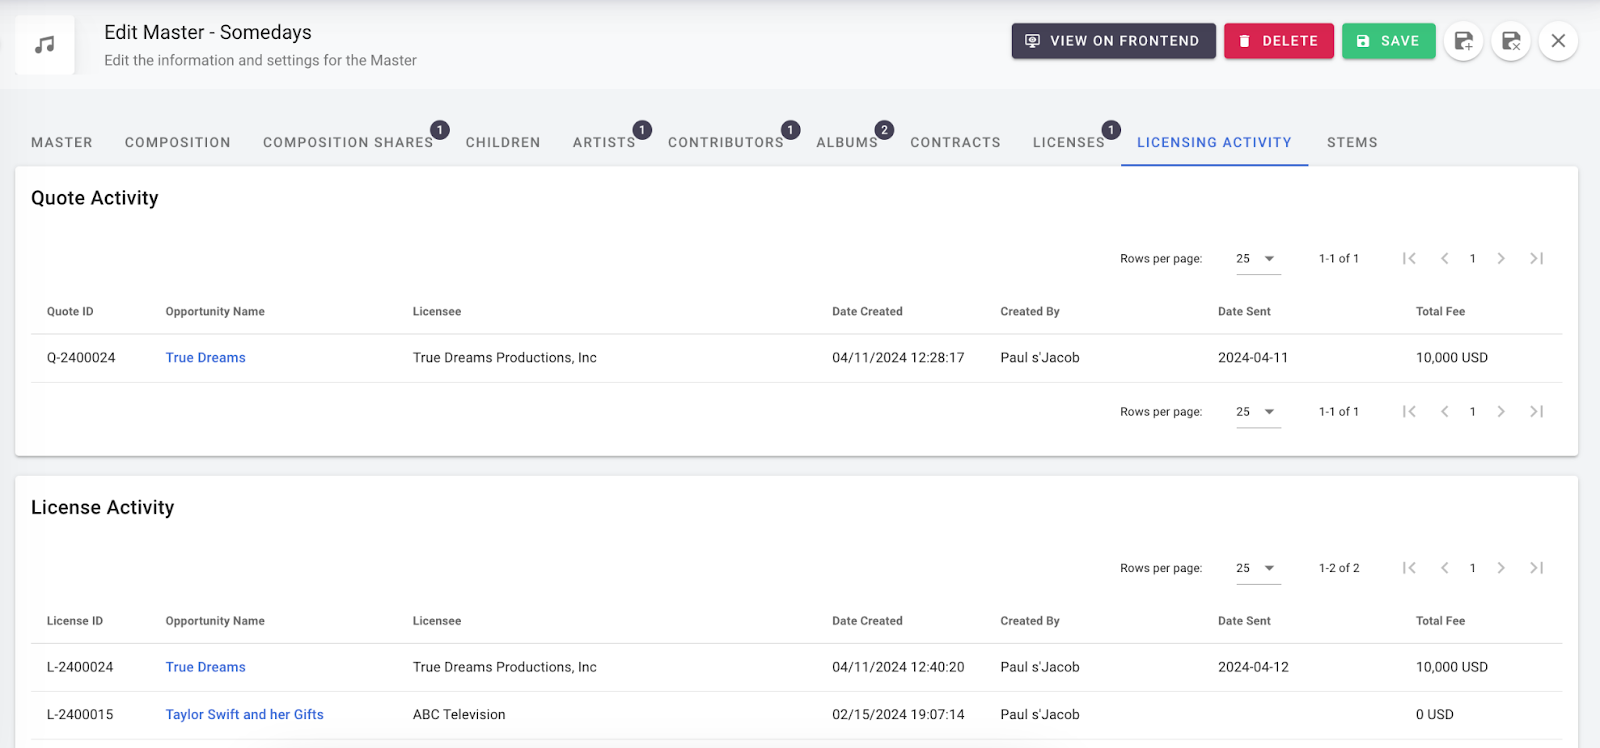
Licensing Activity
Here shows your quote and licensing activity from SyncUP.
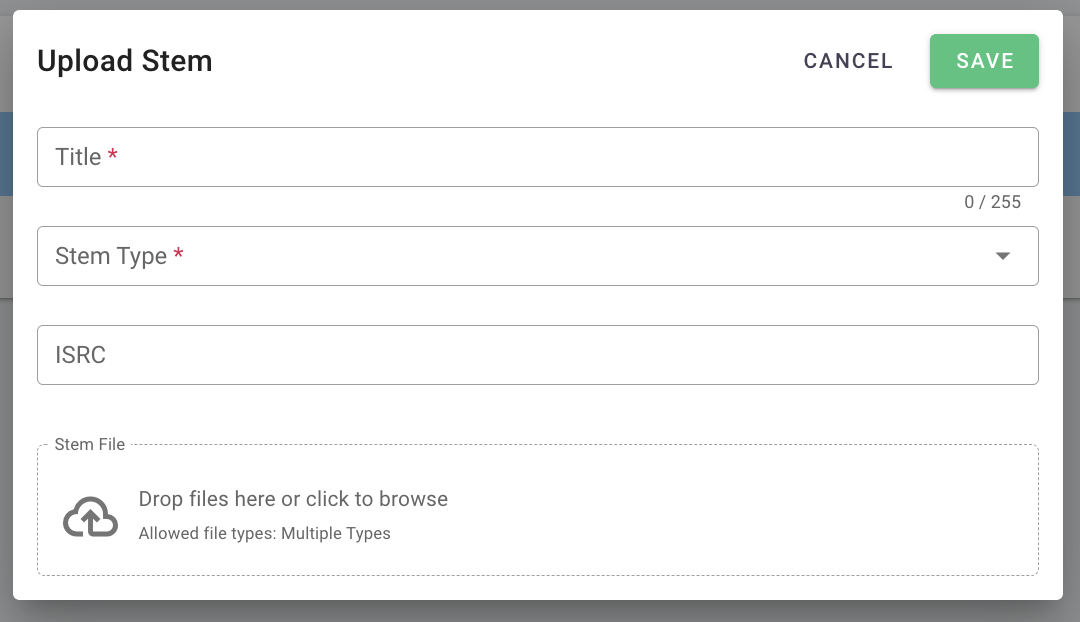
Stems
Within the Masters section you also have the ability to upload your associated stems. Just select the tab which says stems, and press the blue edit button, and upload stem.
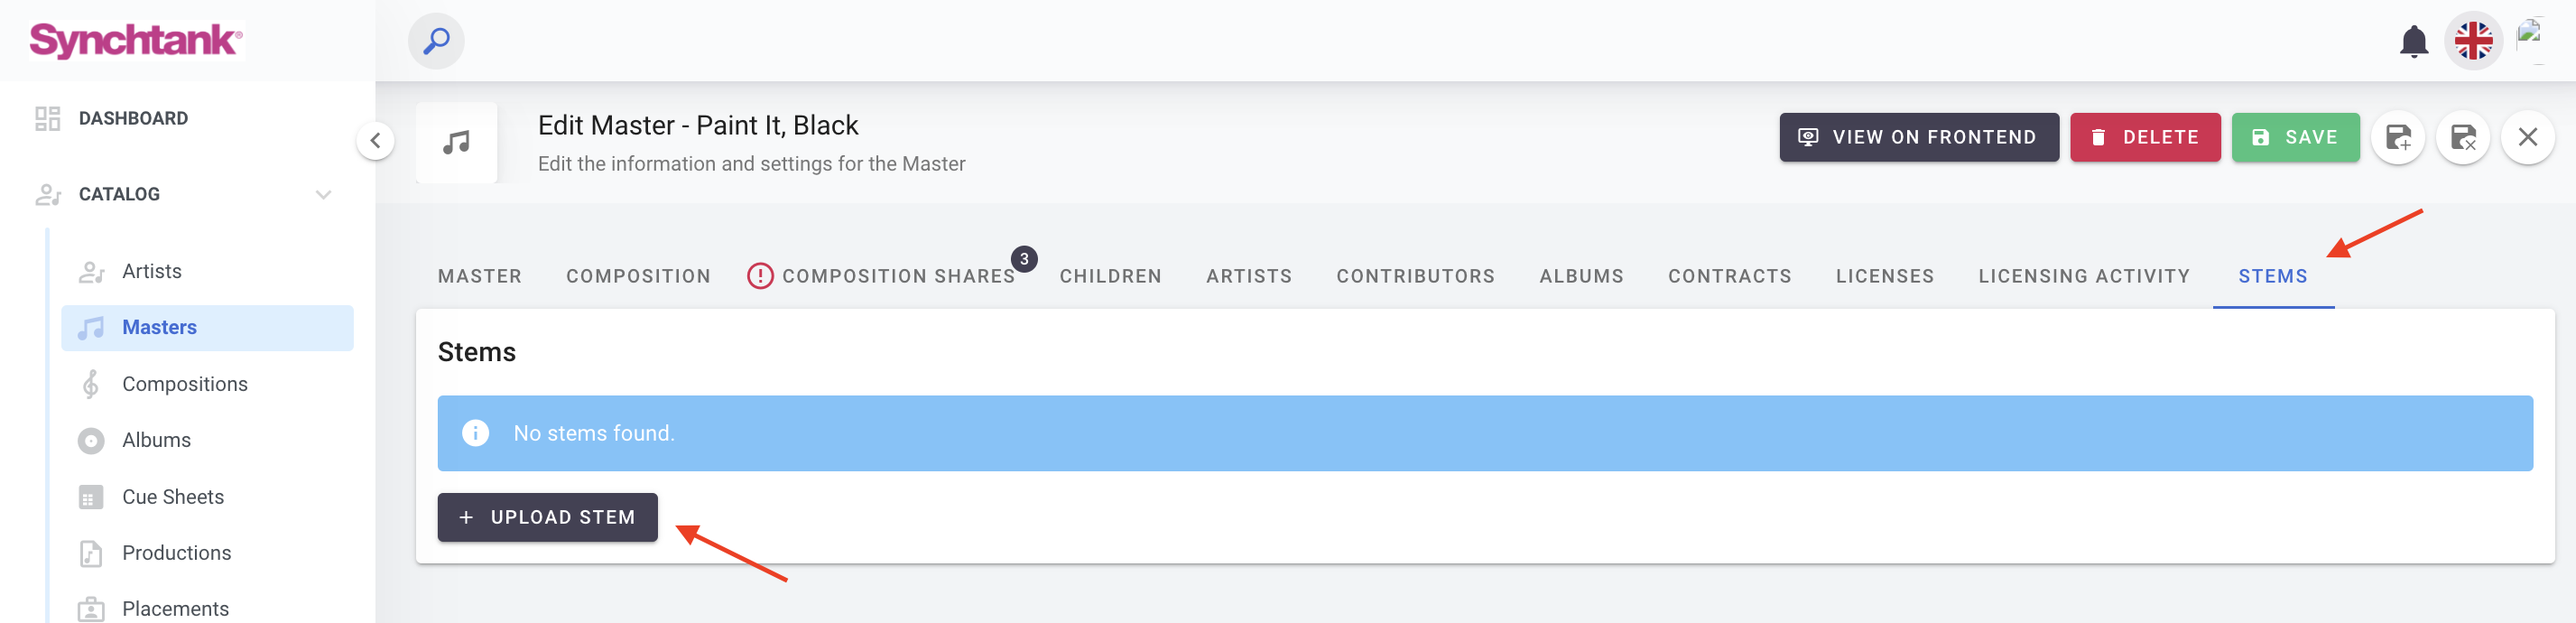
Fill in the required information, title, stem type and if applicable the ISRC code, upload the file and hit save!
Through our partnership with AudioShake you can also have the ability to generate a stem from your Master, for more information on that, check out this article!
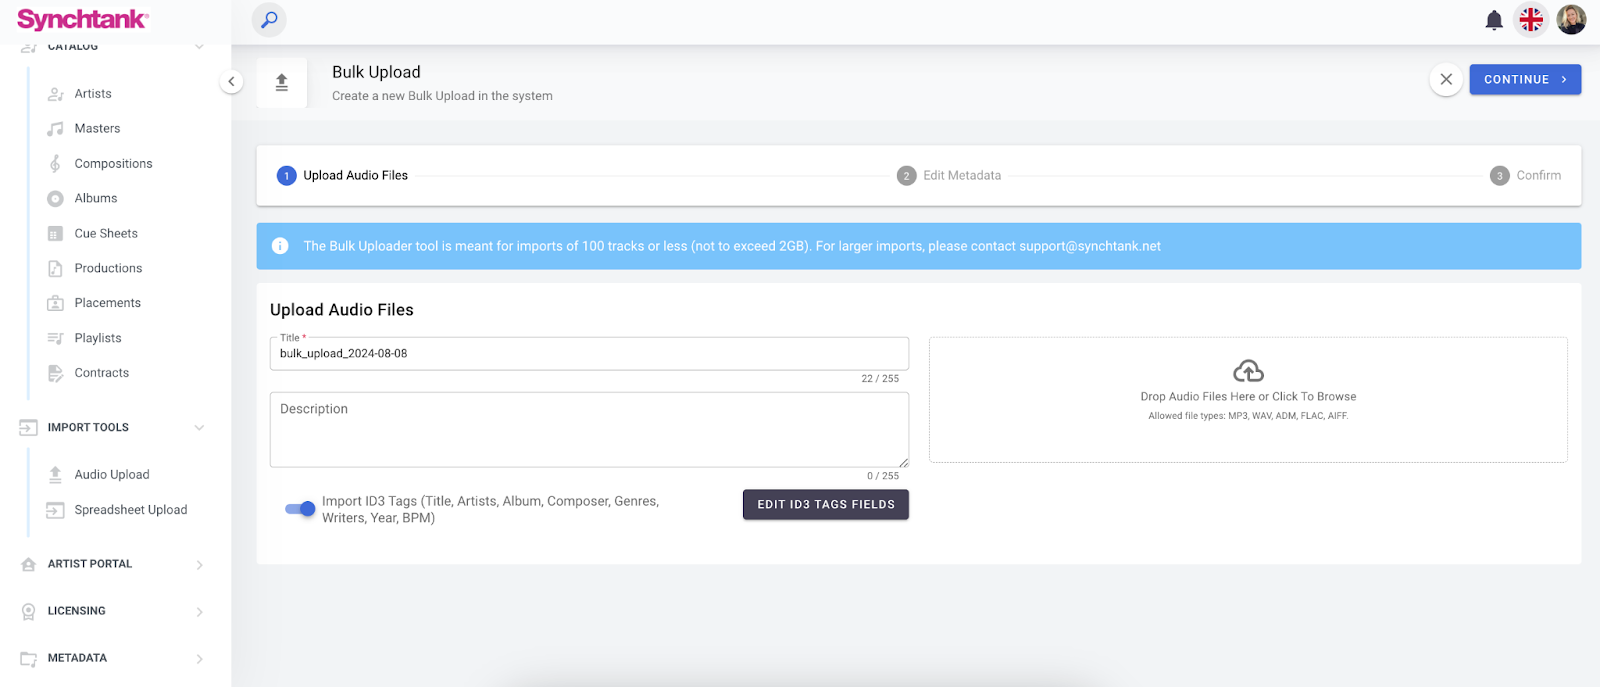
Audio Upload
When you have a set of audio files that you want in your Synchtank system, using Audio Upload within the Import Tools section of the Admin is the fastest method of entry.
You can do this via two entries, either select the “bulk upload” options within the Masters section, or navigate to the Import Tools and select “Audio Upload” ; they will both take you to the same location ready to upload your audio.
You then have the options to amend the batch name, and add a description. Once you’re happy with those drag and drop your tracks and press continue for the files to be uploaded.
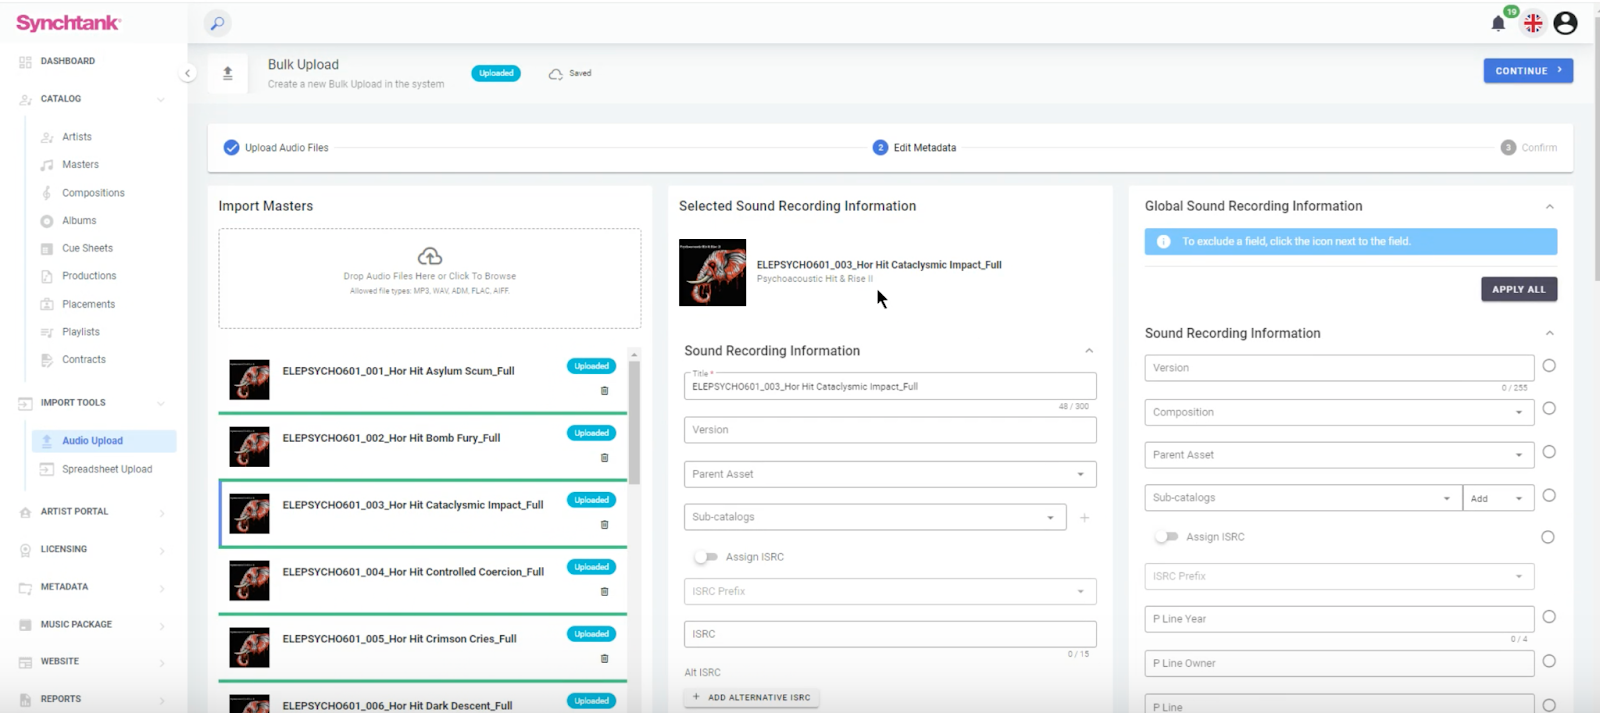
Once uploaded you will see the next step where you can see the progress of the tracks being uploaded and all of the metadata is taken from that file and uploaded too. Within this section you have a middle panel which will allow you to amend the tracks individually updating any metadata and also a right hand panel which allows you to make any edits globally to the tracks you are uploading.
Once you are satisfied, hit that upload button and they will then appear within you Masters catalog!
Additional Information
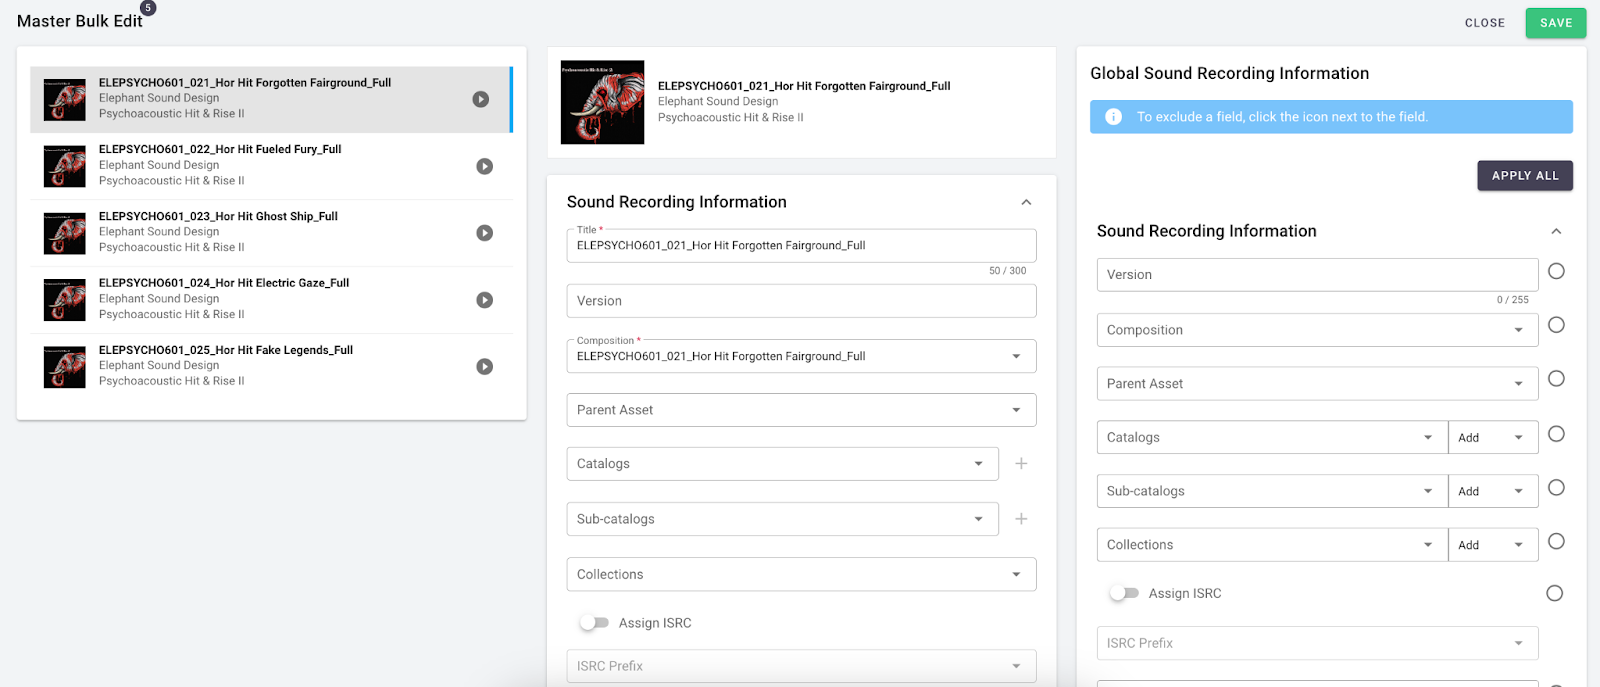
Bulk Edit:
Within the Masters section you have the ability to bulk edit directly in the system. All you need to do is head to the Masters section and select tracks you wish to make changes to and select the pen icon at the top.
This will open up a page showing the chosen Masters on the left hand side with the option to edit them individually via the middle panel or apply the same edits to all the tracks via the right hand panel.
Reporting:
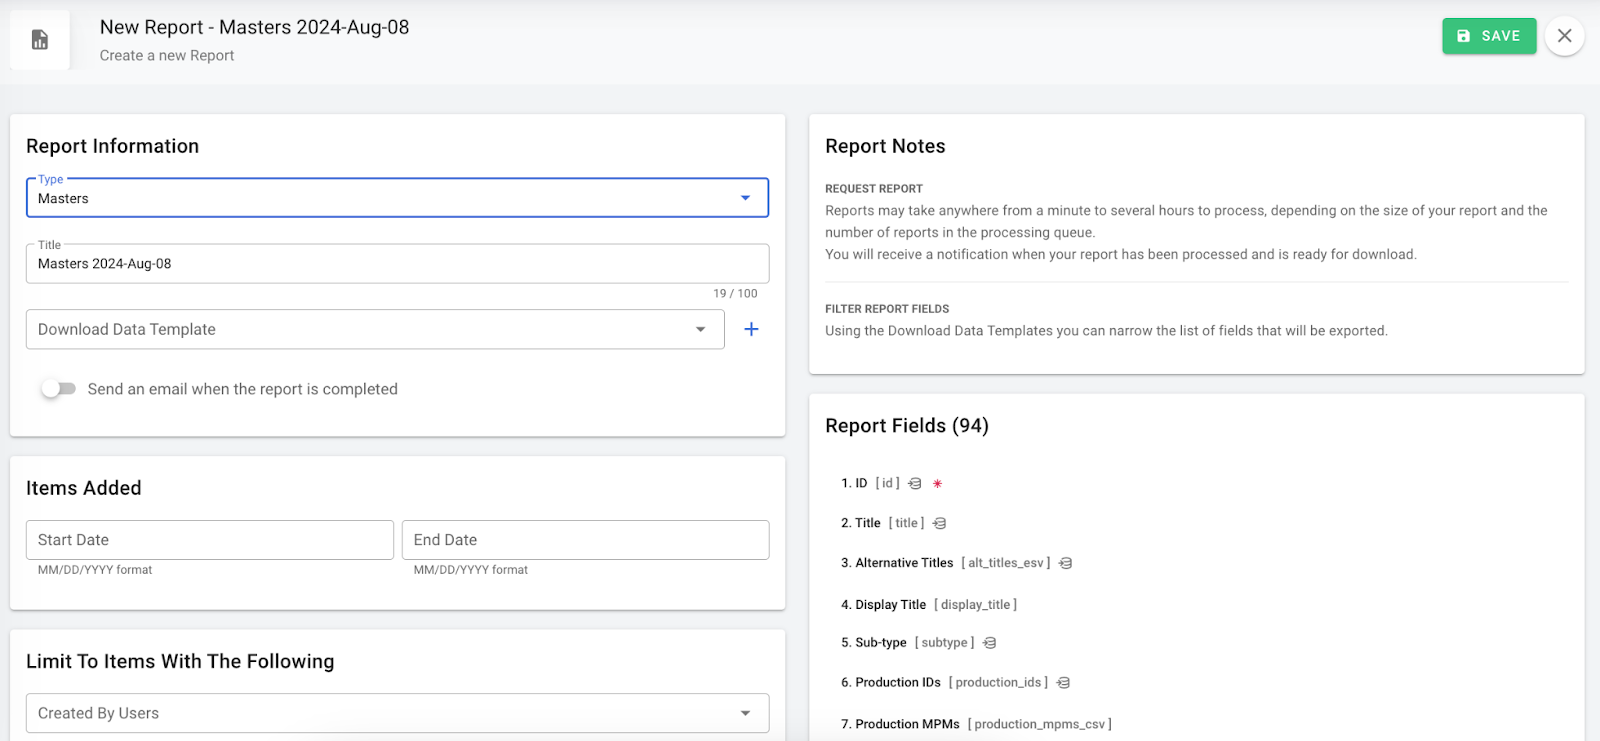
To create a report on your Masters, navigate to the report section within the Synchtank Admin, and select the green “create new” button in the top right.
Next you change the type of report you wish to run, in this instance it will be Masters. Once you have done that you can filter it down to get a refined list, such as created by, type, keywords etc.
Once completed you are able to download the report as a csv. file and open within Excel.
Spreadsheet Import:
This is a popular feature that allows you to make mass-edits to your Masters data using Excel (typically starting with the Reports mentioned above).
When you are ready to upload your spreadsheet, navigate to the Import Tools section and select the spreadsheet import option from the navigation menu. Next select the blue spreadsheet import button and make sure you choose the ‘Masters’ option when uploading.

You can also use this method to complete bulk changes however, we recommend making the most of the bulk import method we listed above.
Delivery Module: Mappings
Customers with the Delivery Module will see the Masters fields in the Mapping section of the Delivery Module. Learn more about Delivery here.
Compositions
This article will walk you through the Compositions section within the Synchtank Admin.
Please note: This article pertains to all customers with the Advanced Rights module (i.e, systems that differentiate Sound Recordings from Compositions). You’ll know this is different in your system if you have a “Tracks” section.
All customers will be migrating to Advanced Rights and your Account Manager will be in contact with you to support this upgrade.
- Entering a Composition and Composition Shares
- Audio Upload
- Additional Information
- APIs
- Merging Compositions
Admin Settings:
To amend your admin settings and to hide/show fields please refer to this article.
Website Settings: Default Writer Role
To amend your Writer Roles, please refer to this article.
Entering a Composition and Composition Shares
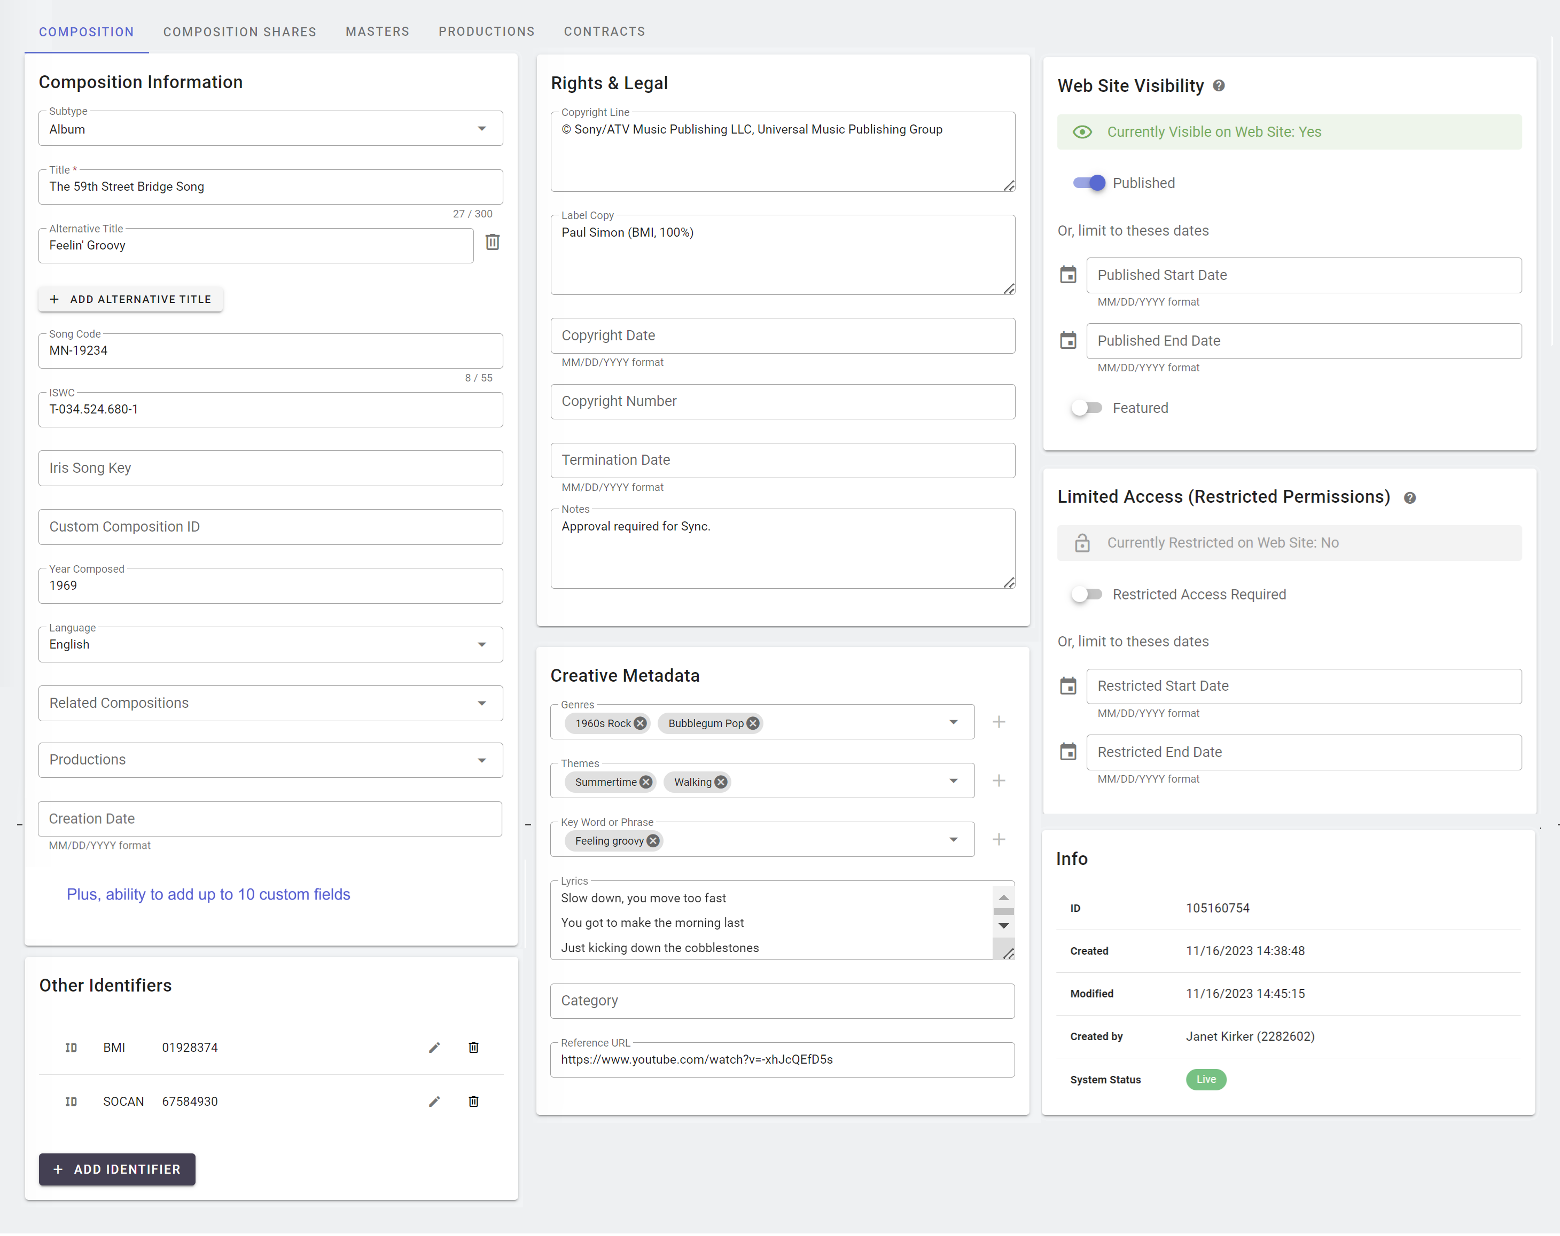
Composition Details:
- Composition Information – Header-level details about the work
- Other Identifiers – Codes for this work used by external parties (e.g., ASCAP)
- Rights & Legal – Data related to legal administration of the work
- Creative Metadata – Used for creative search, sync, and asset monetization
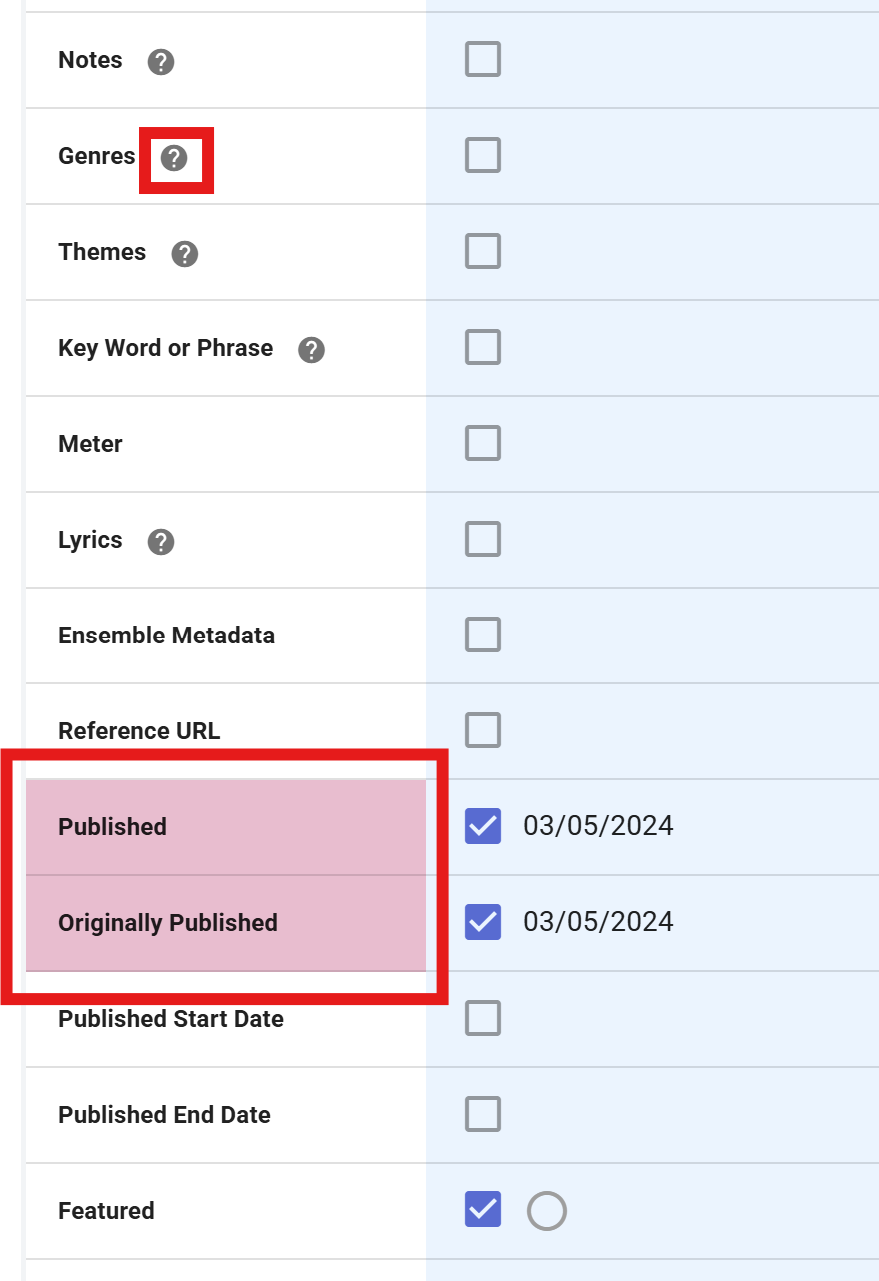
- Web Site Visibility – Controls whether work can be viewed on the Web Site Front End
- Limited Access (Restricted Permissions) – Restricts access to certain users only
- Info – System information about the Composition record
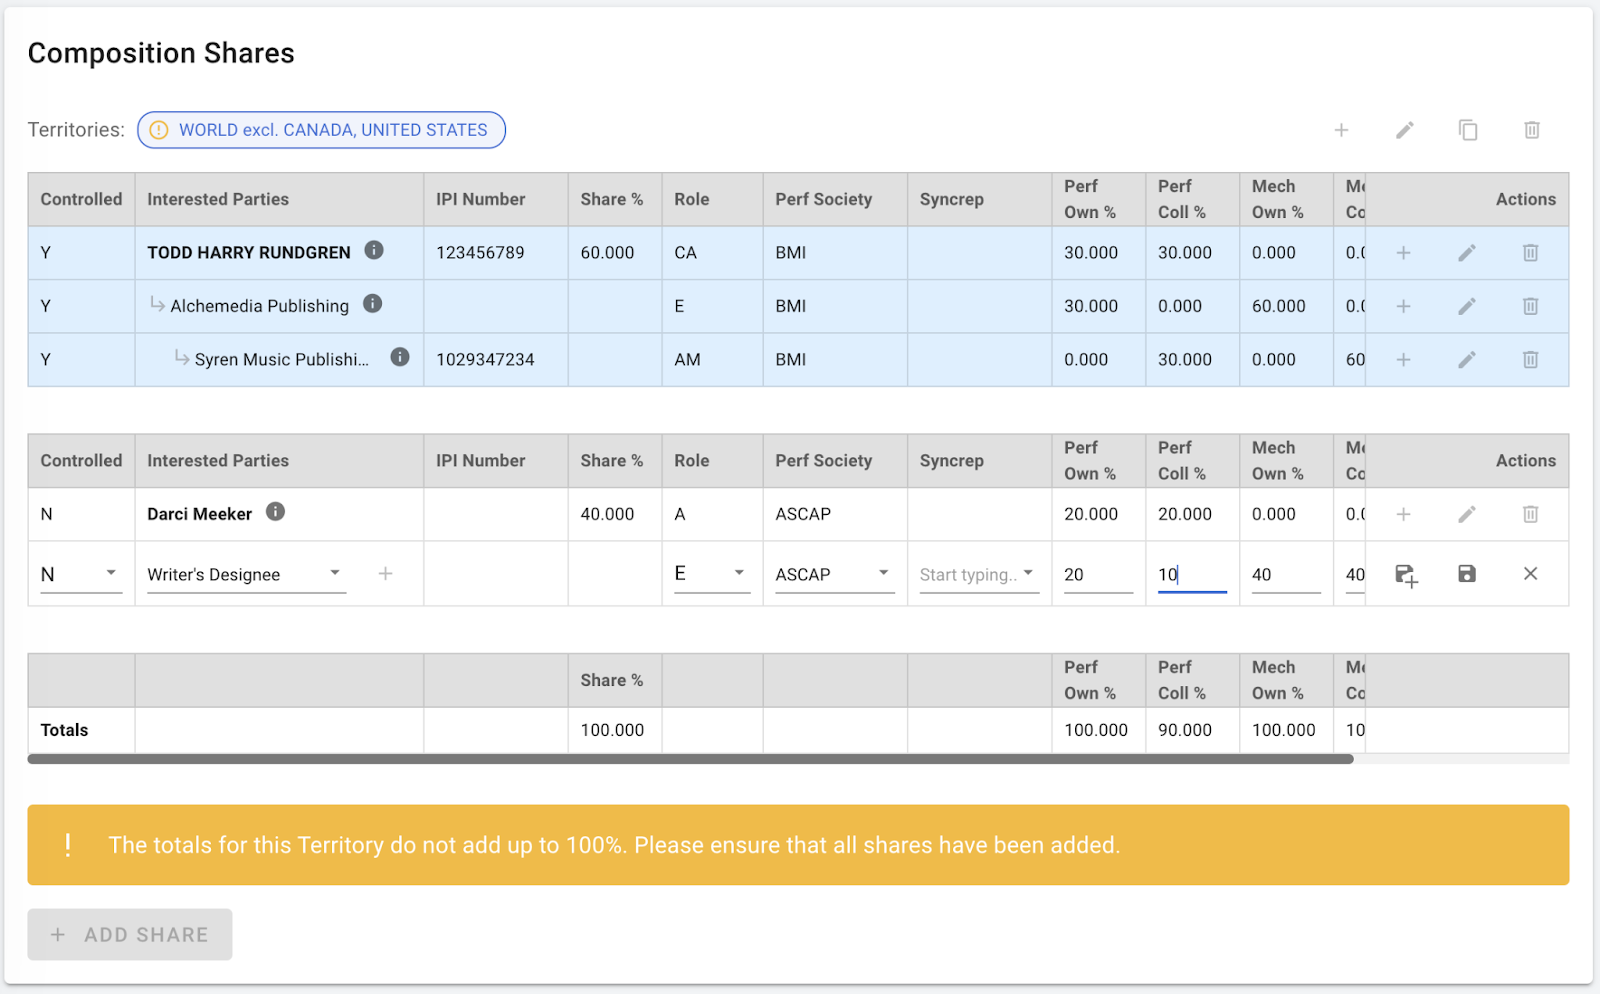
Composition Shares
The Composition Shares is where the data entry occurs. It’s a good idea to click SAVE at the top of the screen as you go. Here are the basic steps:
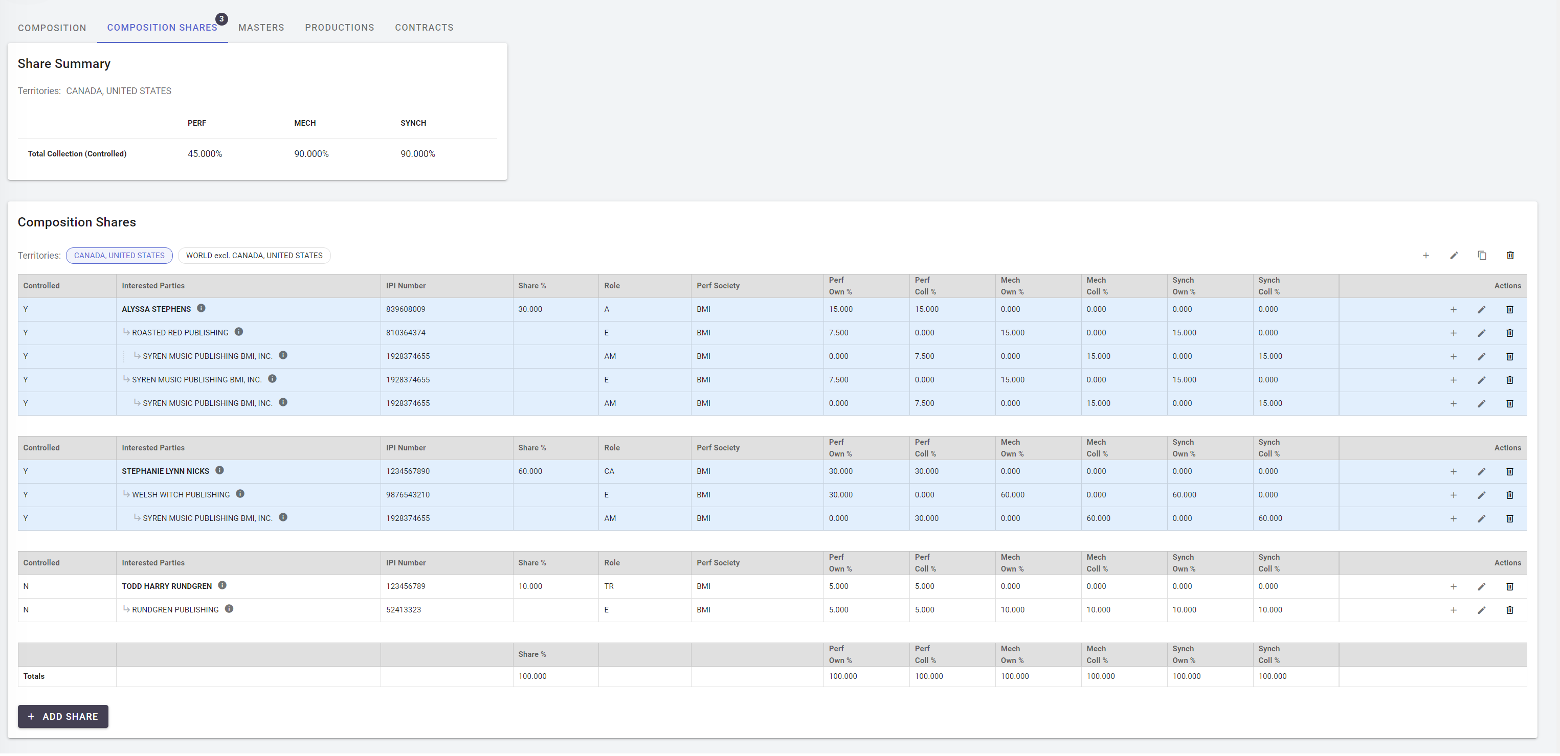
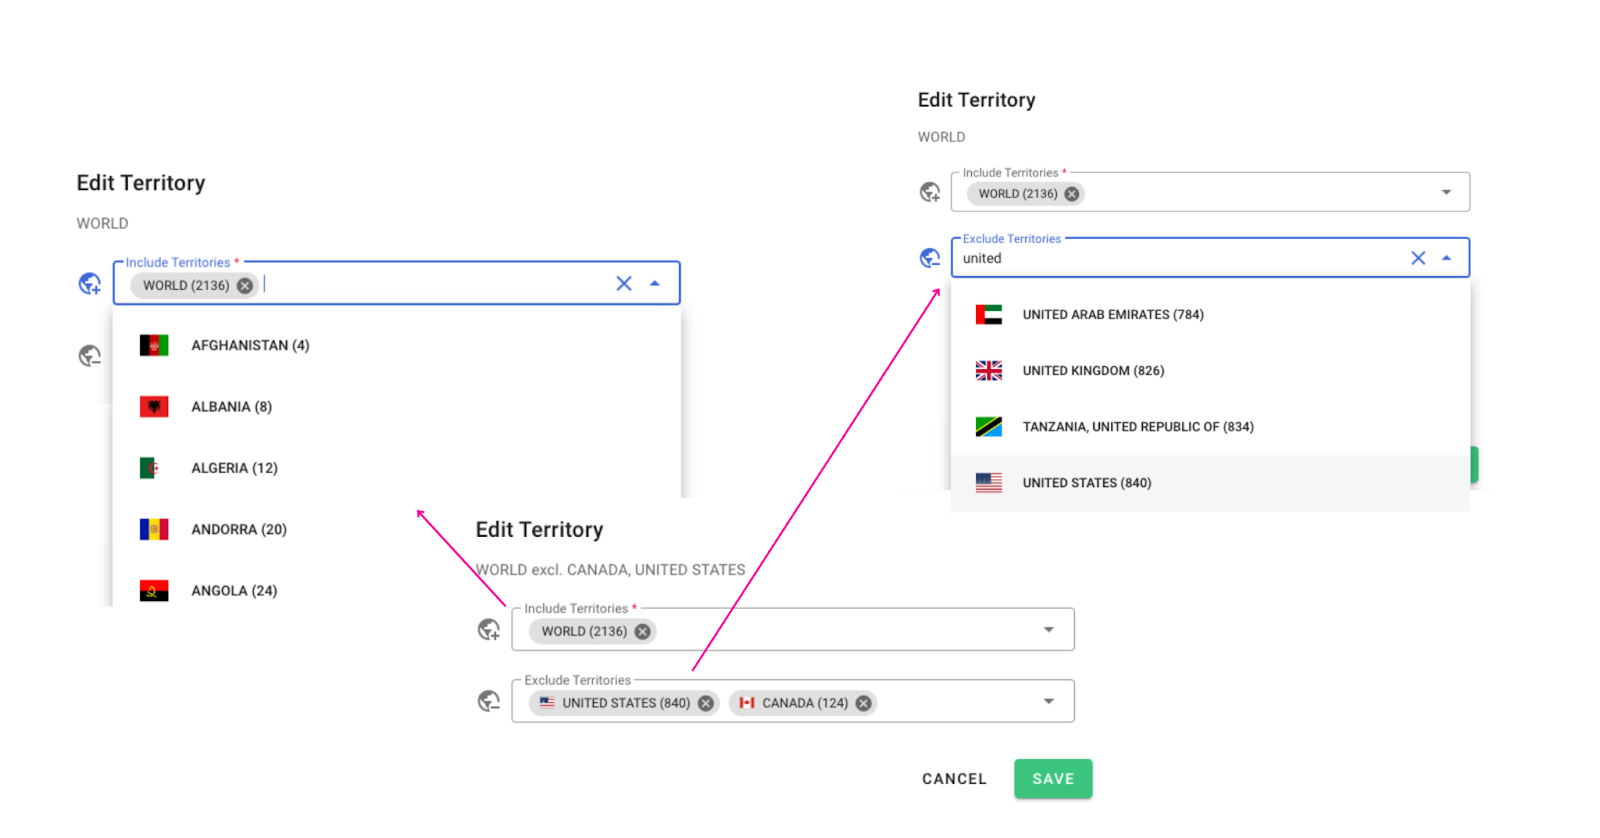
1, Enter the territory for the rights. You may enter more than one territory if rights differ. You can copy shares from one territory to another, and you can edit the territory at any time. The system defaults to WORLD; for other grants, use the Territory Selector, which has been modelled after the CWR Include/Exclude values:
2. Enter the data for each IP row.
- Begin by selecting Controlled Y/N (enter Y if you have a contractual ownership or collection with that share or chain. Note: On save, controlled shares will have a blue background (not white) for easy differentiation.
- Next, enter the Writer. You may select from existing (key ahead) or click + to add a new Writer. These details are held in the “Contacts” section of the CMS. Best practice is to use the legal name of the writer (not the pka). The system will fill in the Society information which can be overwritten here.
- Enter the Own/Collect Values. Use the TAB key on your keyboard to progress along the row to capture the own and collect values for that row. Press ENTER (or +) at the end of the row to go the next line in the Chain (the E Publisher, then the AM publisher). Press ENTER or + to move to the next row.
3. Enter the Original Publisher (E) for this writer. As above, you may select from existing or add new. These details are held in the “Organizations” section of the CMS. The Organization Type should be Publisher (E), Administrator (AM), or both.
4. Enter the Administrator Publisher (AM) for this Original Publisher (E). Enter the own/collect values as above.
- Note: It is not necessary to enter the Sub-Publisher (SE) in this form. Sub-Publisher/Intercompany agreements will be addressed in a future release.
5. Optional: Click SAVE at the top of the screen to save as you go.
Click + ADD SHARE to add another writer to the work. Repeat steps above.
6. Column Totals: Notice that the system displays the column totals as data is entered. When the totals reach 100% in all columns, the work passes validation.
Please refer to the CWR Manual and Specifications if you have questions about setting up the shares. The most common structures are:
Share with one chain:
Writer
Original Publisher
Admin Publisher
Share with two chains (Co-Pub):
Writer
Original Publisher
Admin Publisher
Original Publisher
Admin Publisher
Uncontrolled Share:
Writer
Original Publisher
(If Unknown, enter “Writer’s Designee” and enter all own/collect values on this row)
Audio Upload
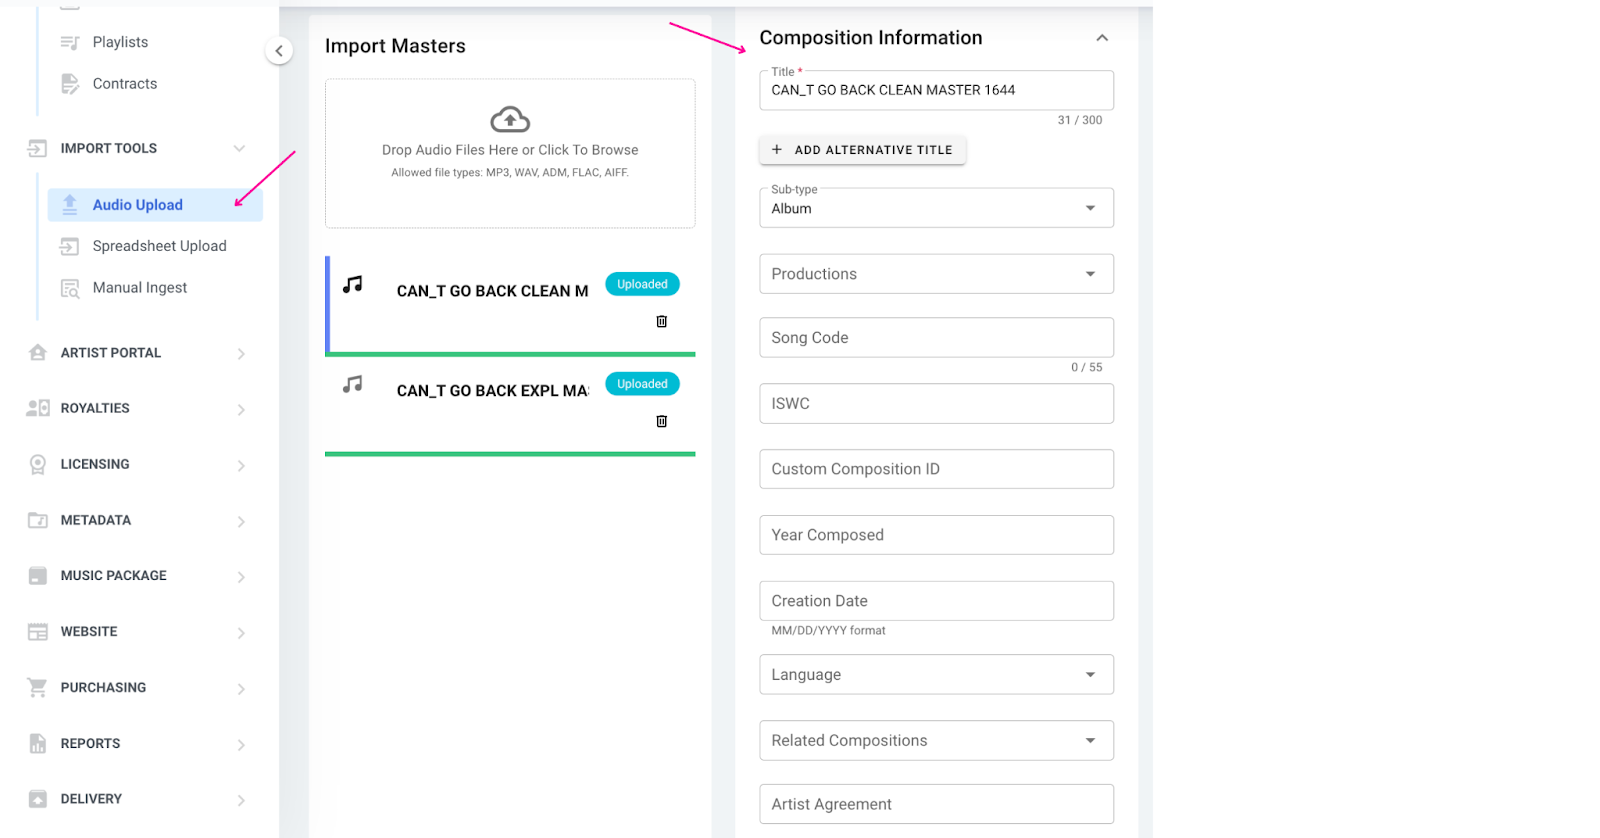
When you have a set of audio files that you want in your Synchtank system, using Audio Upload within the Import Tools section of the Admin is the fastest method of entry.
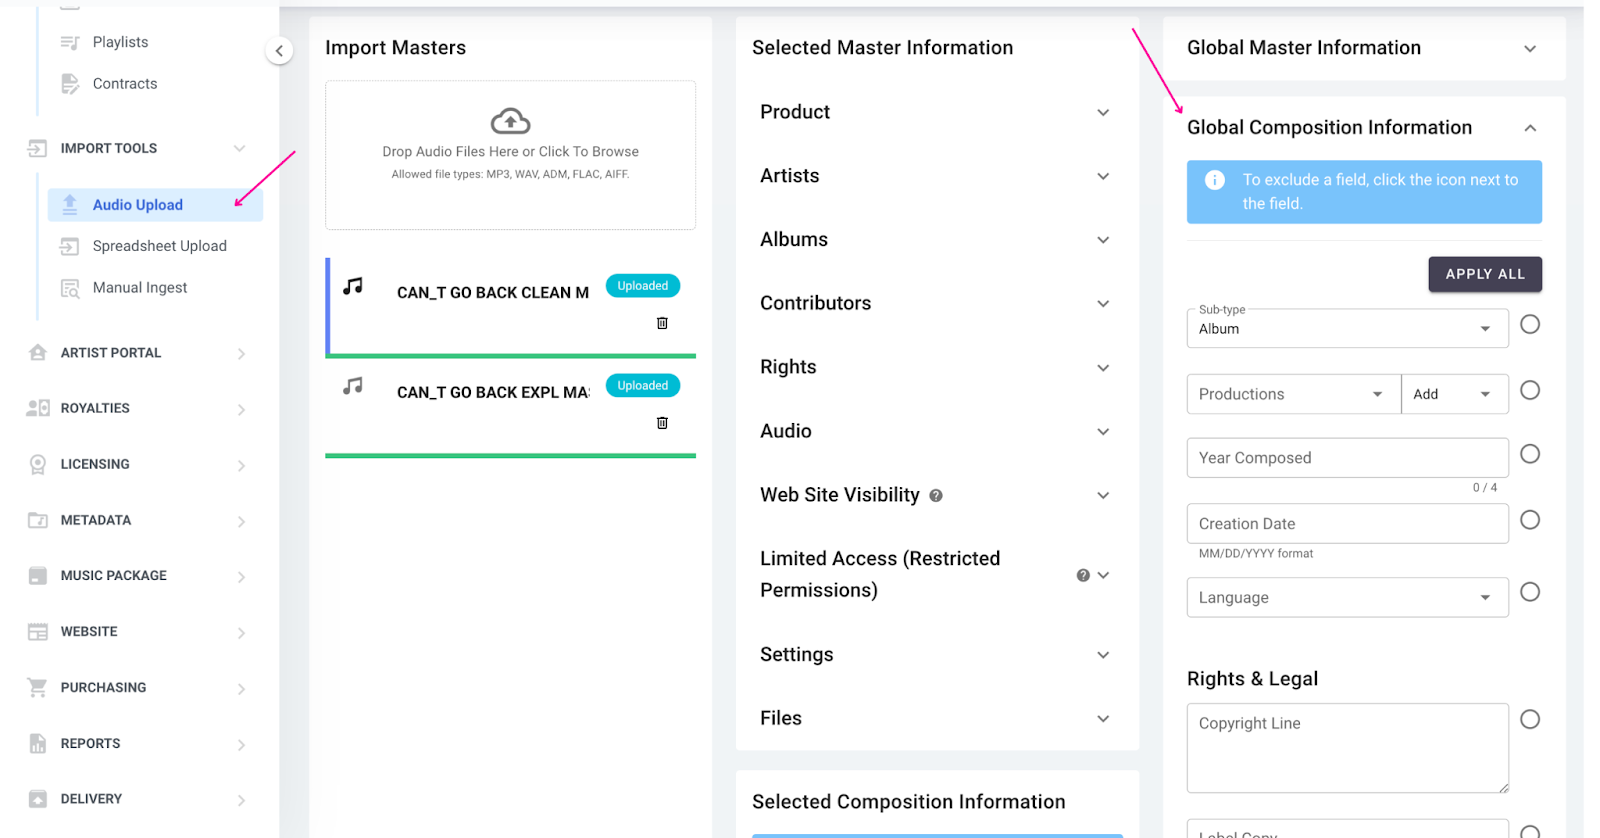
Center Column – Selected Song Details
Scroll down to the Composition Information and you’ll see that the sections now reflect the new sections of the Composition form. For each Sound Recording, you may select an existing Composition. If left blank, the system will create new Composition records for each of the Sound Recordings included in the Audio Upload (no change to current behaviour).
Right Column – Global Song Details
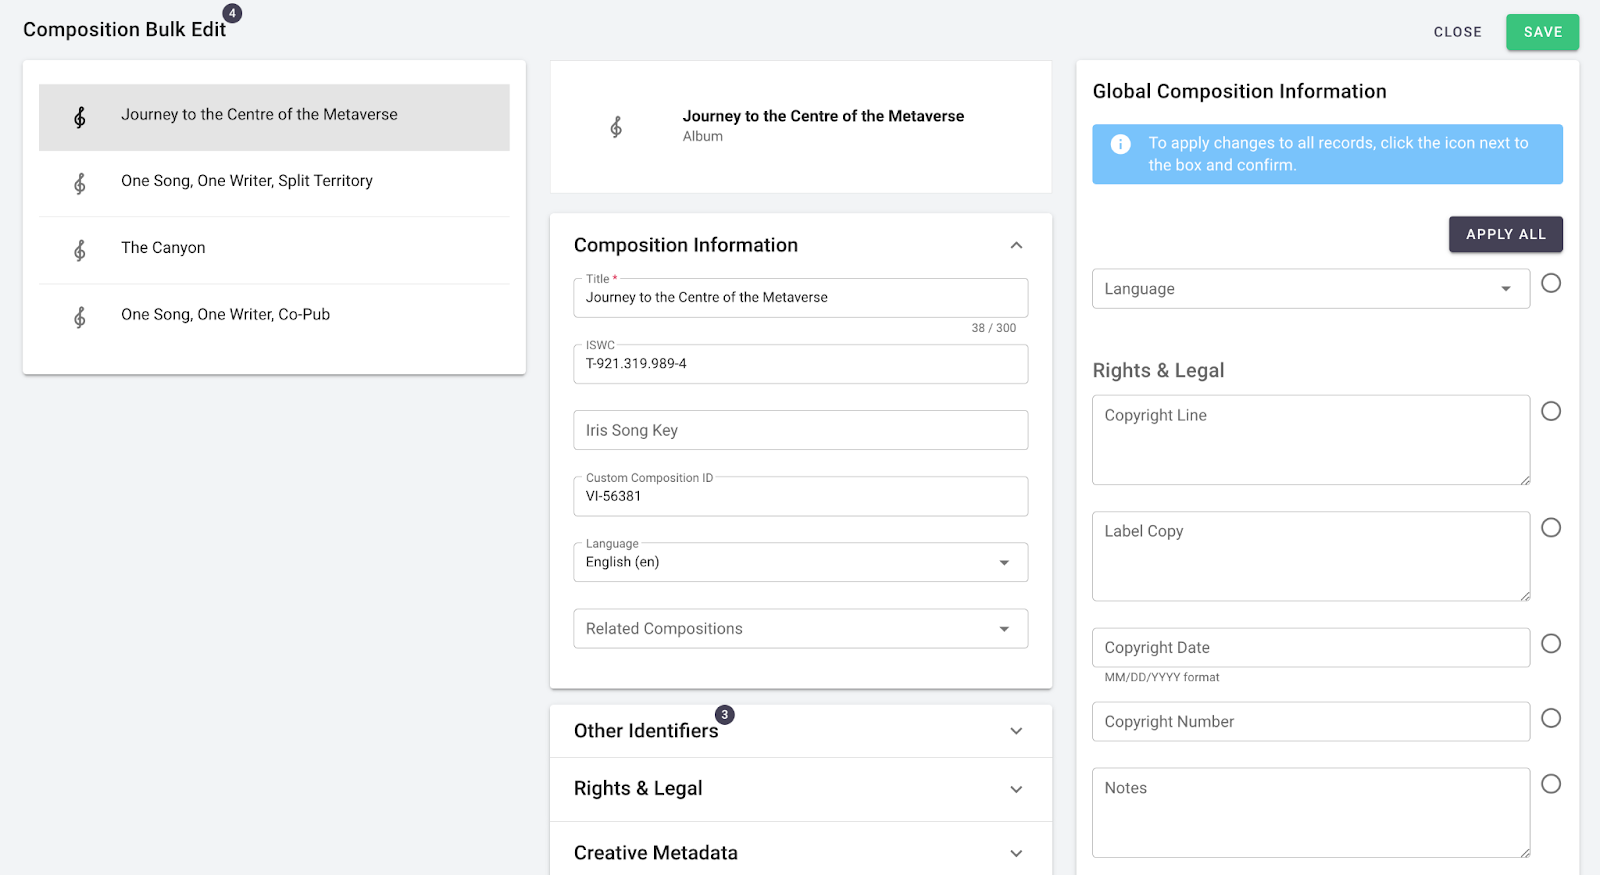
Scroll down to the Global Composition Information and you’ll see that the sections now reflect the new sections of the Composition form (see above). As before, data entered here will be applied to each of the newly created Compositions. Song-specific, non-global fields (e.g., ISWC) have been removed from the right column).
This is a huge time-saver when all of the compositions to be created have the same (or very similar) Share Details. In the Composition Shares section, click + ADD SHARES to open the overlay. There you’ll see the same new entry form for Share Details as described above. Click SAVE to close the overlay. This process will apply those Share Details to all compositions in the Audio Upload session. If one song has a different structure, simply edit that song using the form.
Additional Information
List View
Columns in the list view reflect the Composition fields you choose to show after reviewing your admin settings. Remember, you may customize the columns in the List View using the Field Selector.
Bulk Edit
To bulk edit all you need to do is tick the relevant Compositions you wish to edit, and select the pen icon at the top  , it will then open up a new screen allowing you to individually view your compositions to edit in the middle and globally make changes to those selected on the right.
Reporting
To create a report on your compositions, navigate to the report section within the Synchtank Admin, and select the green “create new” button in the top right.
Next you change the type of report you wish to run and select either Compositions or Composition Shares.
If you do choose Compositions you'll receive the main metadata for the Composition and if you choose Composition Shares you'll get the title and a few bits of metadata plus all the writer and publisher information.
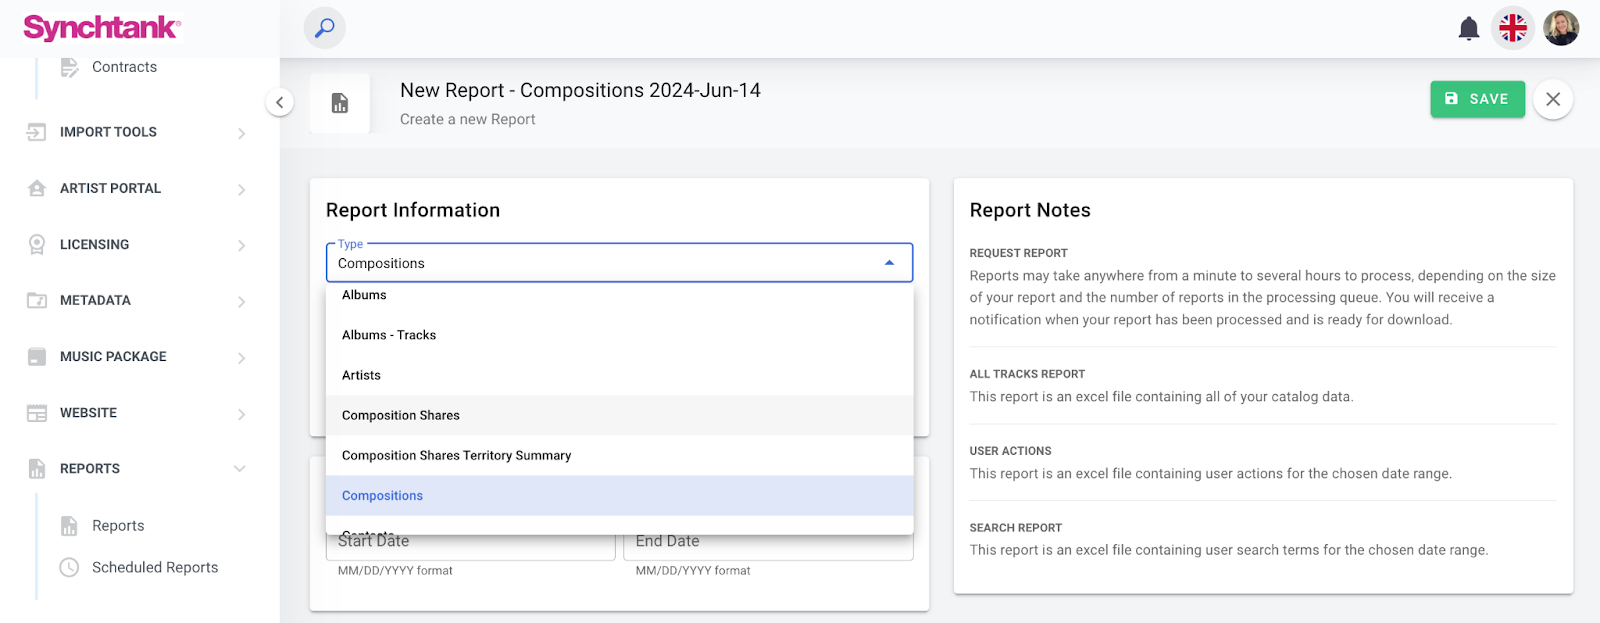
Composition Report
The Composition Report is an (optionally filtered) export of all data from the Composition page.
Composition Shares
The Composition Shares Report is an (optionally filtered) export of all data from the Composition Shares page. This report offers a stacked view (multiple lines per Composition) that models the Composition Shares input form (see above).
Spreadsheet Import
This is a popular feature that allows you to make mass-edits to your composition data using Excel (typically starting with the Reports mentioned above).
Delivery Module: Mappings
Customers with the Delivery Module will see the Composition fields in the Mapping section of the Delivery Module. Learn more about Delivery here.
APIs
IRIS to ARM API
For our Royalty Platform (IRIS) customers, we have written a new API that migrates data from IRIS to Asset Platform (ARM). This API has been updated to reflect the new Composition fields and Composition Shares structure.
Merging Compositions
When you have duplicate records for the same composition (e.g., when the same song has been entered multiple times with slight variations), you can merge them into a single record as follows:
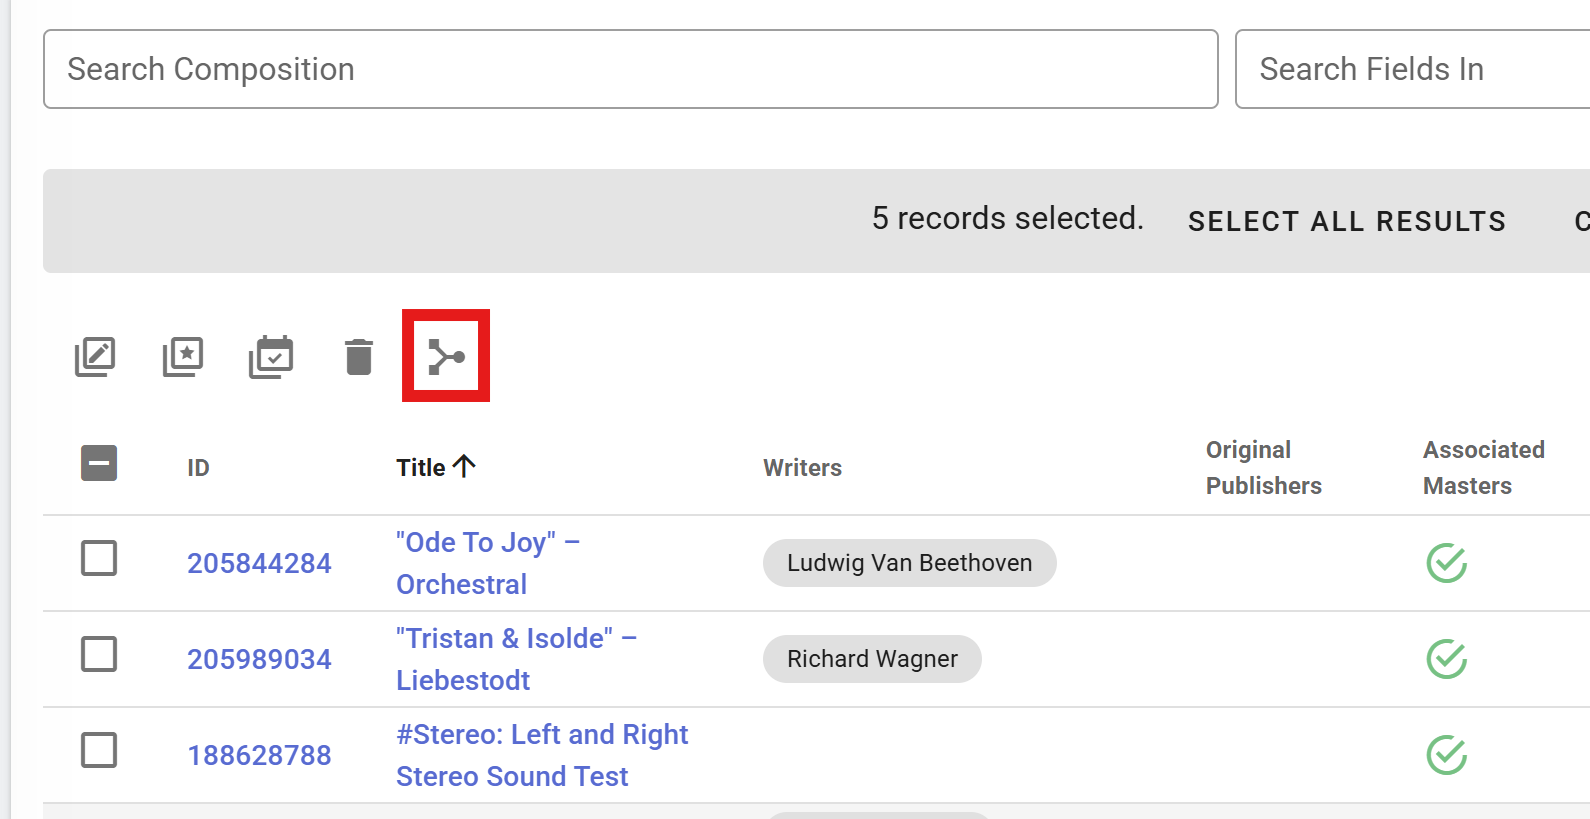
- Navigate to Catalog > Compositions and select the duplicate records (up to 5 records) that you want to merge, e.g.
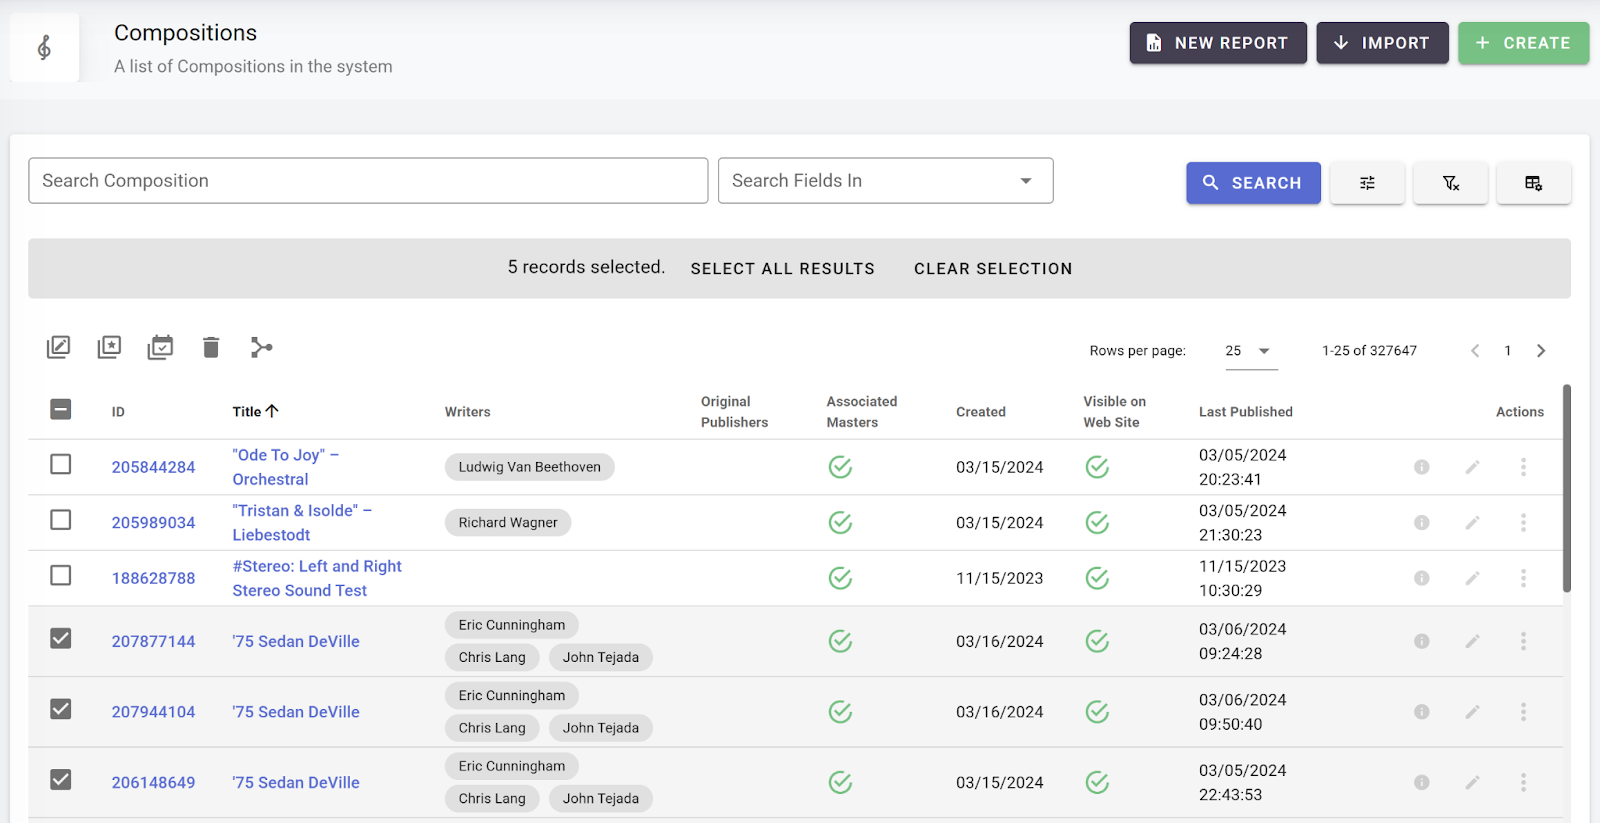
- Click the Merge button:
- A modal will pop up
- At the top, select the Composition that you want to keep. The data for this record will now be displayed in the left hand column, with the duplicated records’ data in the other columns

- Scroll through the fields on each Composition to see which data you want to keep or not keep. The left hand field name will be highlighted where there are differences in the column values. For some fields you can concatenate the data, for others you can only keep one value. There is a help tool on the field names to guide you
- Once you’re happy with your selections, press Merge on the top right
- The system will merge your records and repoint any Sound Recording or other references to the merged Composition record
- NB merging records cannot be undone, so take care!
Albums
Album Details:
- Album Information: Everything from your release title, alternative titles, versions, release dates etc
- Production Information: Productions link, MPM, Album WBS Element
- Metadata: All your album metadata details, like categories, genres, keywords etc
- Digital Album Information: All the digital album information
- Physical Album Information: All you physical album information
- Links: Any associated links like Apple Music, Spotify etc
- Web Site Visibility & Restrictions: If this is published on your Synchtank site
- Related Files & Media: Your album artwork for example
- System Information: Standard system information like user created
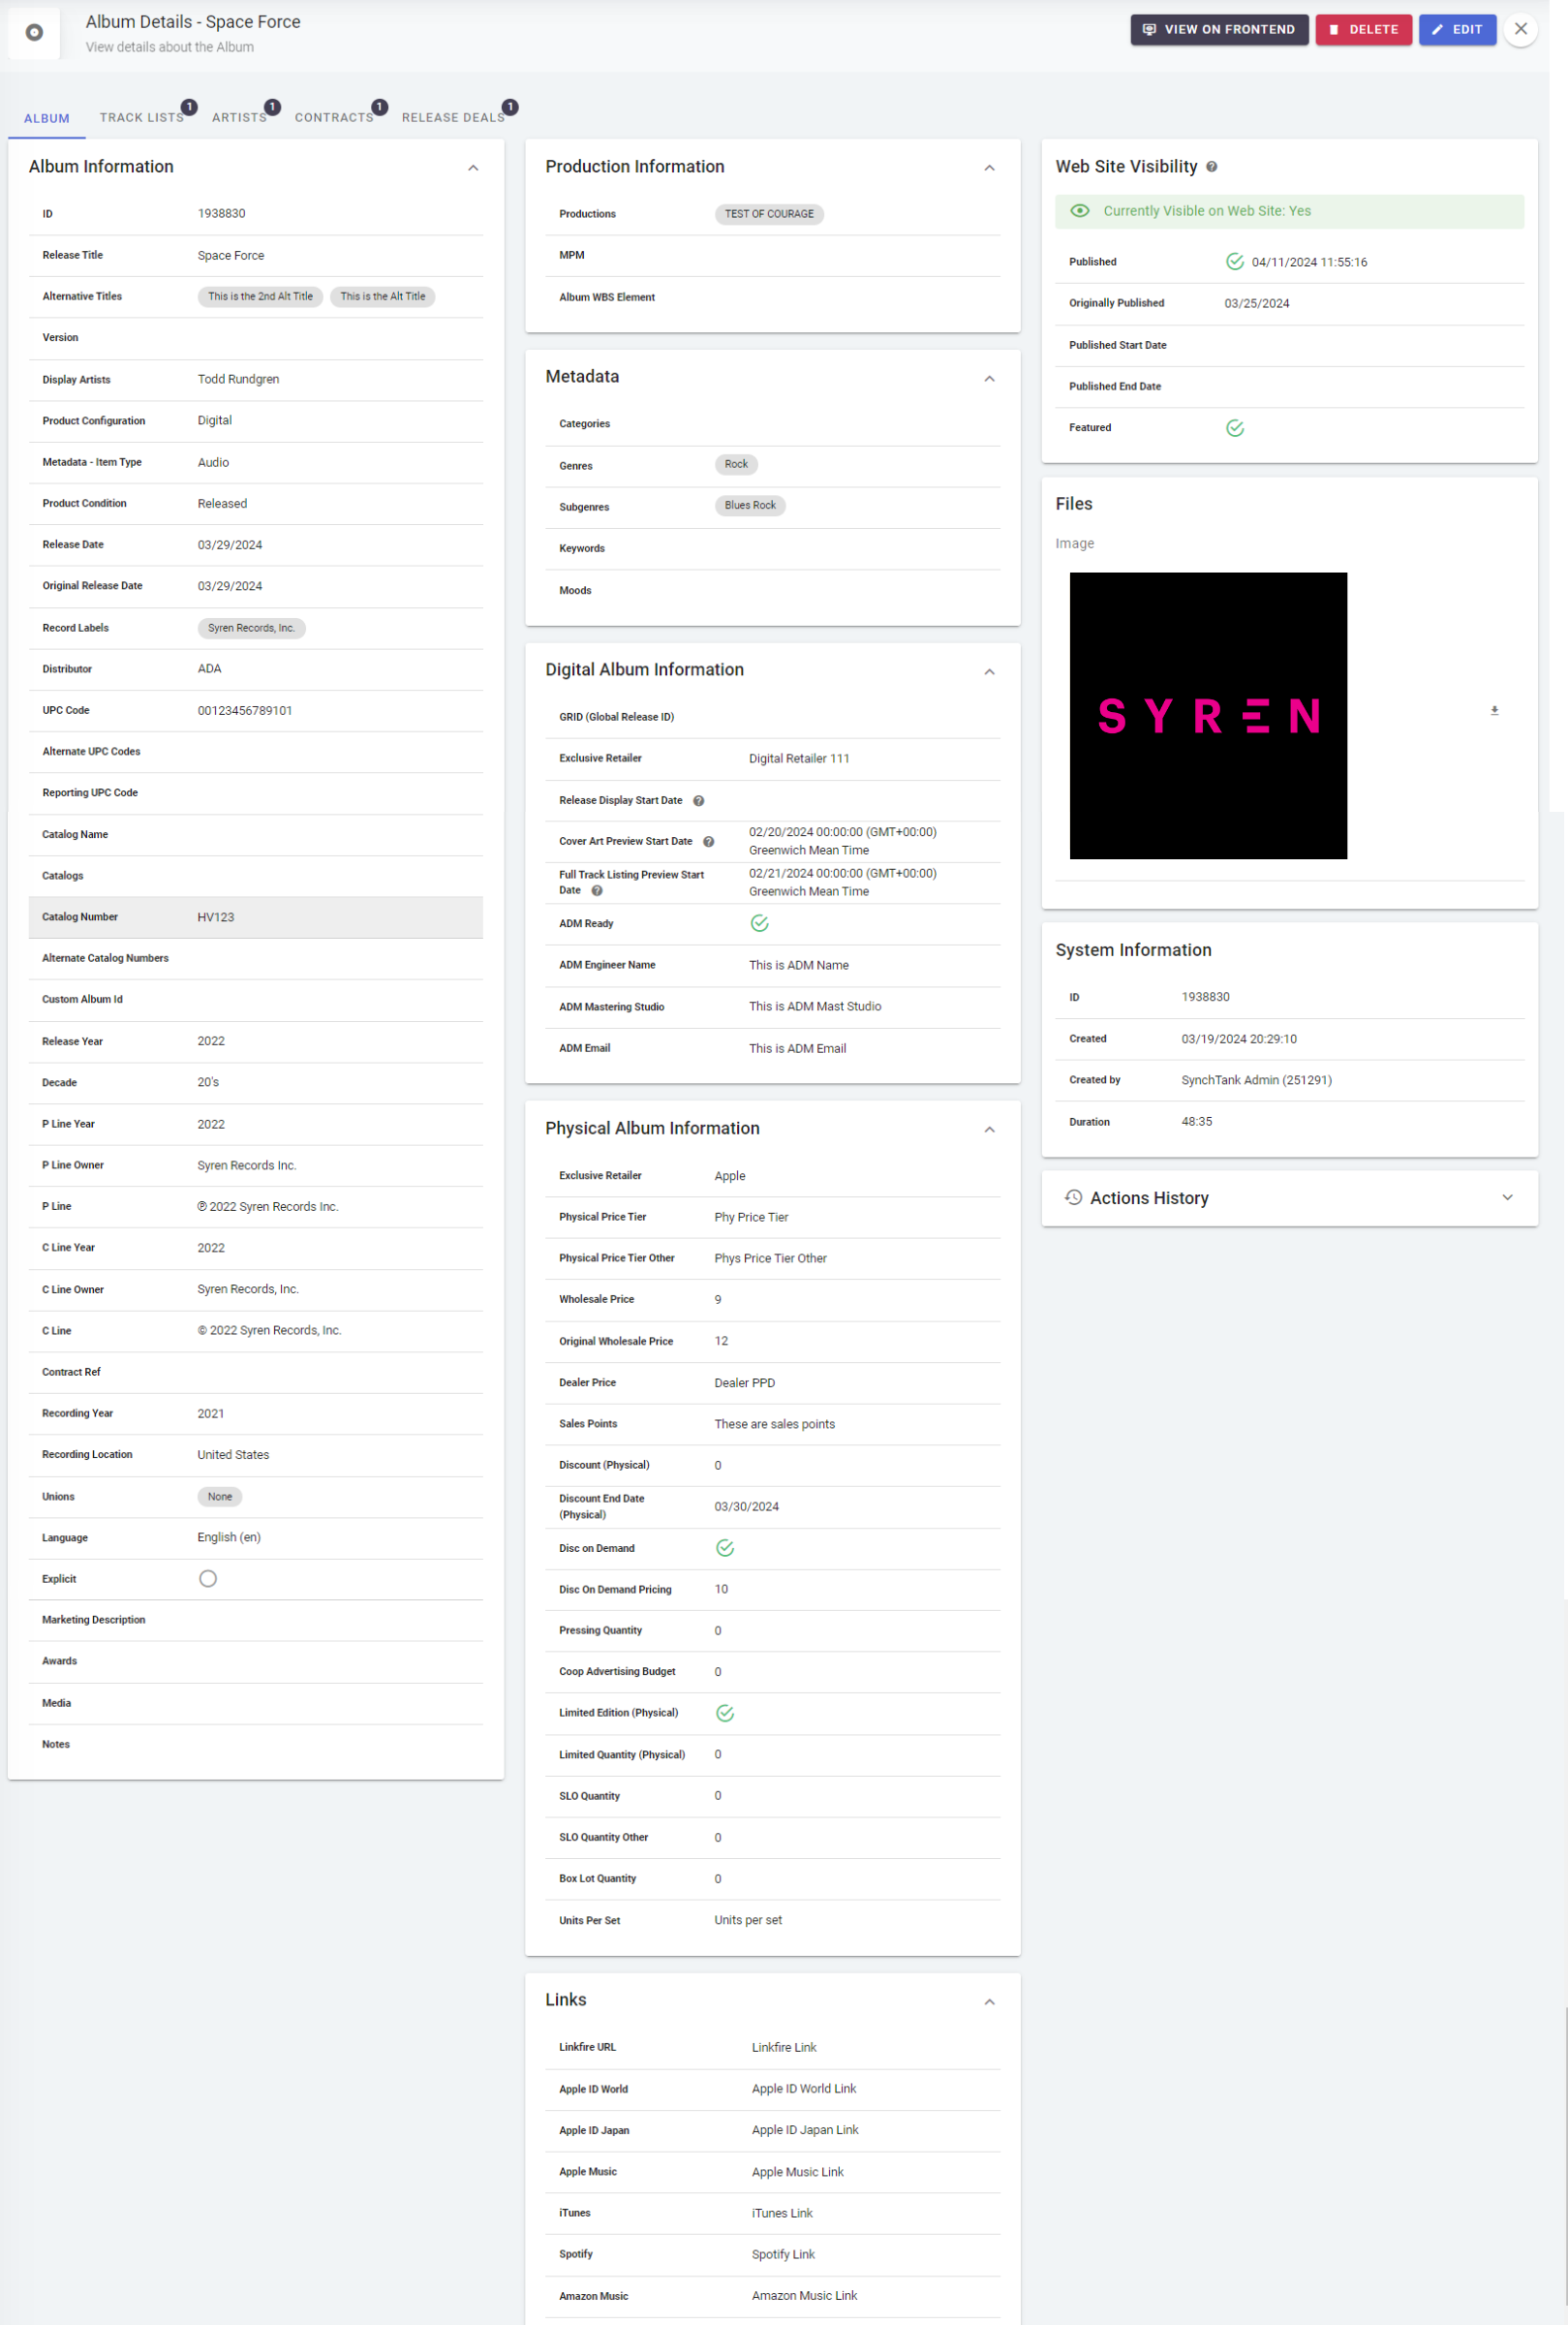
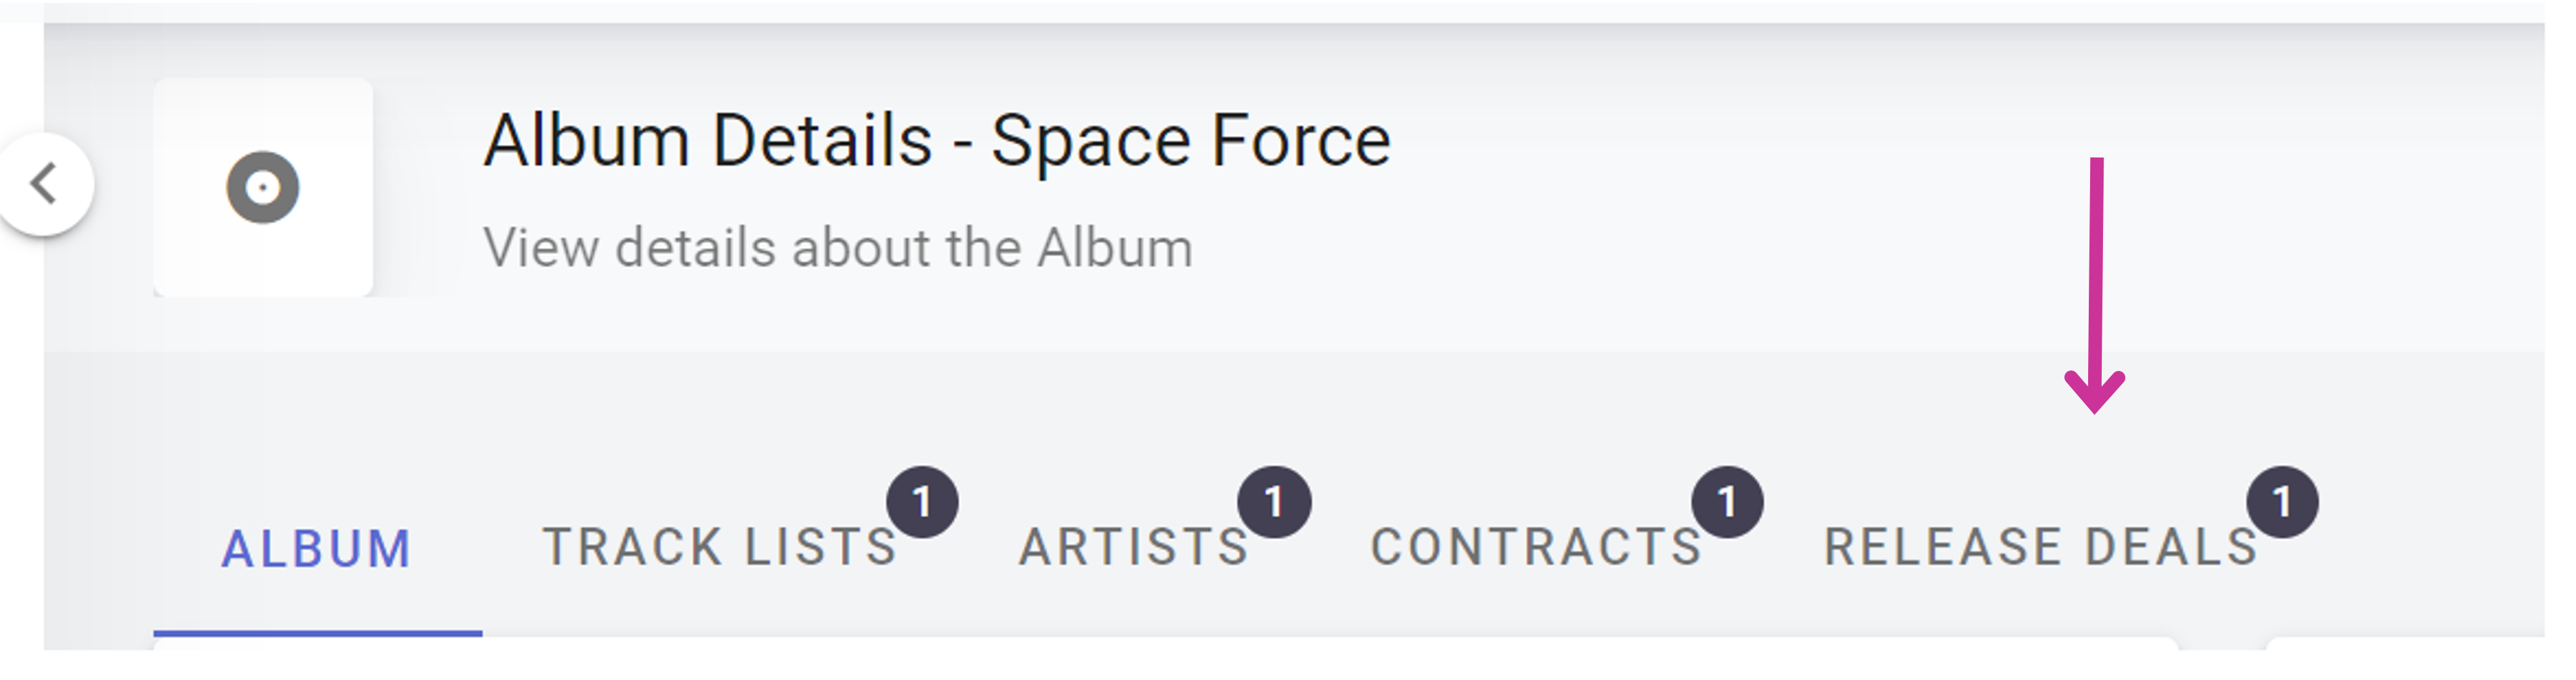
At the top of the Album page are the tabs:
- Track Lists
- Artists
- Release Deals
Track Lists
The Track Lists tab shows all Tracks on the Release. Within the table view you can see ‘Preview Date Overrides’ so you can see if the dates on the track do or do not match the album and ‘Release Deal Overrides’ which is when the track deal terms do not match the release deal terms. All allowing you to see at a glance if tracks differ.
You can find Download, Streaming, and Bundle Only relations within the Track Release Deals.
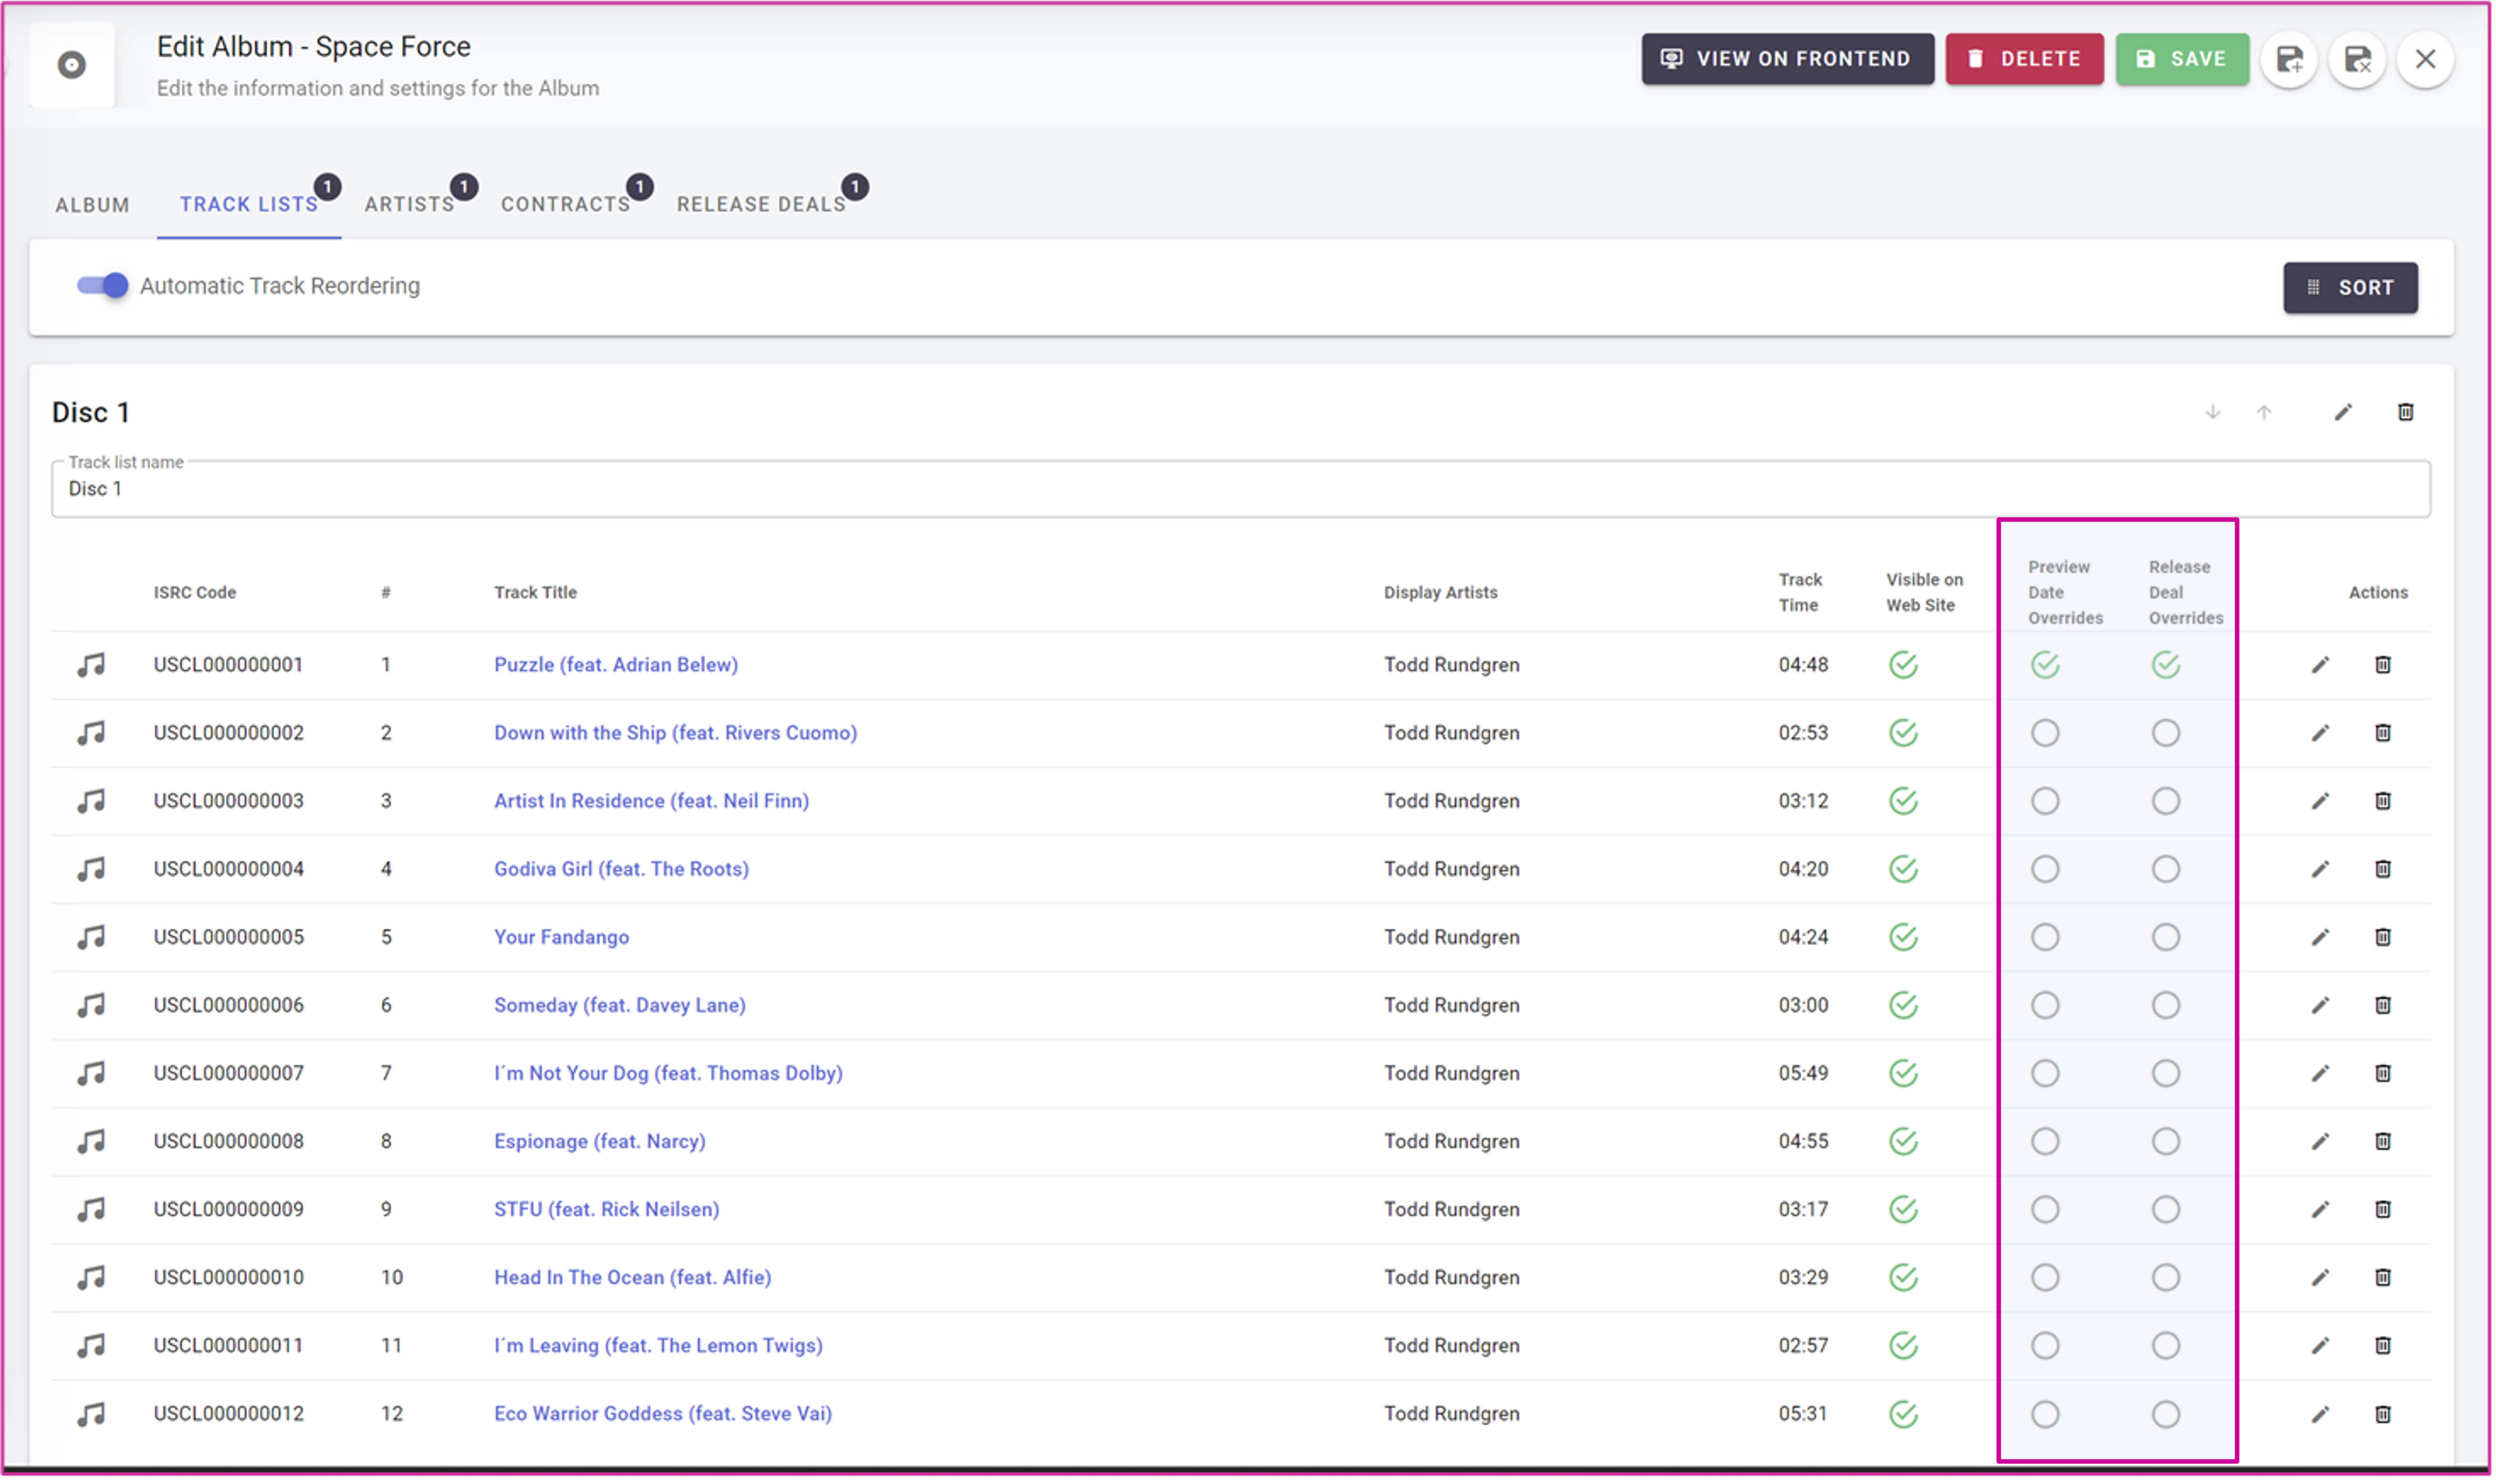
Track Details
A Track is the instance of a Sound Recording on an Album. Clicking to edit a given Track on the Album opens the Track (not Master!) details.
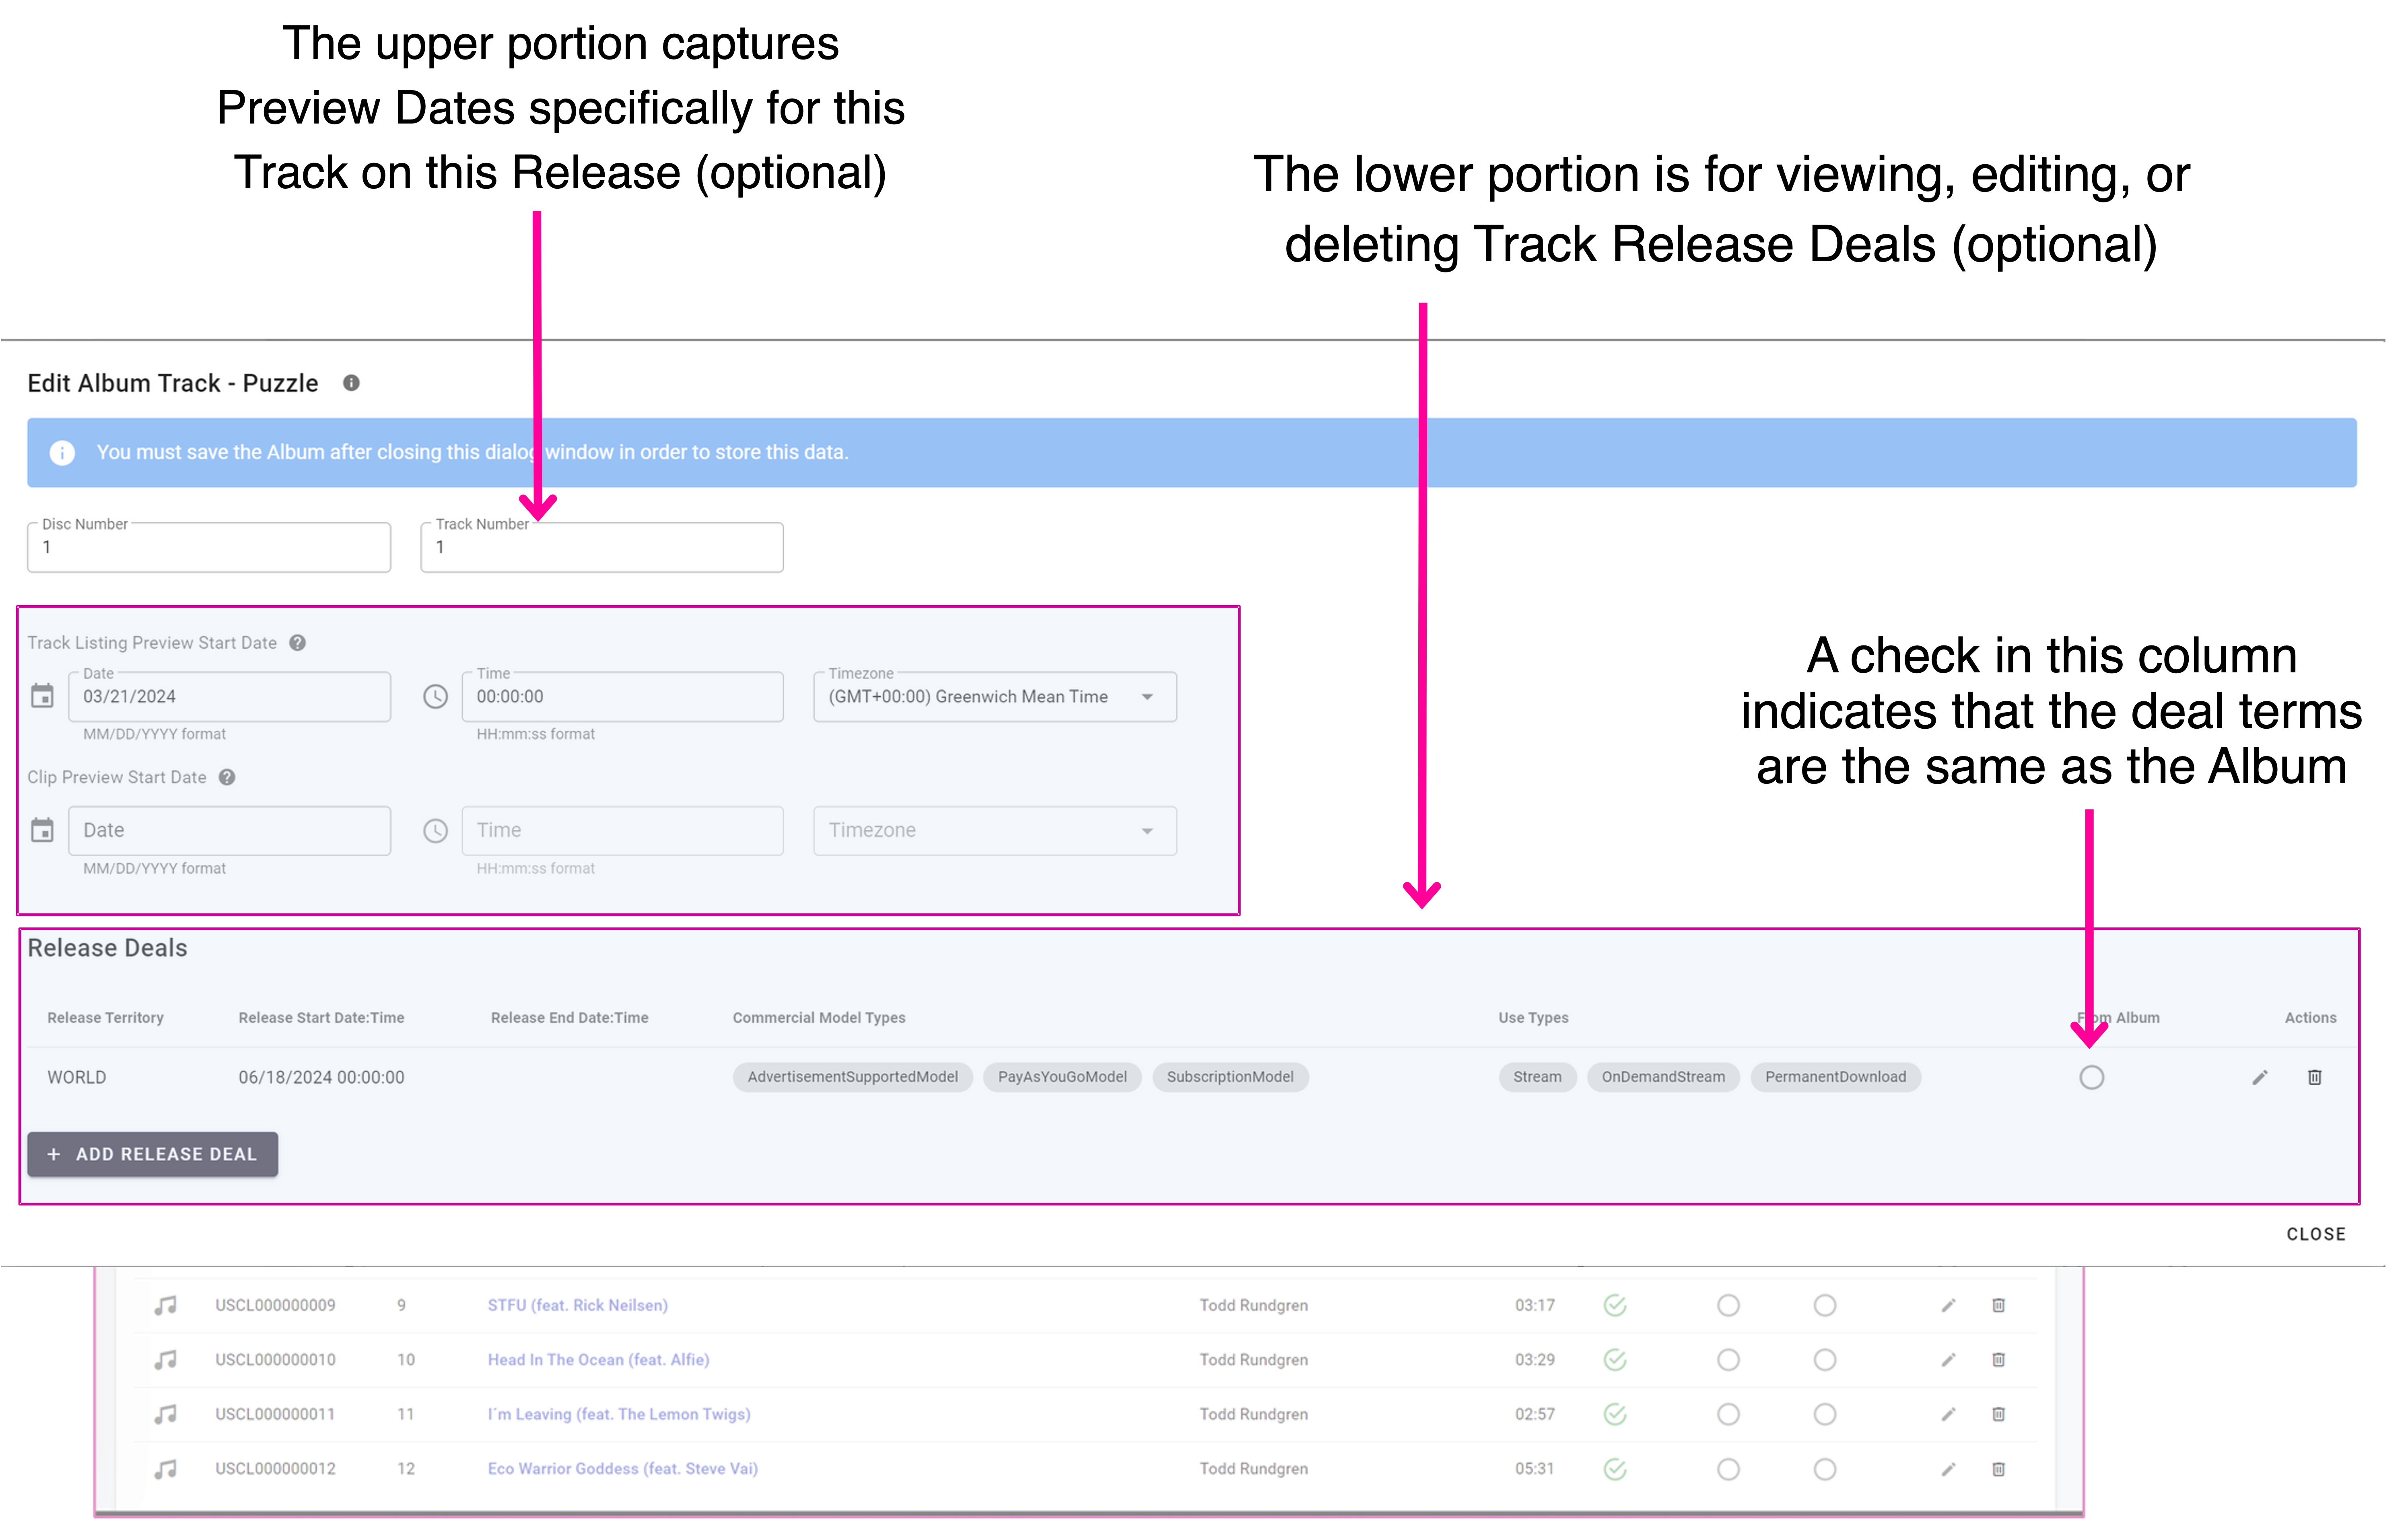
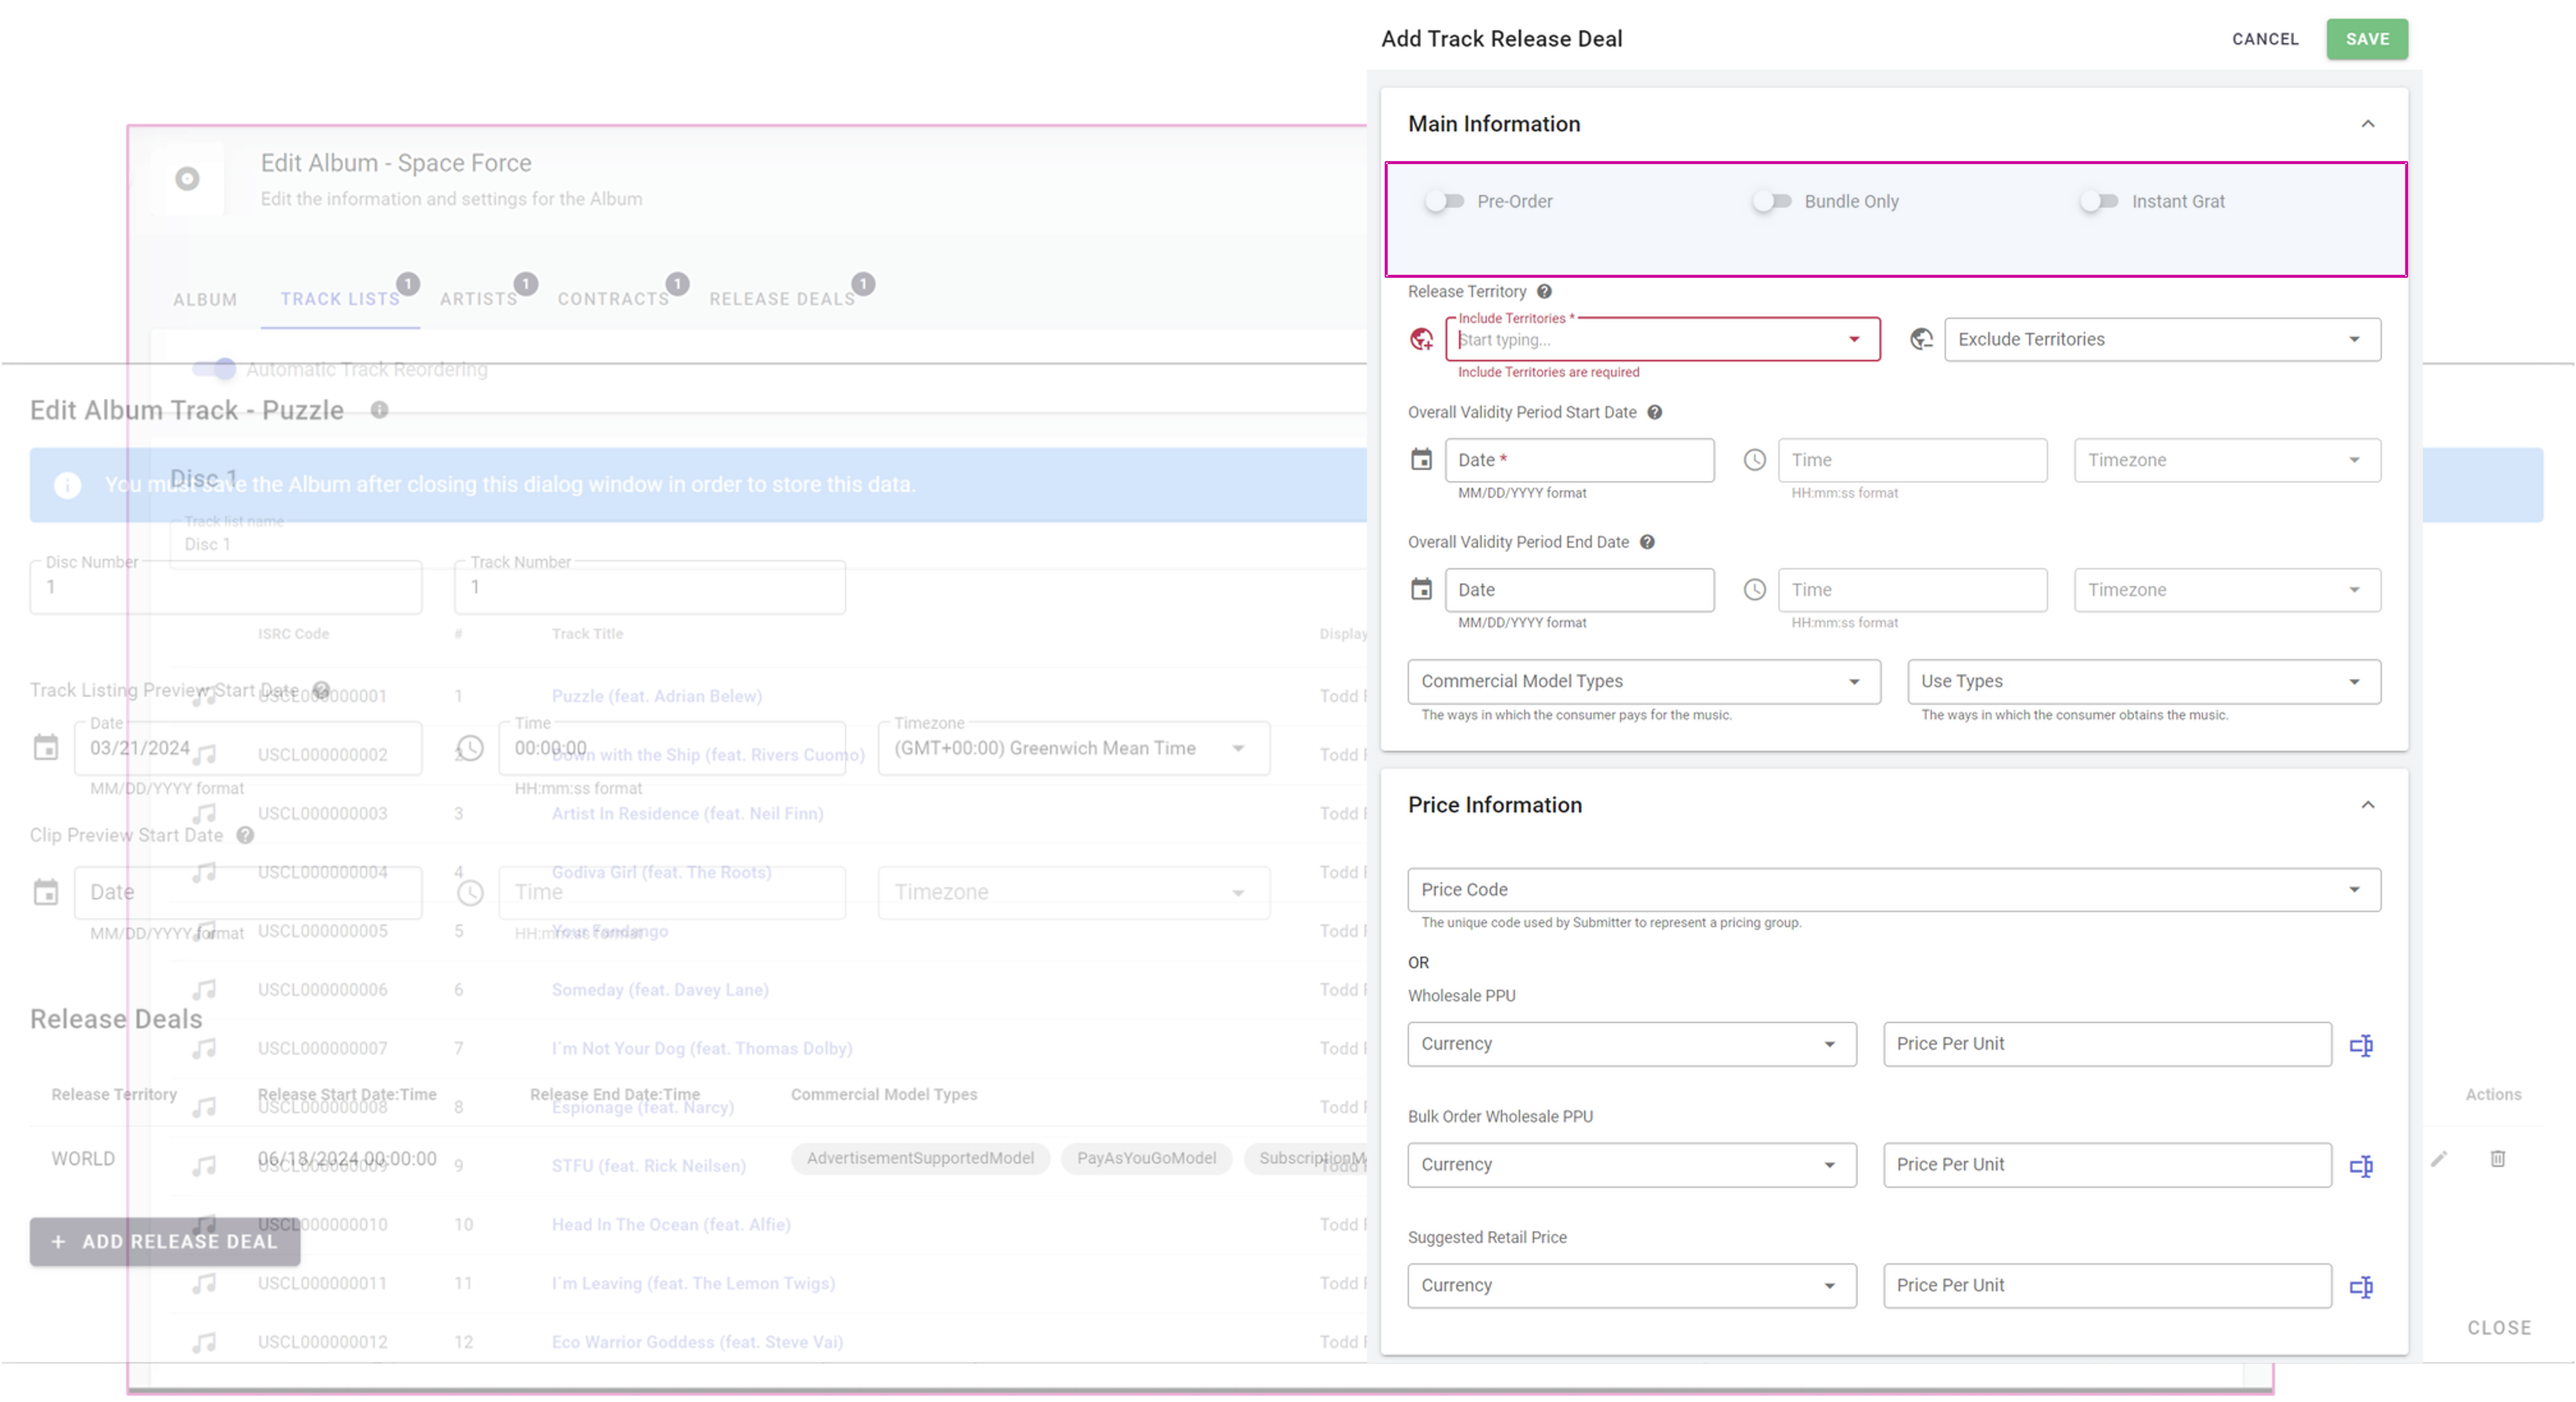
Track Release Deals
This screen is very similar to the Album release screen, but with a couple of exceptions; the toggles at the top that say; Pre-Order, Bundle Only and Instant Grat.
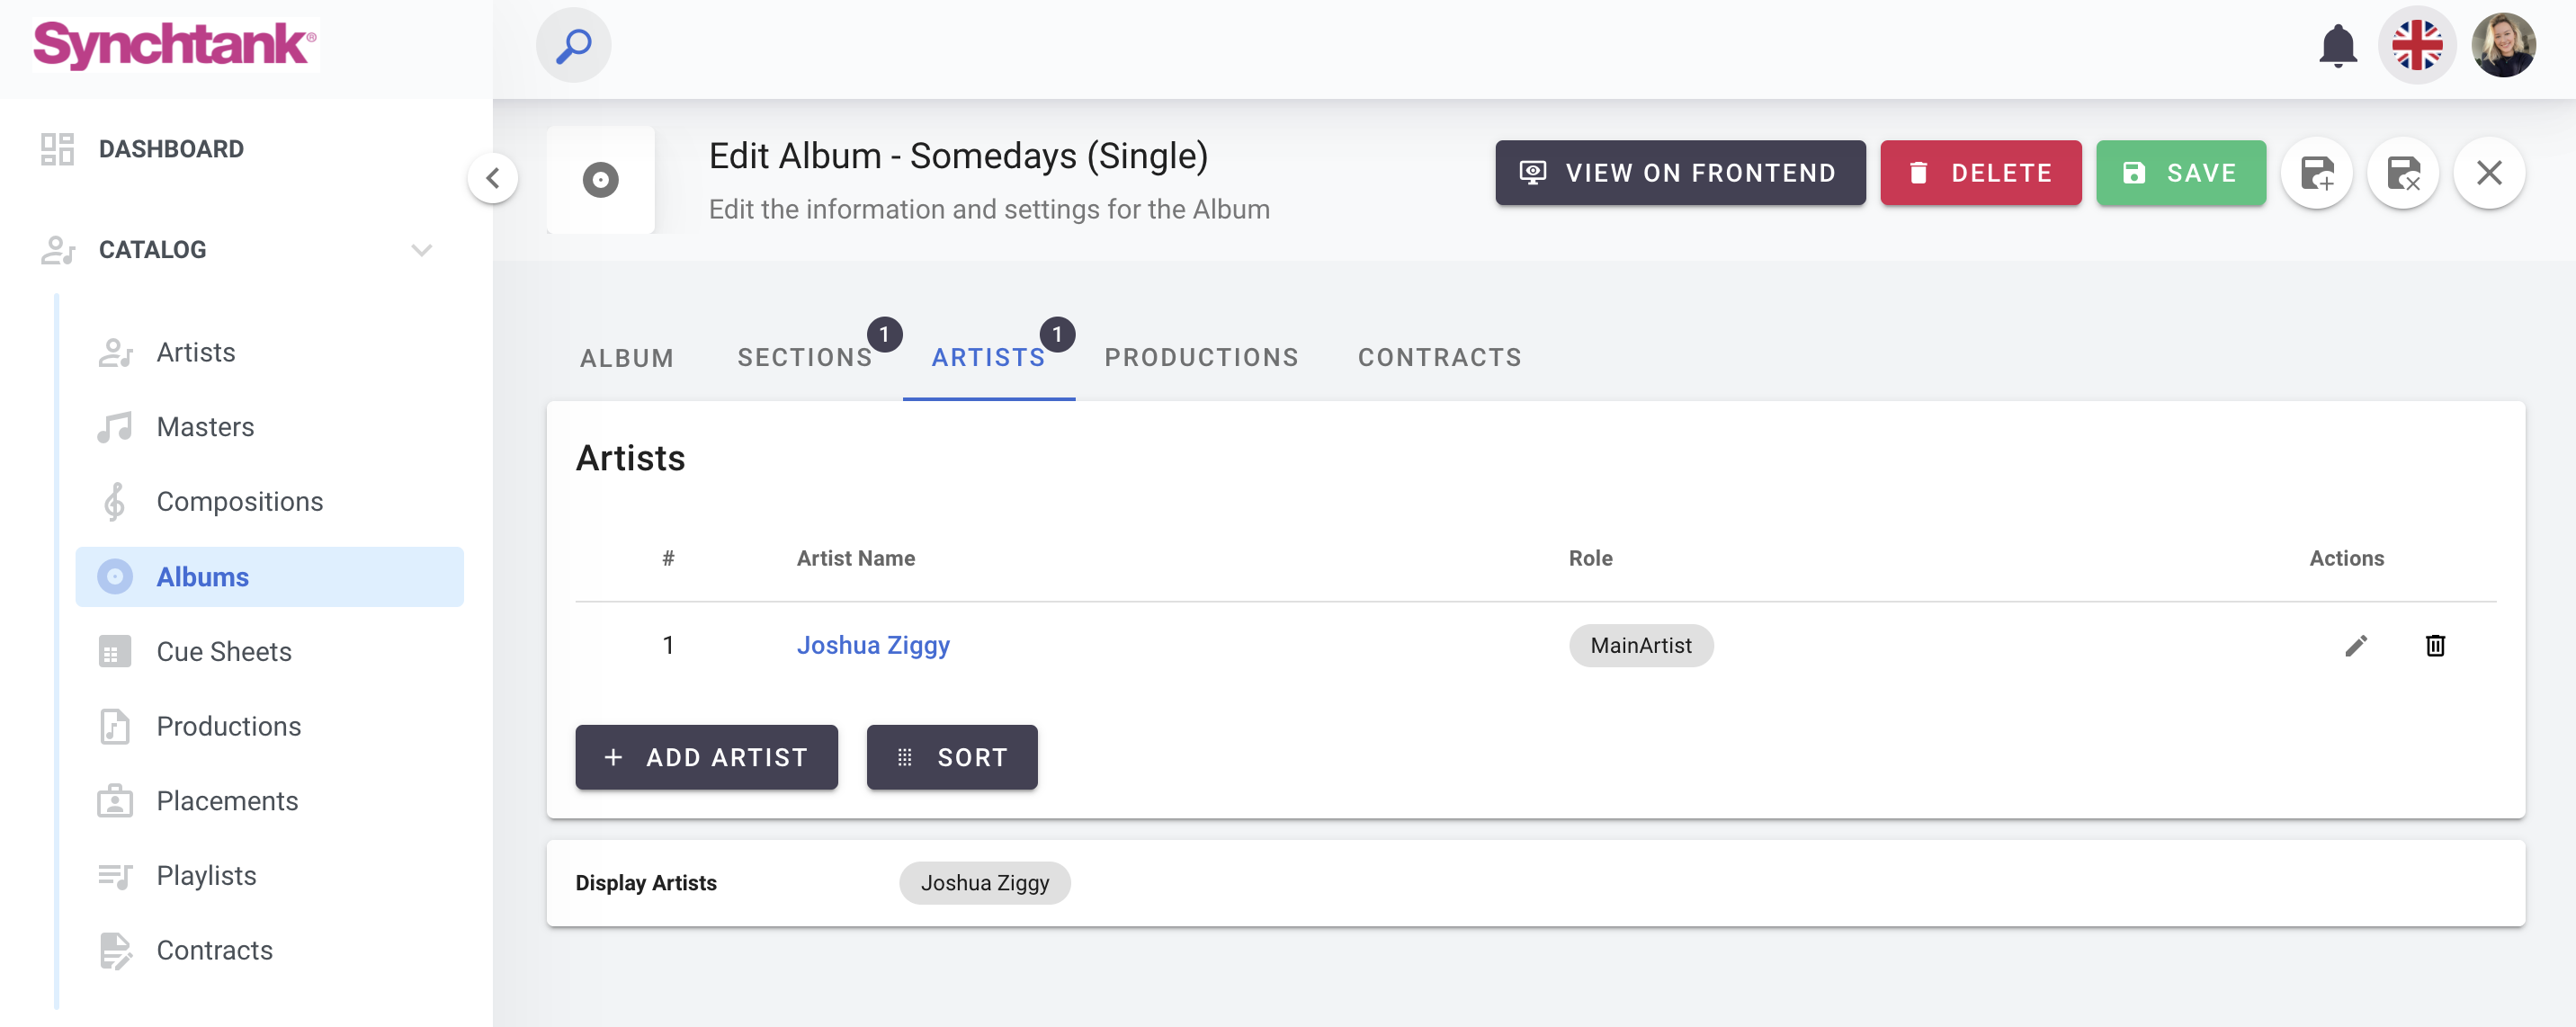
Artists
Within this section you will see a list of artists that are in the album and their role, i.e. main, features, or artist.
Release Deals
In the Release Deals tab, you’ll see a list of existing Album Release Deals. You may choose to create no Release Deals, or many, depending on your release plan and how you wish to use your Synchtank system. As Admin, you are in full control of how your Release Deal data is presented.
Adding a release deal:
Within the main information section you can add the details of your release deal. There is a slider which allows you to show if the deal being added is a pre-order deal (if your Album is a pre-order deal then you fill out all the details and create a new release for the pre-order deal as those terms can differ).
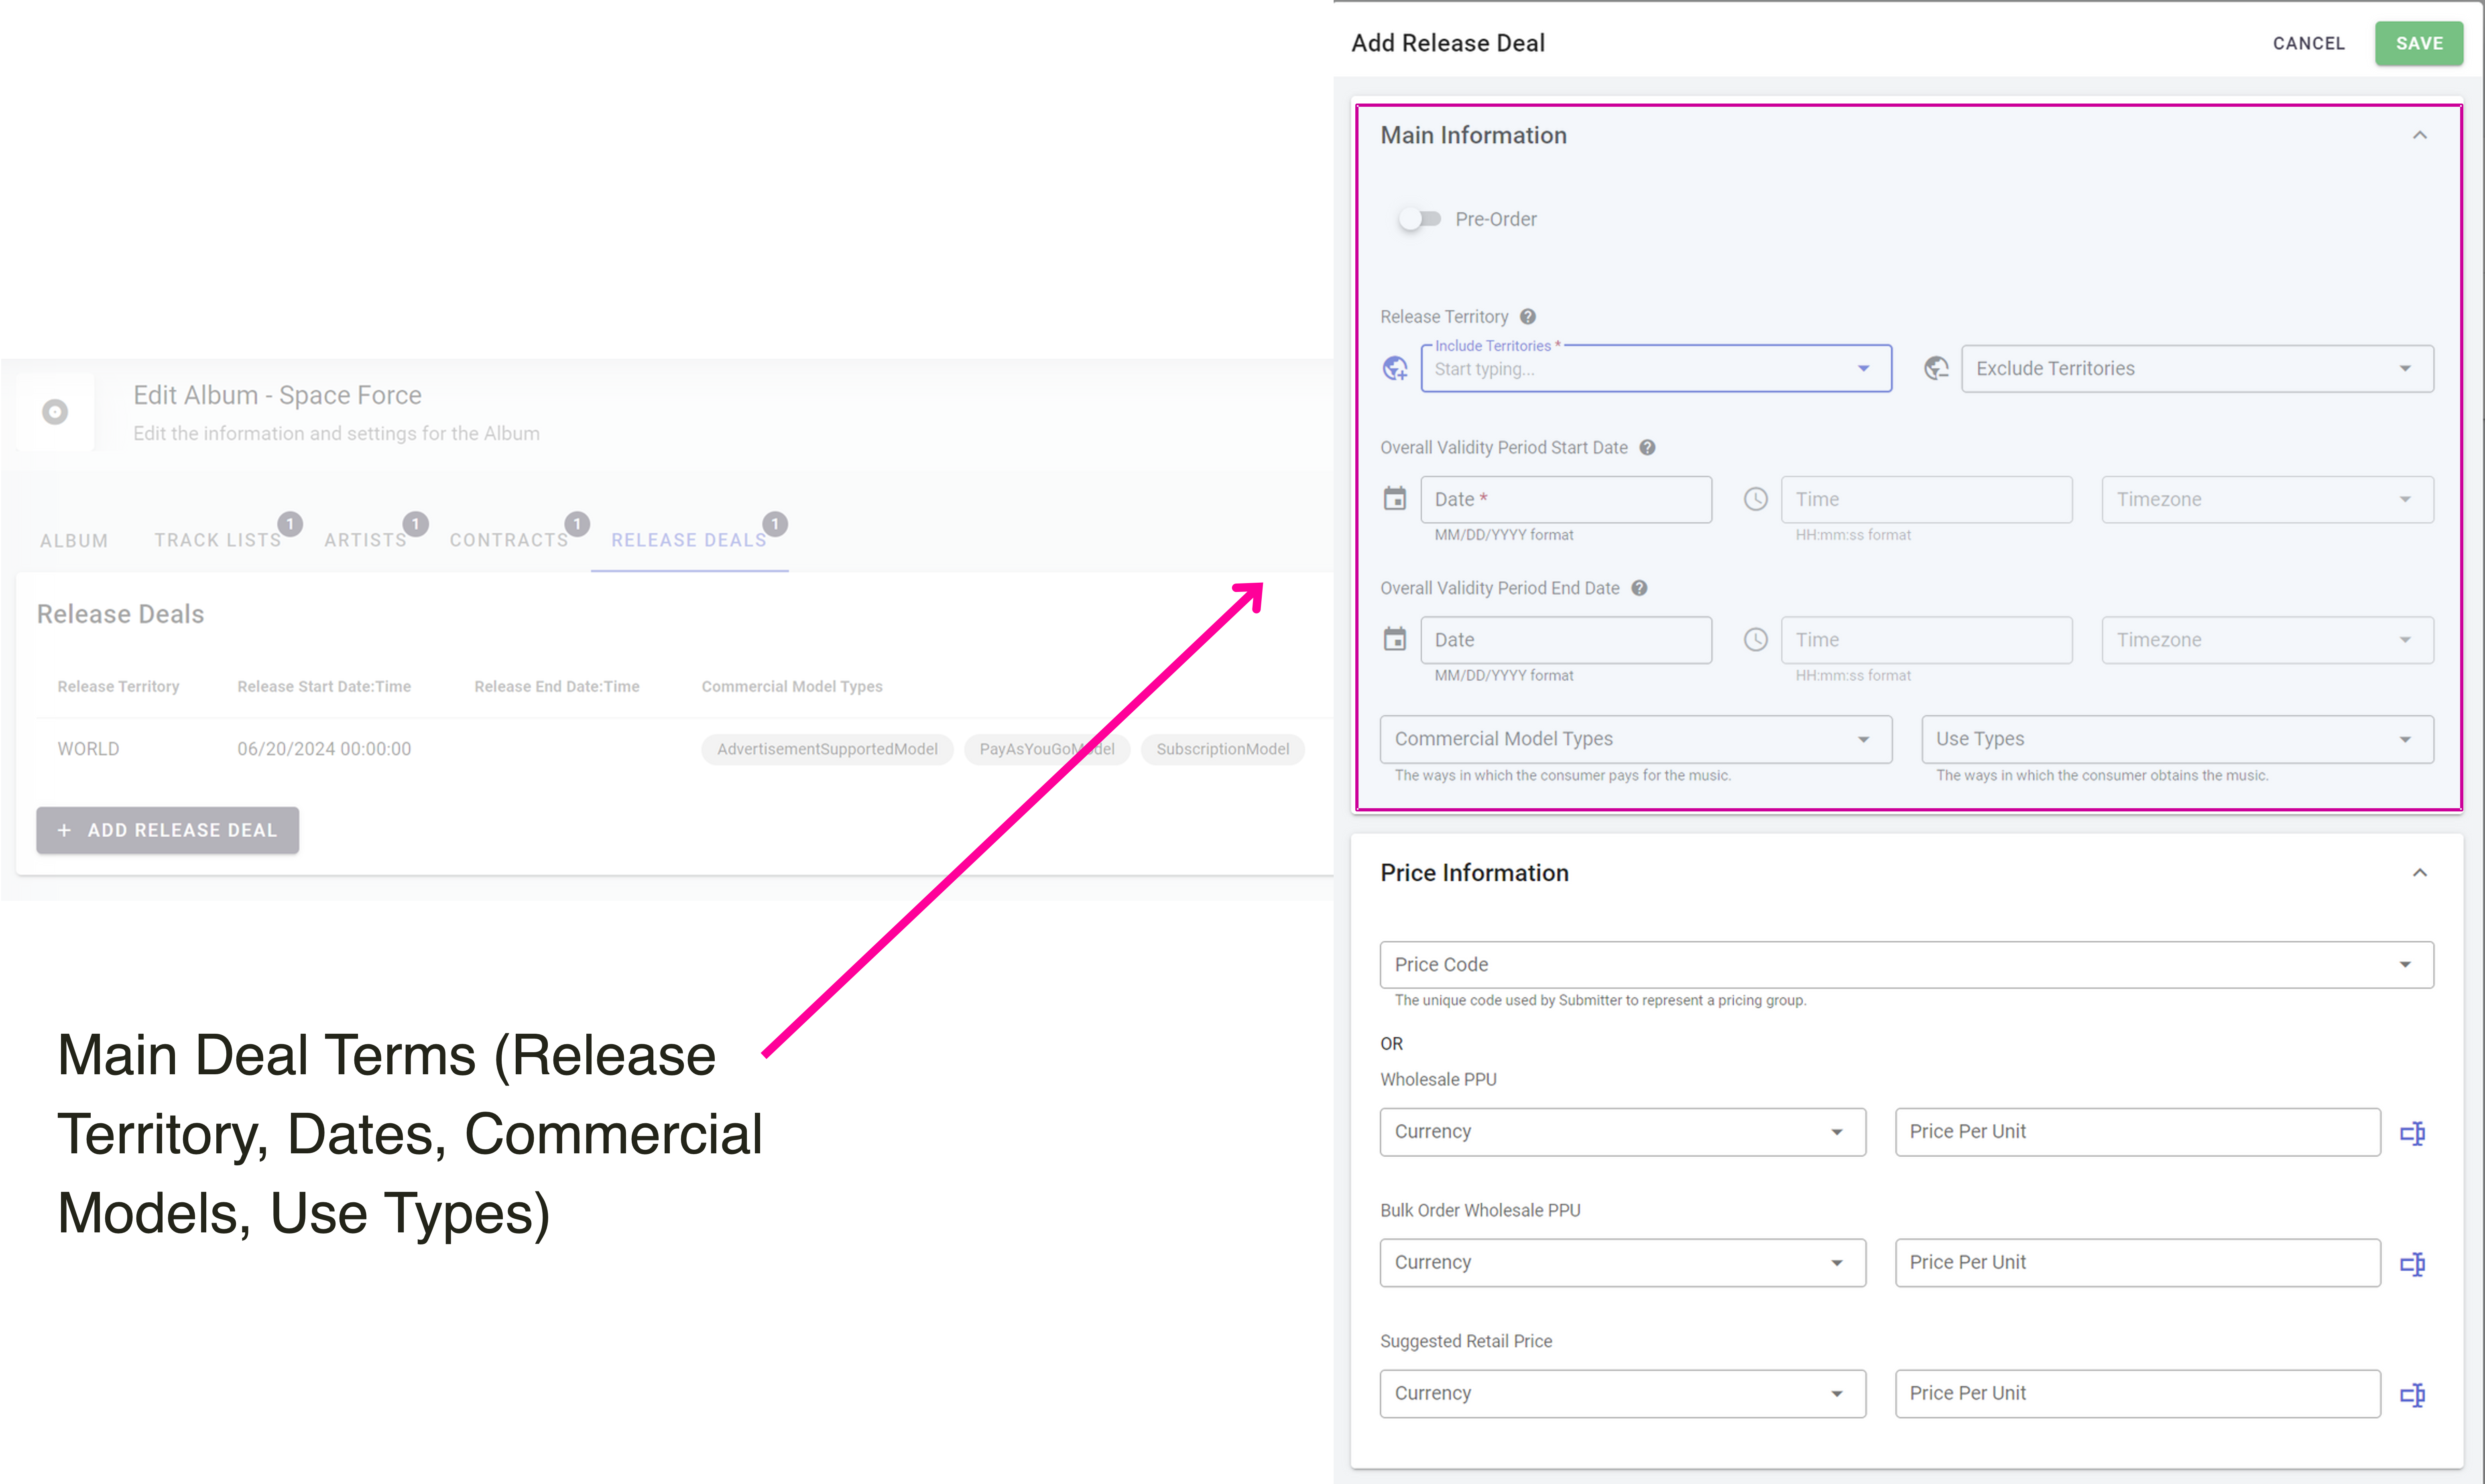
Within your top section there are handy elements such as including/excluding territories as well as worldwide. Validity dates for the DSP’s to know when the Album will be visible in store, and if you include an end date that will mean the DSP will remove from their site on that specific date. Within this section we have also included ‘timezone’ to allow you to release your Album worldwide at the same time (so Australia doesn’t get the release before anyone else!).
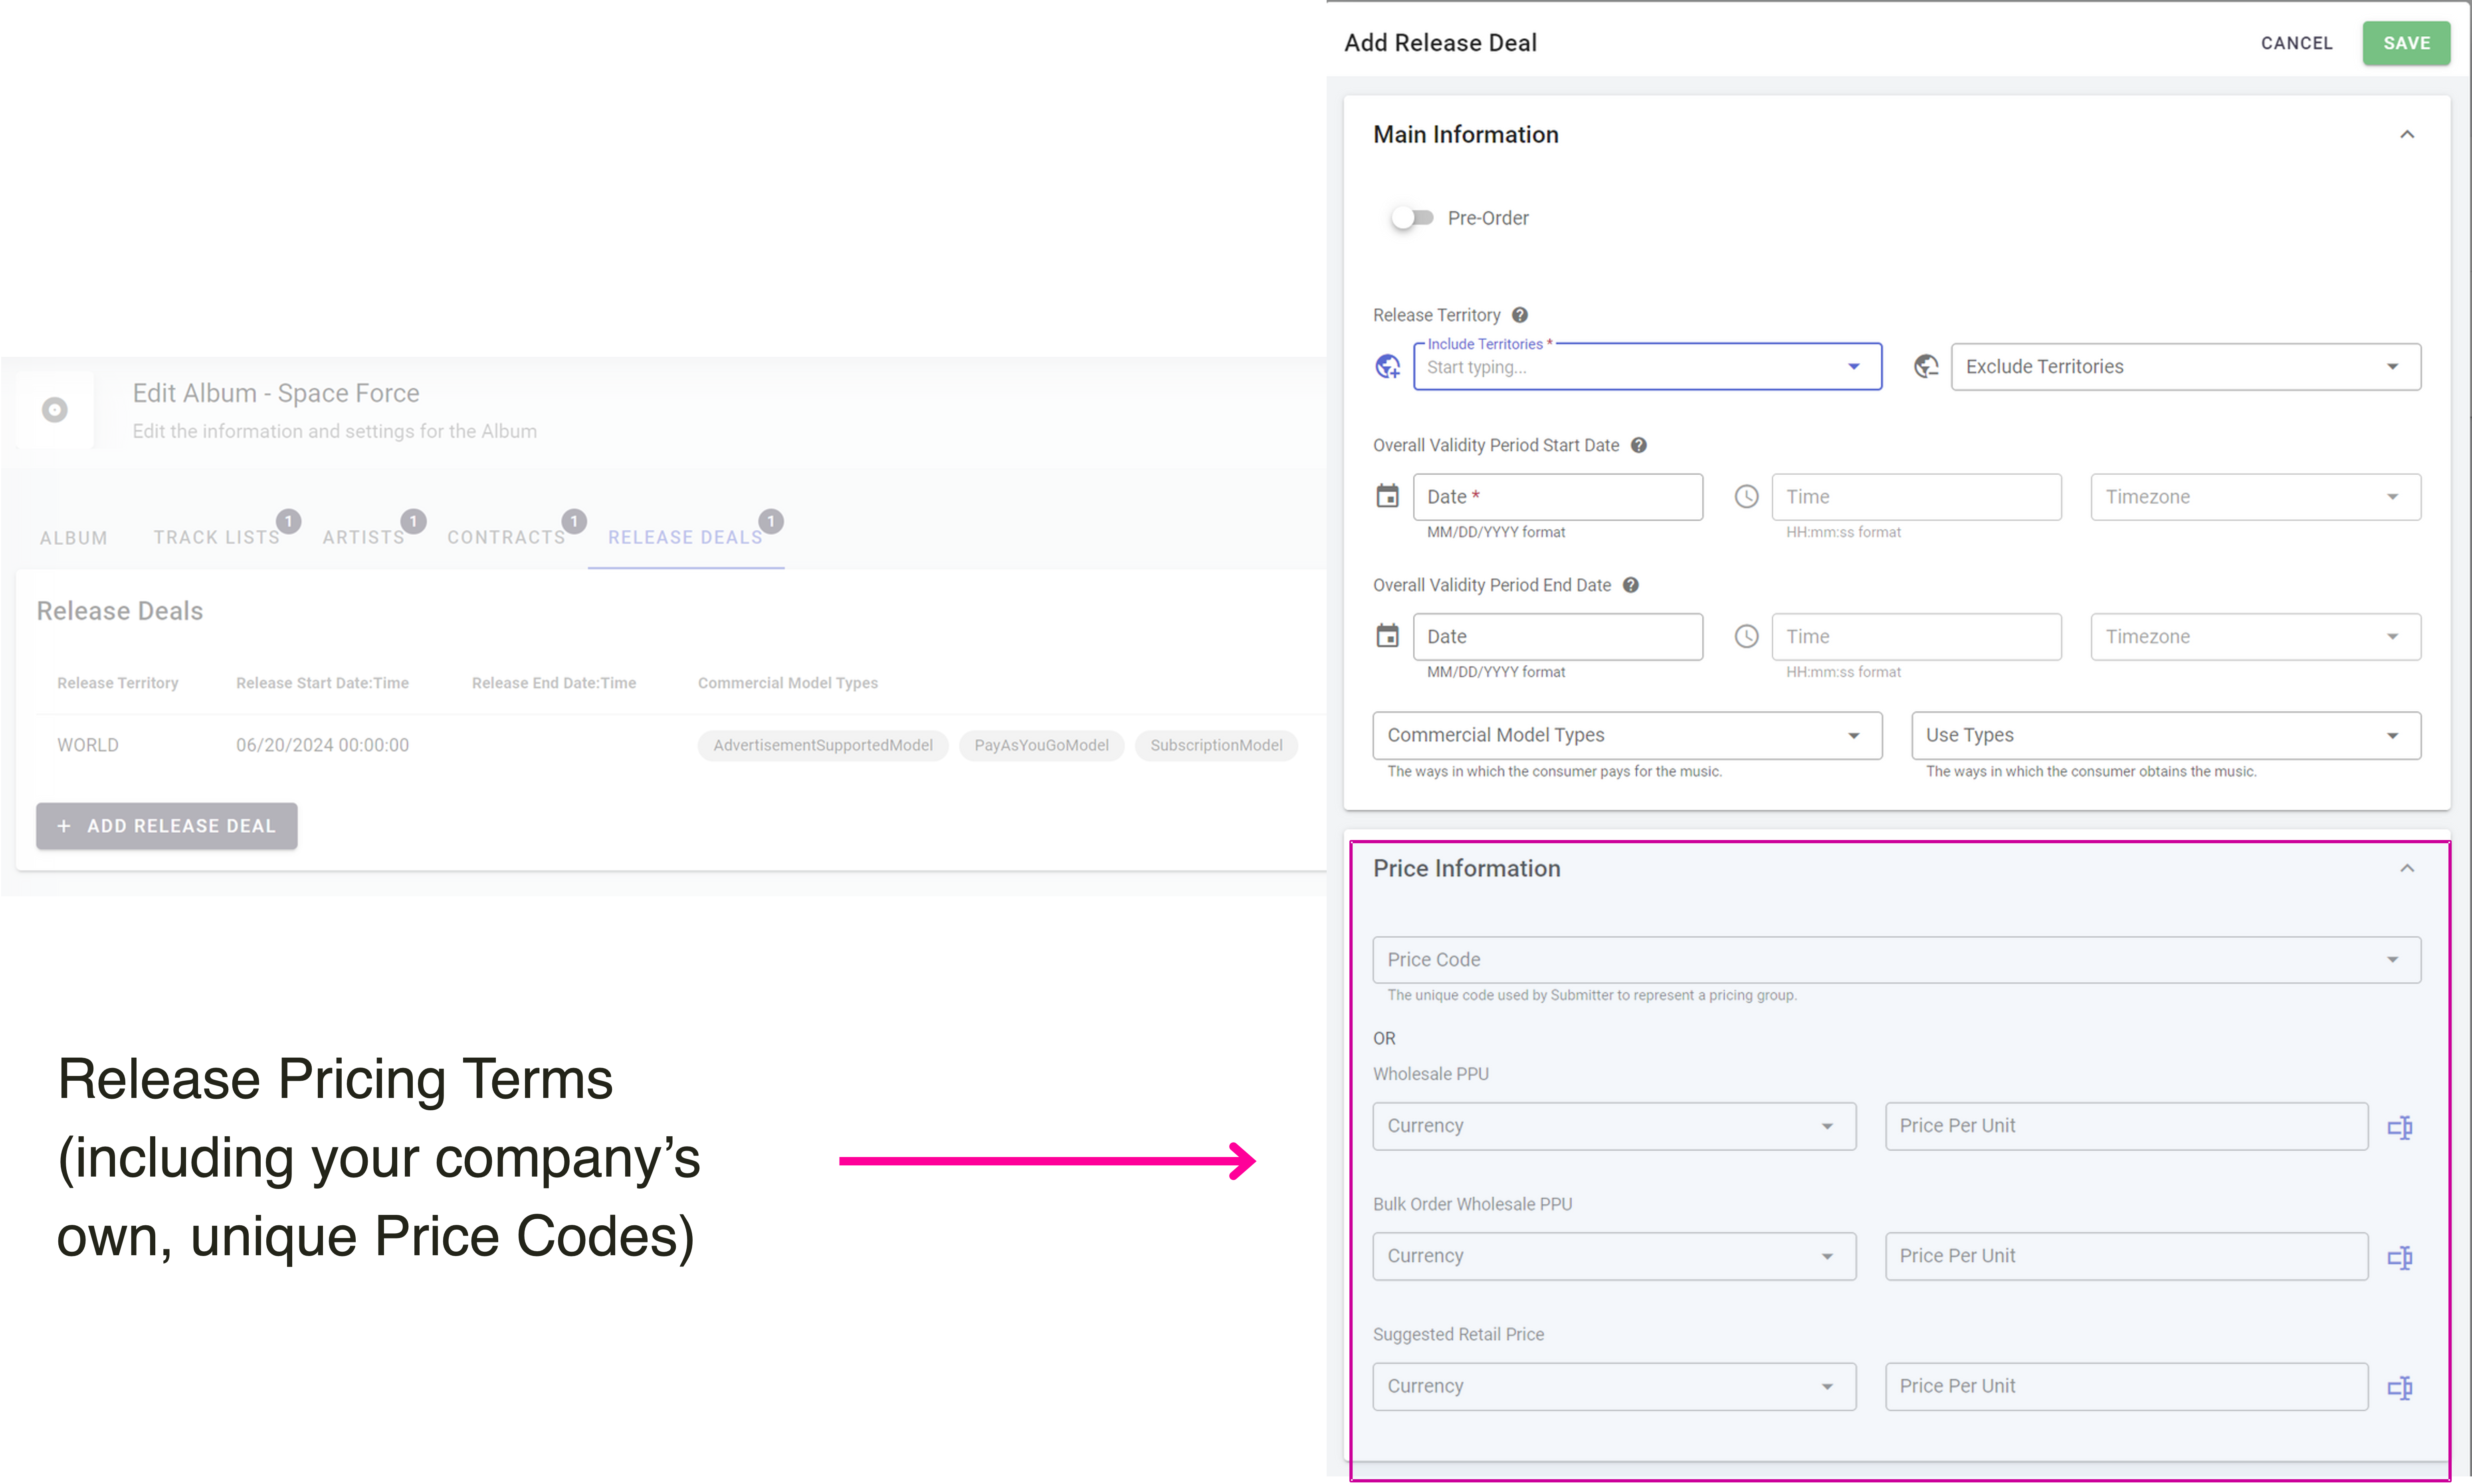
Then you have your price information, and for all label cases the need for price codes is required and unique to every company - this has now been implemented within the Synchtank system and we can implement specific codes for you.
Album Uploads
When creating a new album we recommend following these simple steps.
This process covers how to:
- Create compositions
- Create an album
- Upload main mixes (Masters)
- Link compositions and albums
- Upload child tracks (versions)
- Perform bulk metadata updates
Overall Sequence
For each album:
1. Create compositions2. Create the album
3. Upload main mixes (Masters)
4. Link compositions and album to Masters
5. Bulk update metadata (if needed)
Step 1: Create Compositions
Path: Catalog → Compositions → Create
1. Create a composition for each main track2. Add Title (or relevant info) and Save

- Add Writers
- Add Splits
- Add PRO details (manual lookup if needed)
4. Repeat for all main tracks in the album
Step 2: Create the Album
Path: Catalog → Albums → Create
1. Enter Album Title (or relevant info)2. Save

Step 3: Upload Main Mixes (Masters)
Path: Import Tools → Audio Upload → Create
1.Go to Import Tools > Audio Upload > Create

- Upload in correct order (sets album sequence)
5. Add Metadata per Track:
- Composition; Click Select Composition & Assign the correct composition to each track
- Artist; Under Global Sound Recording Information, Add display artist
- Album; Under Global Sound Recording Information & Assign album

- A composition
- The correct album
- The correct artist
- Click Continue
- Review the summary
- Click Confirm
Notes
Album vs Singles
Album upload:- Use Global (right column) metadata
- Apply to all tracks
- Do NOT use global metadata
- Edit each track individually
Track Order
- Tracks are uploaded in the order selected
- This determines album sequencing
- Can be adjusted later if needed
Step 4: Link Validation (Post Upload)
After upload, confirm:
- Tracks appear in Catalog → Masters
- Each track is linked to:
- Composition
- Album
- Artist
Step 5: Bulk Update Metadata (Spreadsheet)
Path: Reports → Reports → Create
Export Report
1. Run a Masters Report- Apply filters (e.g. “Created Today”)

- The report will appear in the list
- Status will update to indicate it’s ready
- Using the direct download button right next to the report

- Or, can open the report again and download it from there

Update Metadata

- Each row = one Master (track)
- Each column = a metadata field
You can:
- Add metadata
- Update existing fields
- Remove metadata (clear cells)
Important Rules
- Do NOT:
- Delete columns
- Add columns
- Change structure
This will cause upload errors
Re-upload Spreadsheet
Path: Import Tools → Import Spreadsheet
Steps:
1. Select Import Master Spreadsheet2. Add a Batch name
3. Upload the edited file
4. Click Save
5. Wait for the file to be processed
- The system will validate and apply the updates
- Processing time may vary depending on file size

Result
- Metadata is updated in bulk
- Changes are reflected in:
- Catalog
- Track detail pages

Cue Sheets
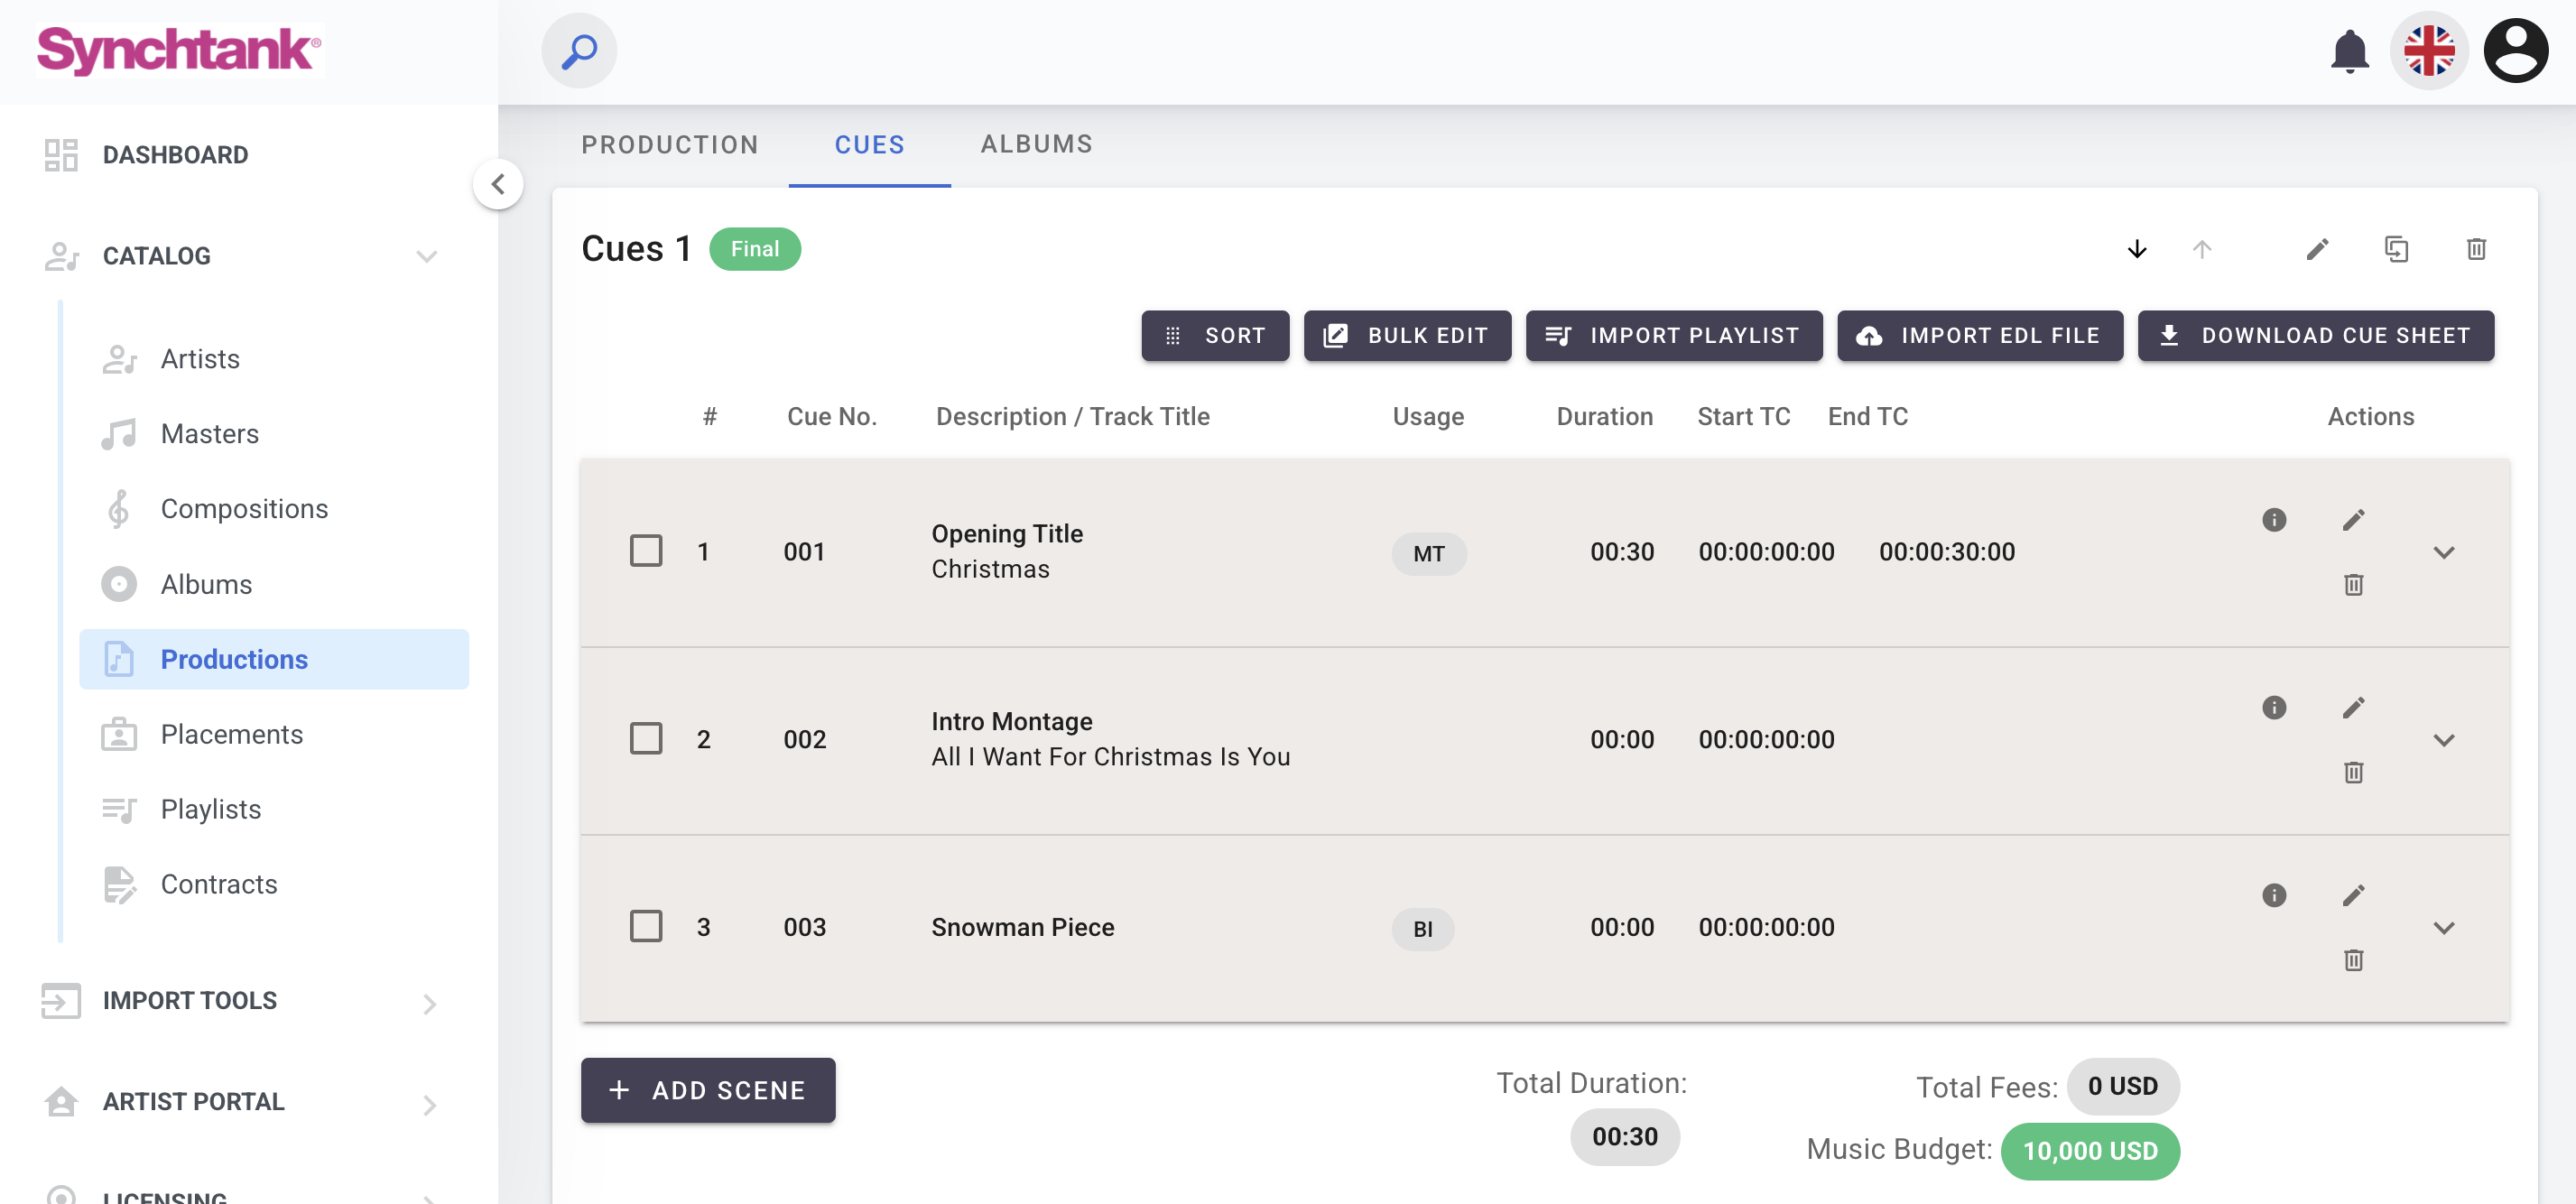
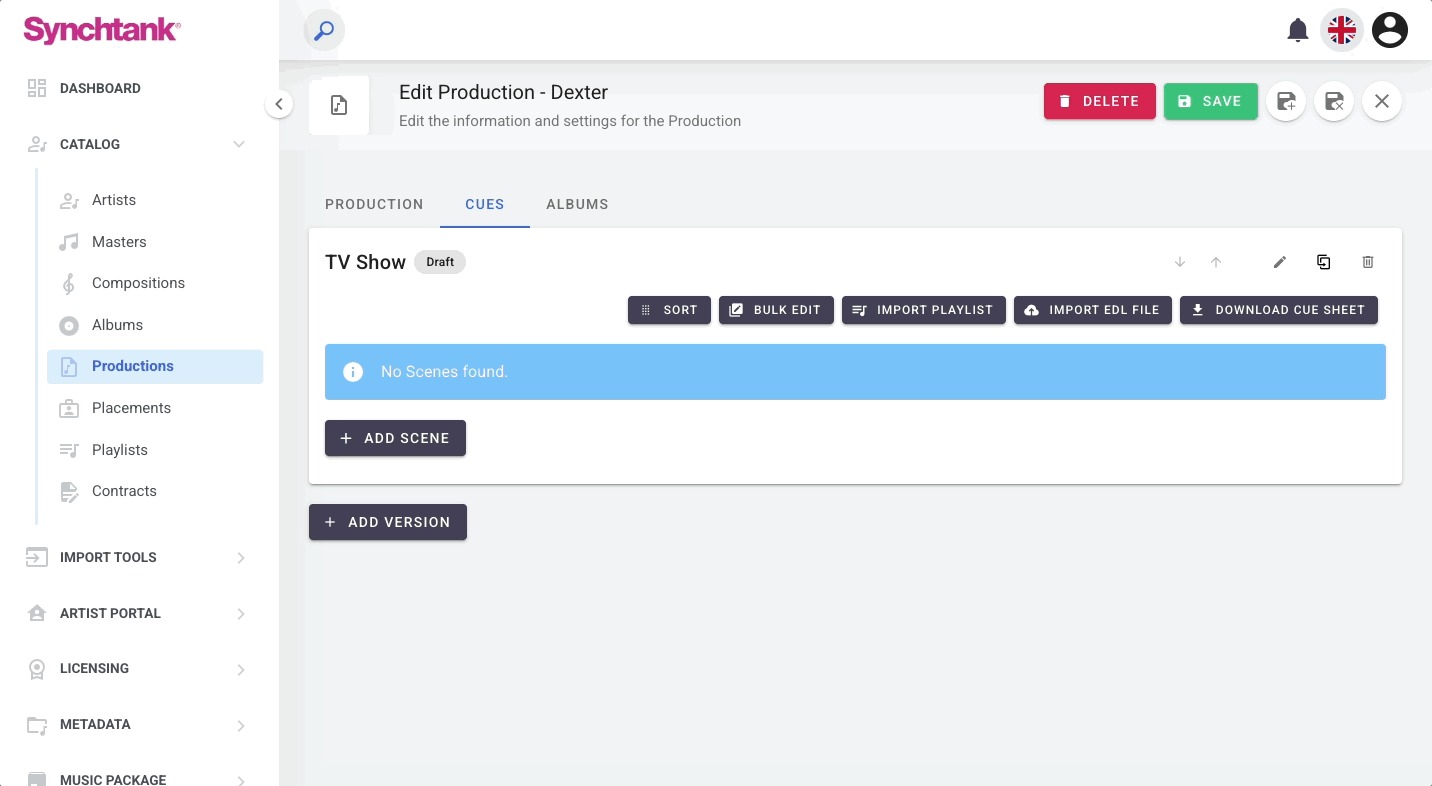
Cue sheets live under a Production (the production is the umbrella that contains all the Cue Sheets for a show/episode). You can create Cue Sheets manually, generate them from a Playlist, or import them from an EDL file. Once created, Cue Sheets can be exported (Excel/CSV) and include queue/scene details, tracks, writers/publishers, timings and other header metadata.
Create a Cue Sheet manually
- From the main menu go to Catalog → Productions.
- Find and open the Production that will contain the Cue Sheet. (If you don’t have one yet, create a new Production and fill the header details you want to include — title, version, production company, year, release year, etc. These header fields appear on exports.)
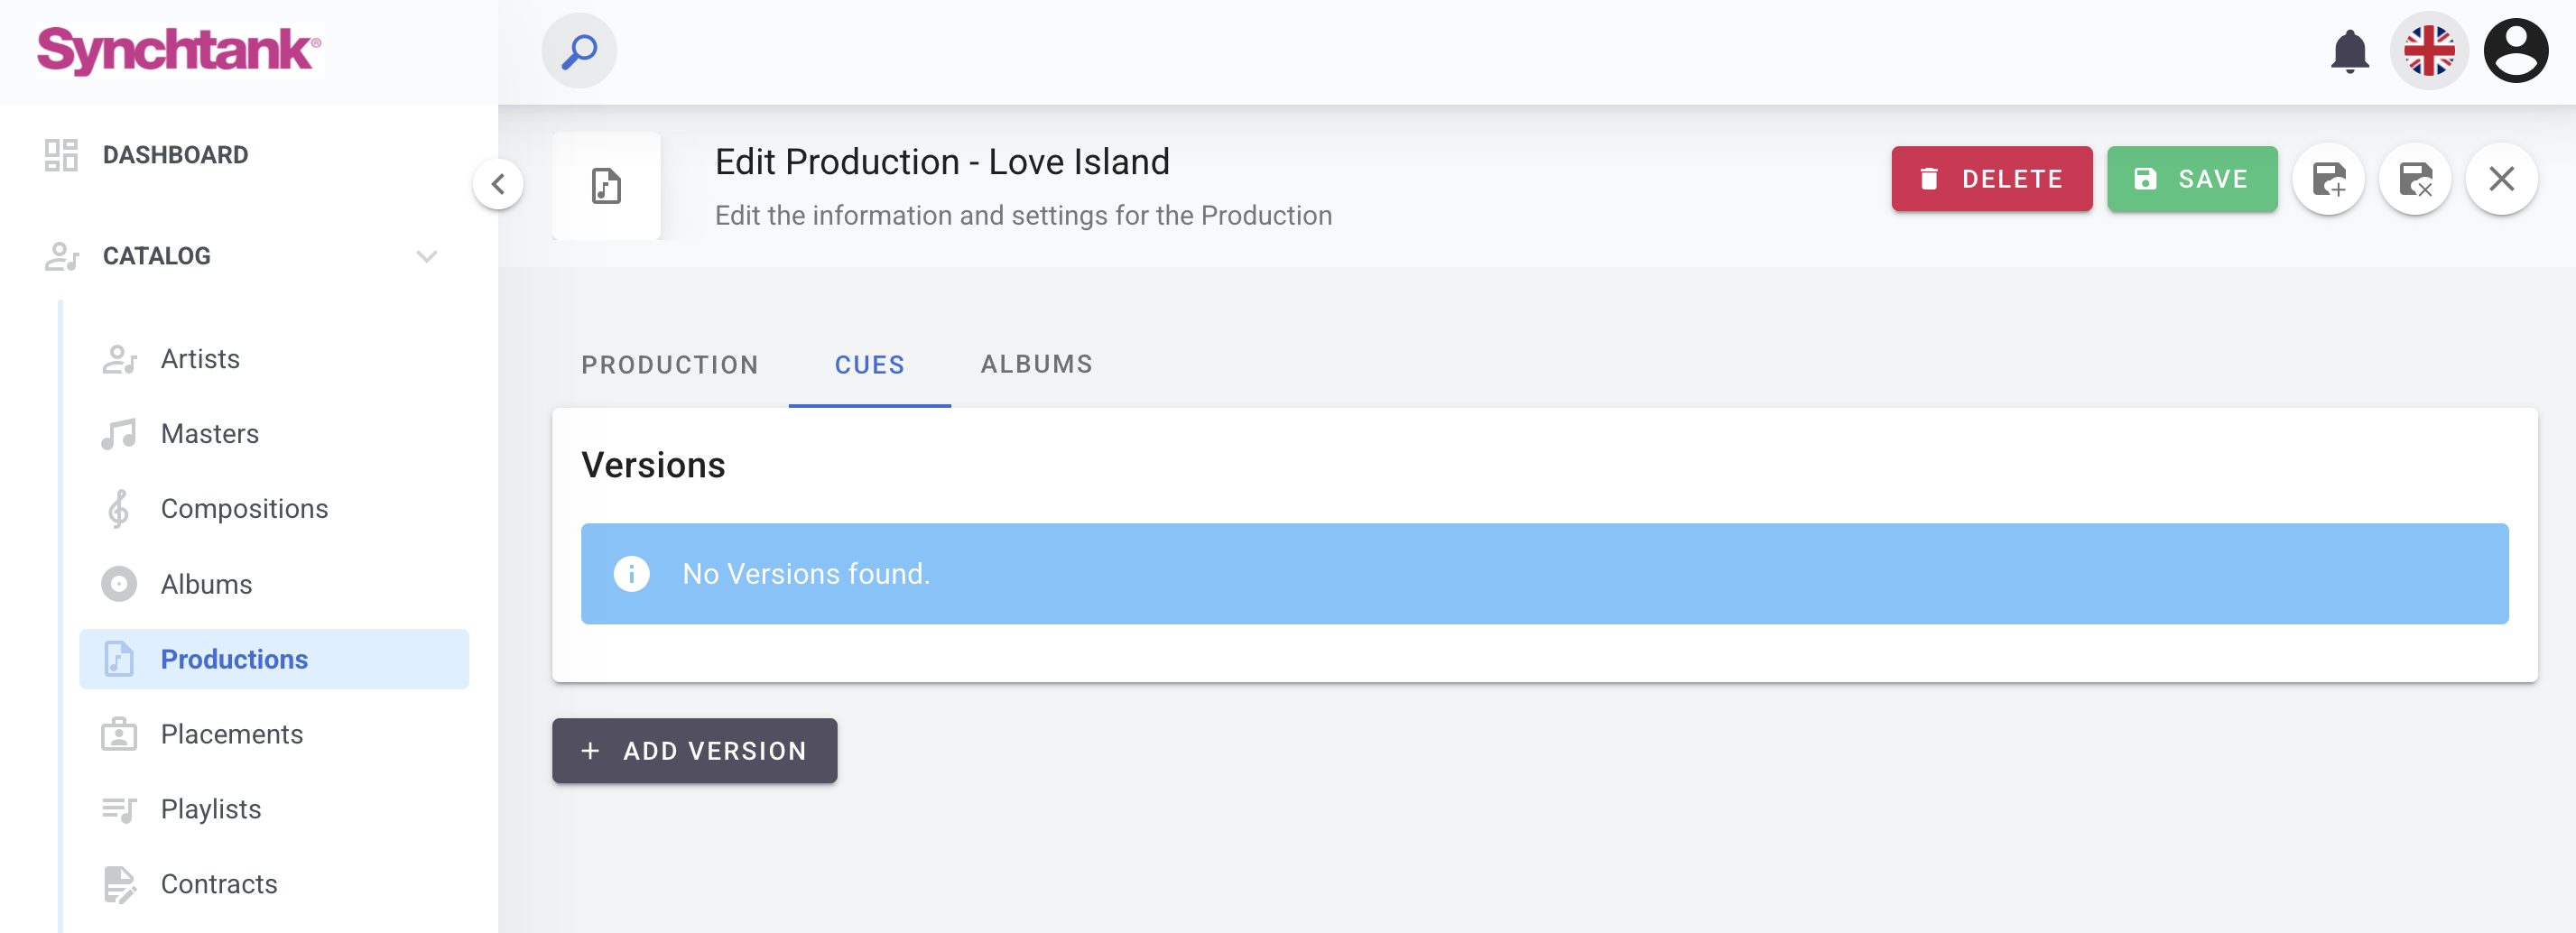
- In the Production page, move to the Cues tab.
- Add Version.
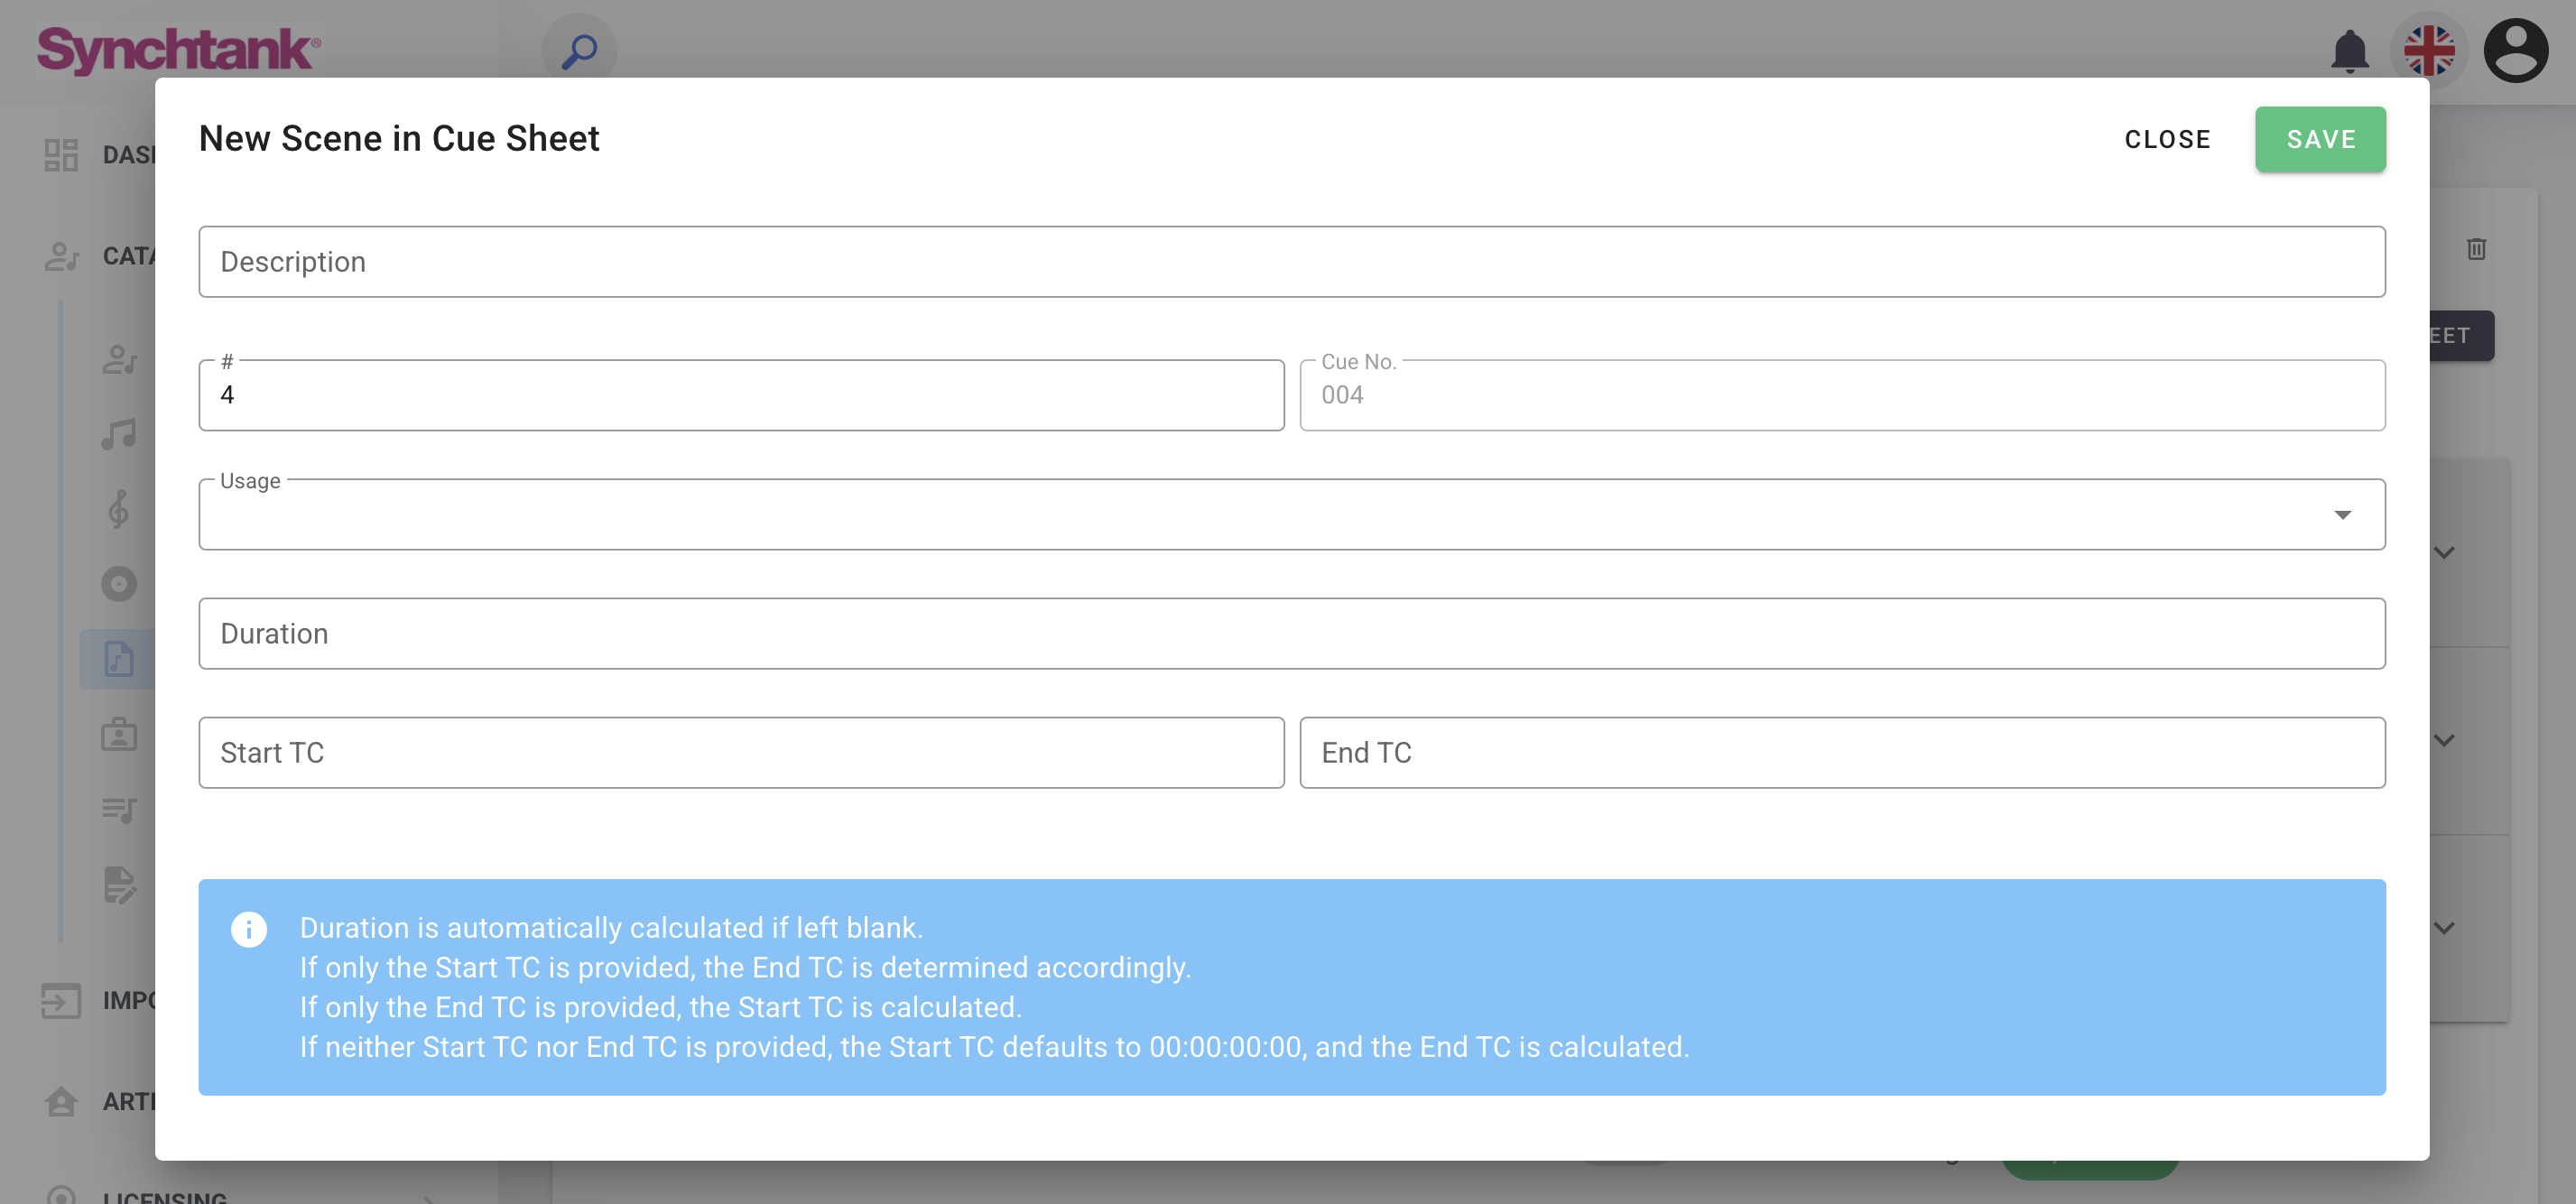
5. Add the Scene:
a. Add a Description (e.g., “Opening Titles”, “Scene 1”, “Intro Montage”).
b. Set Scene number if you use numbering.
c. (Optional) Add Start and End timecodes.
d. (Optional) Set the duration (or let the system calculate it when track timings are set).
6. Add tracks to the Cue:
a. Click Add track (or Add existing track) and search the Catalog for the track(s) you want.
b. Select the track and confirm it’s added to the cue.
c. Edit the track details if needed (e.g., mark as library/commercial, correct artist name, edit writers and publishers if metadata didn’t come through correctly).
7. Repeat steps 4–5 for each scene/queue. If you need multiple timings for the same track, create separate scenes for each timing.
8. Save the Cue Sheet.
Create a Cue Sheet from a Playlist (fast for front-end playlists)
- In the front-end, build the playlist with the tracks in the correct order (and save it).
- Back in the Production → Cue Sheets area, choose Create Cue Sheet → From Playlist (or select “Add from playlist”).
- Select the playlist you created — the system will show the playlist tracks so you can confirm.
- Import them: the selected playlist will create scenes/queues and add tracks automatically.
- Adjust scene durations, timings, and any track metadata as needed.
- Save the Cue Sheet.
Create a Cue Sheet from an EDL (best for precise timecode imports)
- Export/gather the EDL file from your editing system.
- In the Production → Cue Sheets area, choose Create Cue Sheet → From EDL (or similar).
- Upload the EDL file. The system will parse the EDL and:
- Create scenes/queues based on EDL entries,
- Add tracks referenced in the EDL, and
- Import durations and timecodes directly from the EDL.
- Review and fix any track name mismatches (EDL file names may not exactly match Catalog items).
- Save the Cue Sheet.
Editing track metadata inside a Cue Sheet
- You can edit artist, writers, publishers, usage type (library/commercial), and timing fields directly in the Cue Sheet entry for each track.
- If a track’s metadata is missing or incorrect, update it in the Cue Sheet and then (optionally) update the Catalog item if you want the changes to persist globally.
Best practices & tips
- Header fields matter — fill useful header info (production title, version, release year) if you want that printed on exports. You can hide unused header fields if they’re irrelevant.
- One timing per track/scene — if you need multiple independent timings for the same track, create separate scenes for each timing.
- Use Playlists for speed — if a front-end playlist already contains the correct tracks in order, create Cue Sheets from playlists to save time.
- Use EDL for accurate timecodes — EDL imports automatically bring timecodes and durations. Good for broadcast/film workflows.
- Metadata cleanup — always check composer/writer/publisher fields before export so cue-sheet reporting is accurate.
- Templates — create or select a Cue Sheet export template tailored to the recipient (e.g., publishers need composer/publisher columns; finance teams need duration and usage columns).
Download your Cue Sheet
Once you are happy with your Cue Sheet and ready to download, all you need to do is hit the download button, and select the format you would like to use.
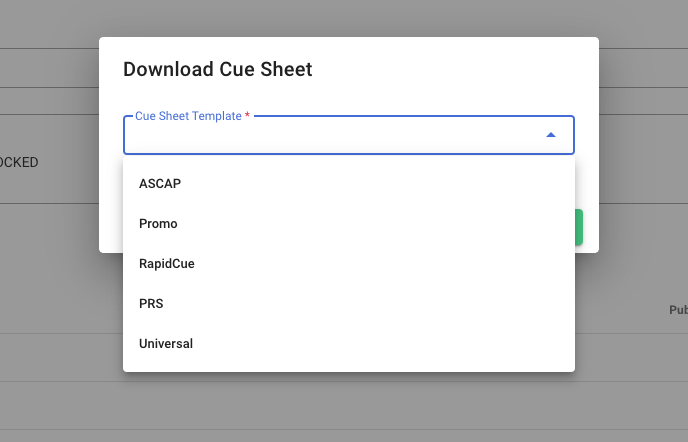
Exporting a Cue Sheet (to Excel / CSV)
- Open the Cue Sheet you want exported.
- Choose Download Cue Sheet.
- Select the template you need. Templates determine which columns appear (e.g., Queue number, Scene name, Track title, Composer, Writer, Publisher, Duration, Start/End, Producer/Production header fields).
- Download and open the exported file in Excel. It will contain the scene and track details you entered.
Productions
Within the Synchtank Admin you have the ability to manage and store your Productions information, your TV shows or Films for example. This module works nicely with your cue sheets and you can also feed this information to the front-end of your site to use as promotional purposes if you wish.
Navigating to Productions from the Catalog section, you will see a list of your Productions, from here we will create a new one but clicking on the green 'Create' button.
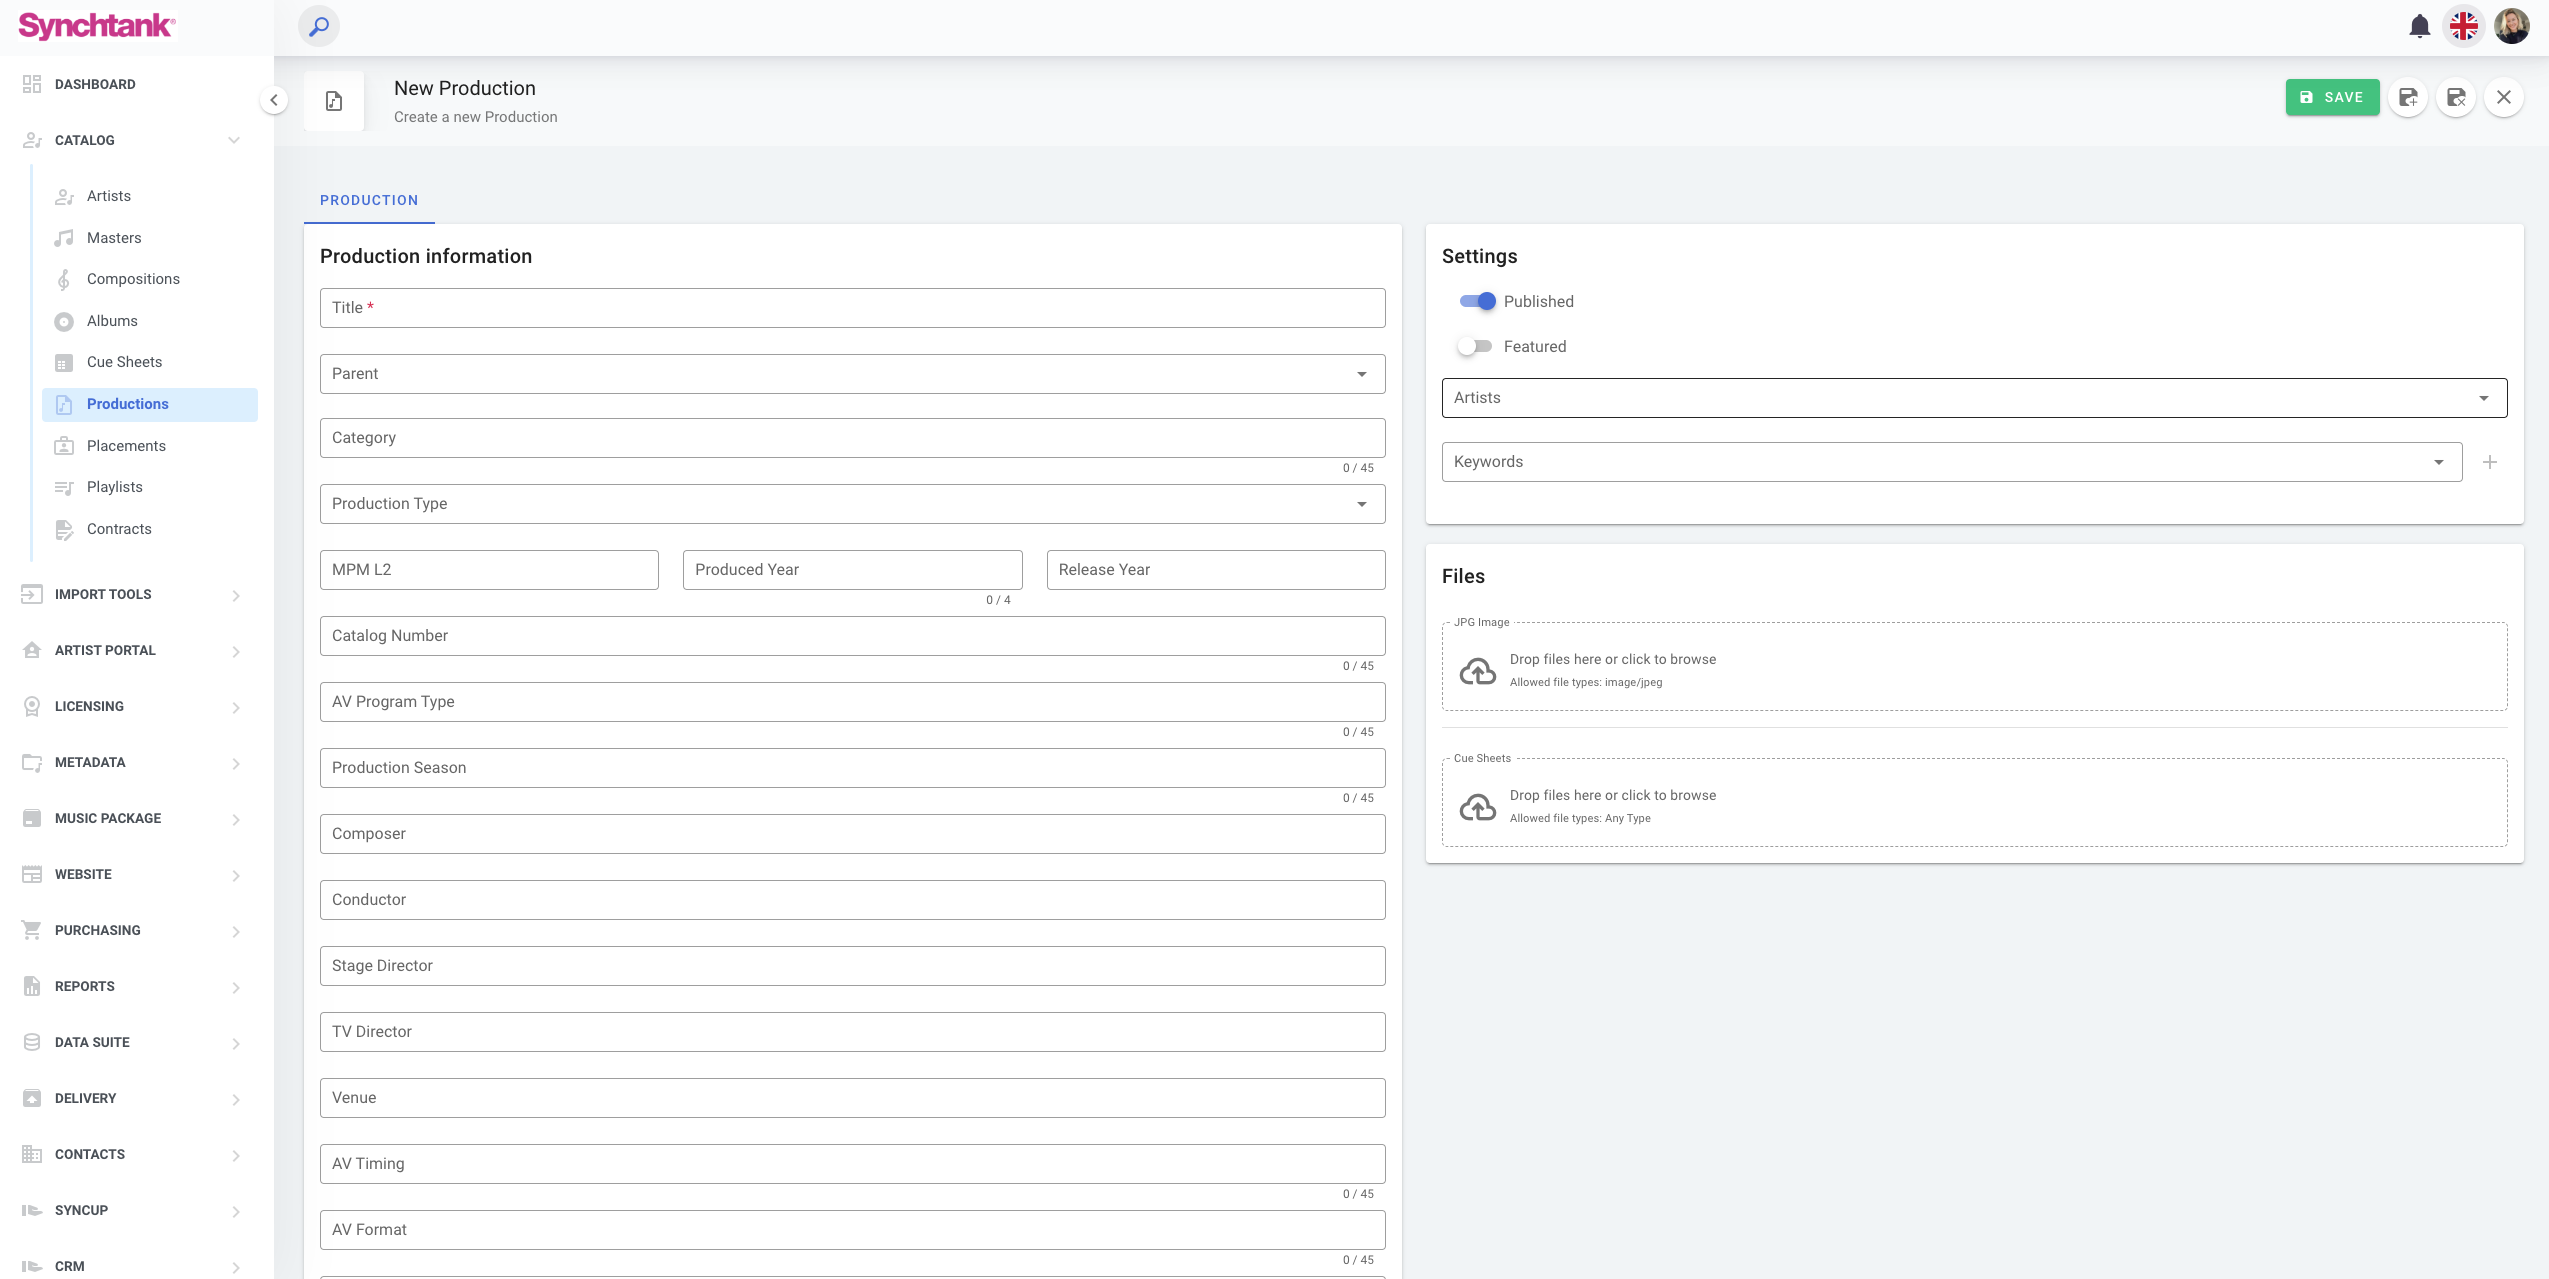
As you can see from the screenshot we have many fields available so you can capture as much detail of your production as possible.
Once you click save and are happy with your set up, you will see some tabs appear at the top:
- Cue Sheets - allowing you to link the right cue sheets to your productions (note you have to do this within the Cue Sheets module)
- Compositions - allowing you to link your compositions to the productions (note you have to do this within the Compositions module)
- Albums - allowing you to link your albums to the productions (note you have to do this within the Albums module)
- Contracts - allowing you to link your contracts to the productions (note you have to do this within the Contracts module)
- Masters - allowing you to link your masters to the productions (note you have to do this within the Masters module)
Placements
For our customers who wish to promote their syncs/spots we have a Placements module where you can add those to the front-end of your site and showcase them.
When you navigate to the Catalog section select the Placements options and you will see a list of all the placements you have added.
To create a new one, hit the green 'Create' button, you will then see a list of fields to give as much detail about your sync, such as the title, date, artist etc. Here you are also able to link it to the specific Master and Composition within your system.
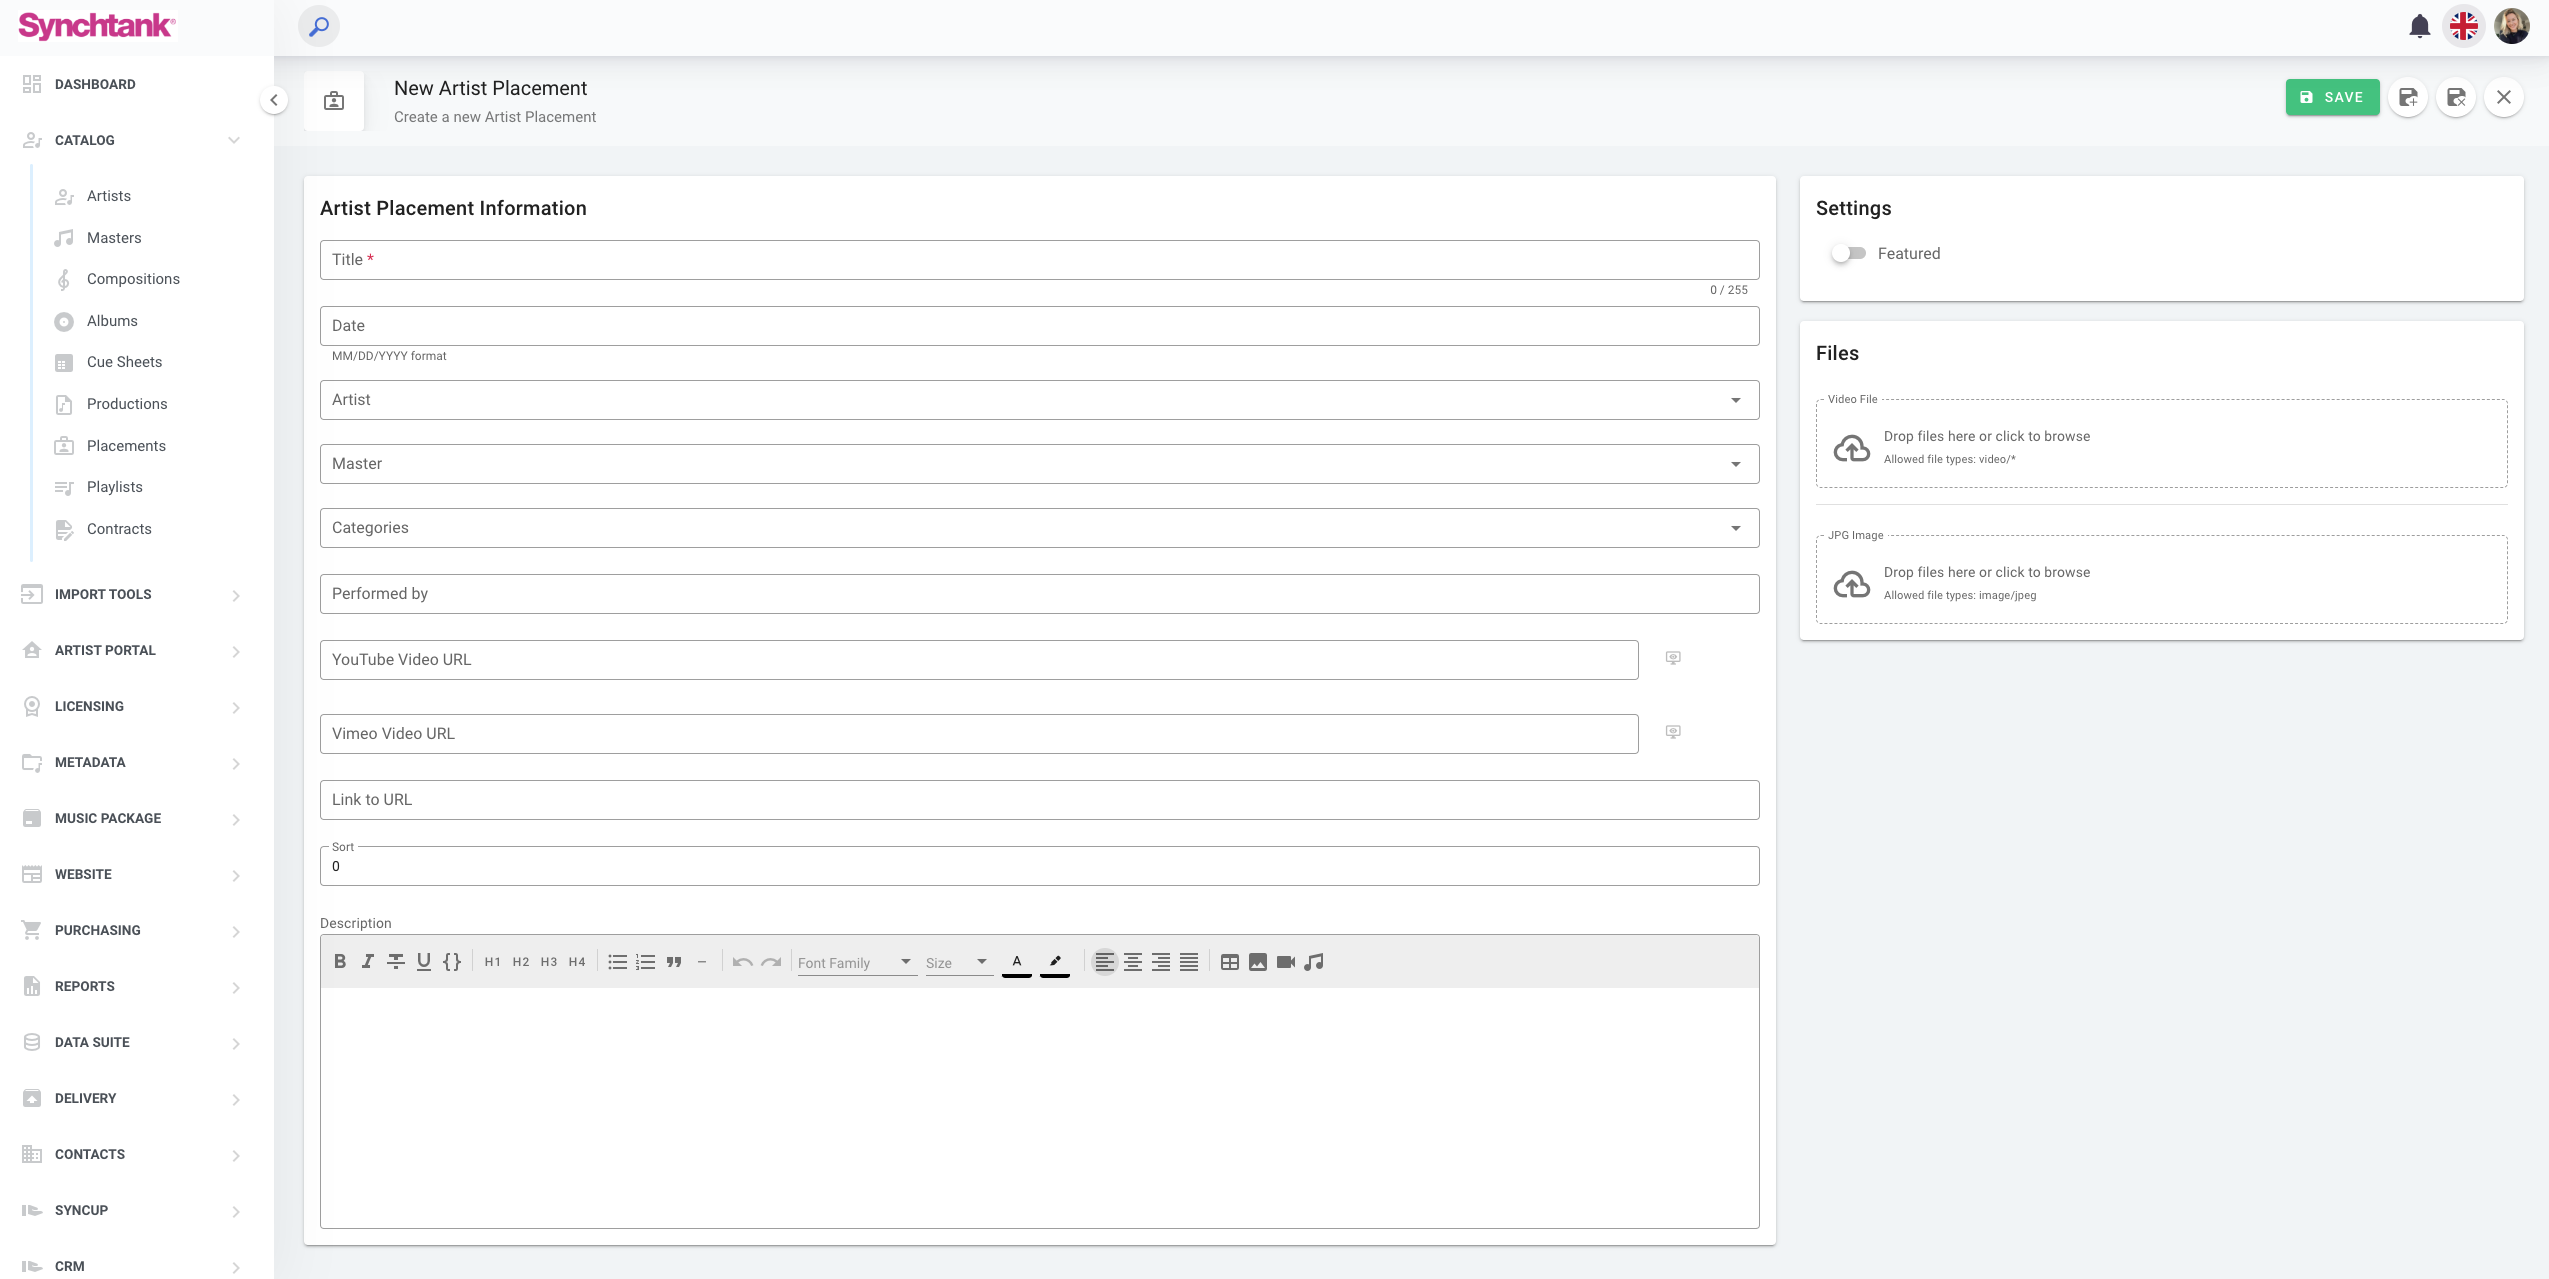
Another feature we have is adding in a YouTube or Vimeo link so your users can head straight to the spot and watch the sync be it TV show or Film trailer. If you don't have the link you can also upload the video and have people watch it directly in your system.
Within this section you can also assign categories for your Placements, to split them out by ads, film, TV or whichever categories you like. All you need to do is add this in the Metadata section - more on Metadata here.
Playlists
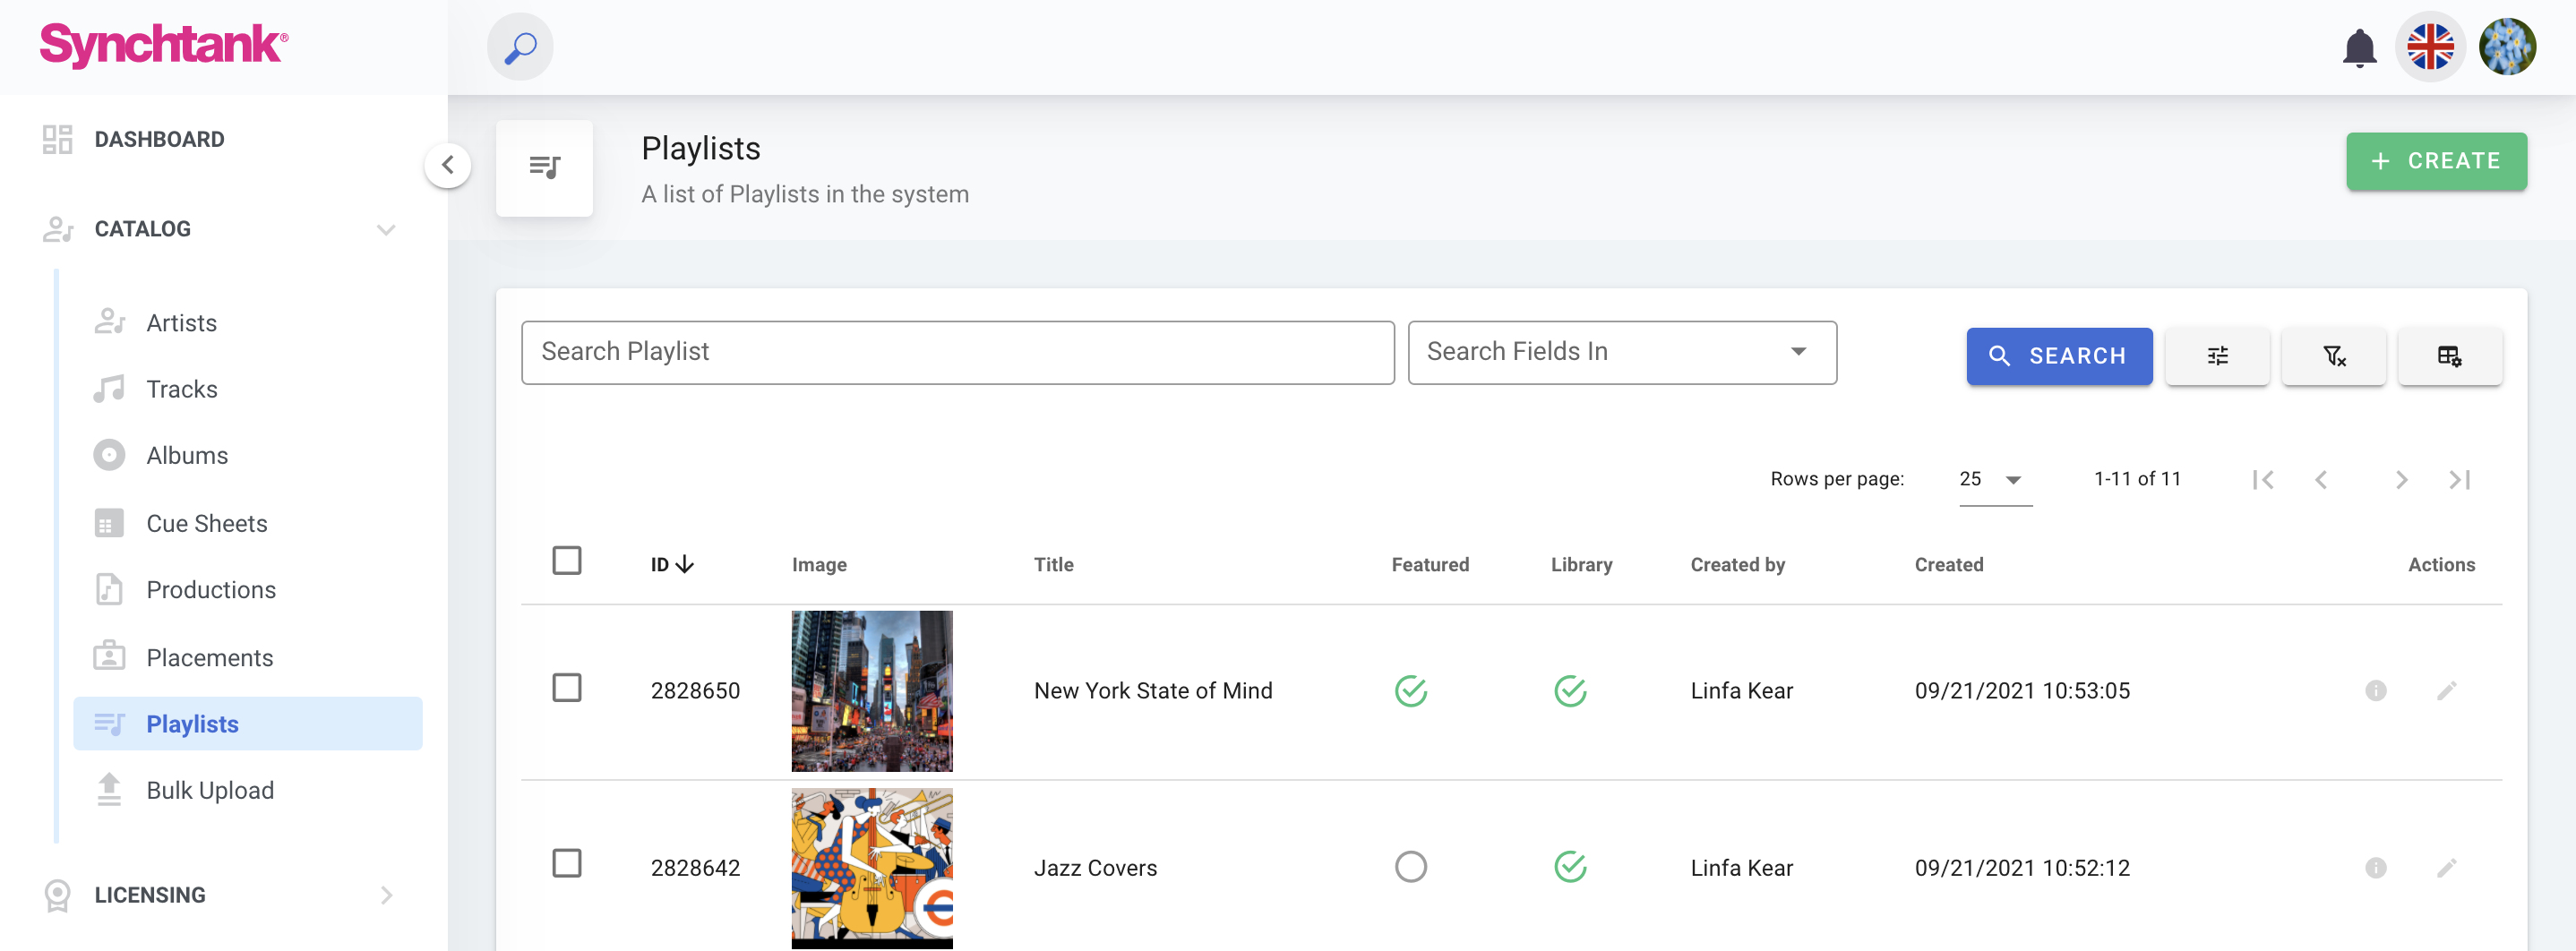
Using the new Synchtank Admin, you can easily view, create, and manage your playlists all from one place.
Viewing Your Playlists
Playlists can be found in the Catalog drop-down menu in the Navigation Sidebar. From the Playlists page, you can find all the playlists in your system and any data associated with them. You can also easily feature playlists from this page by pressing the green 'Featured' button.
Creating a New Playlist
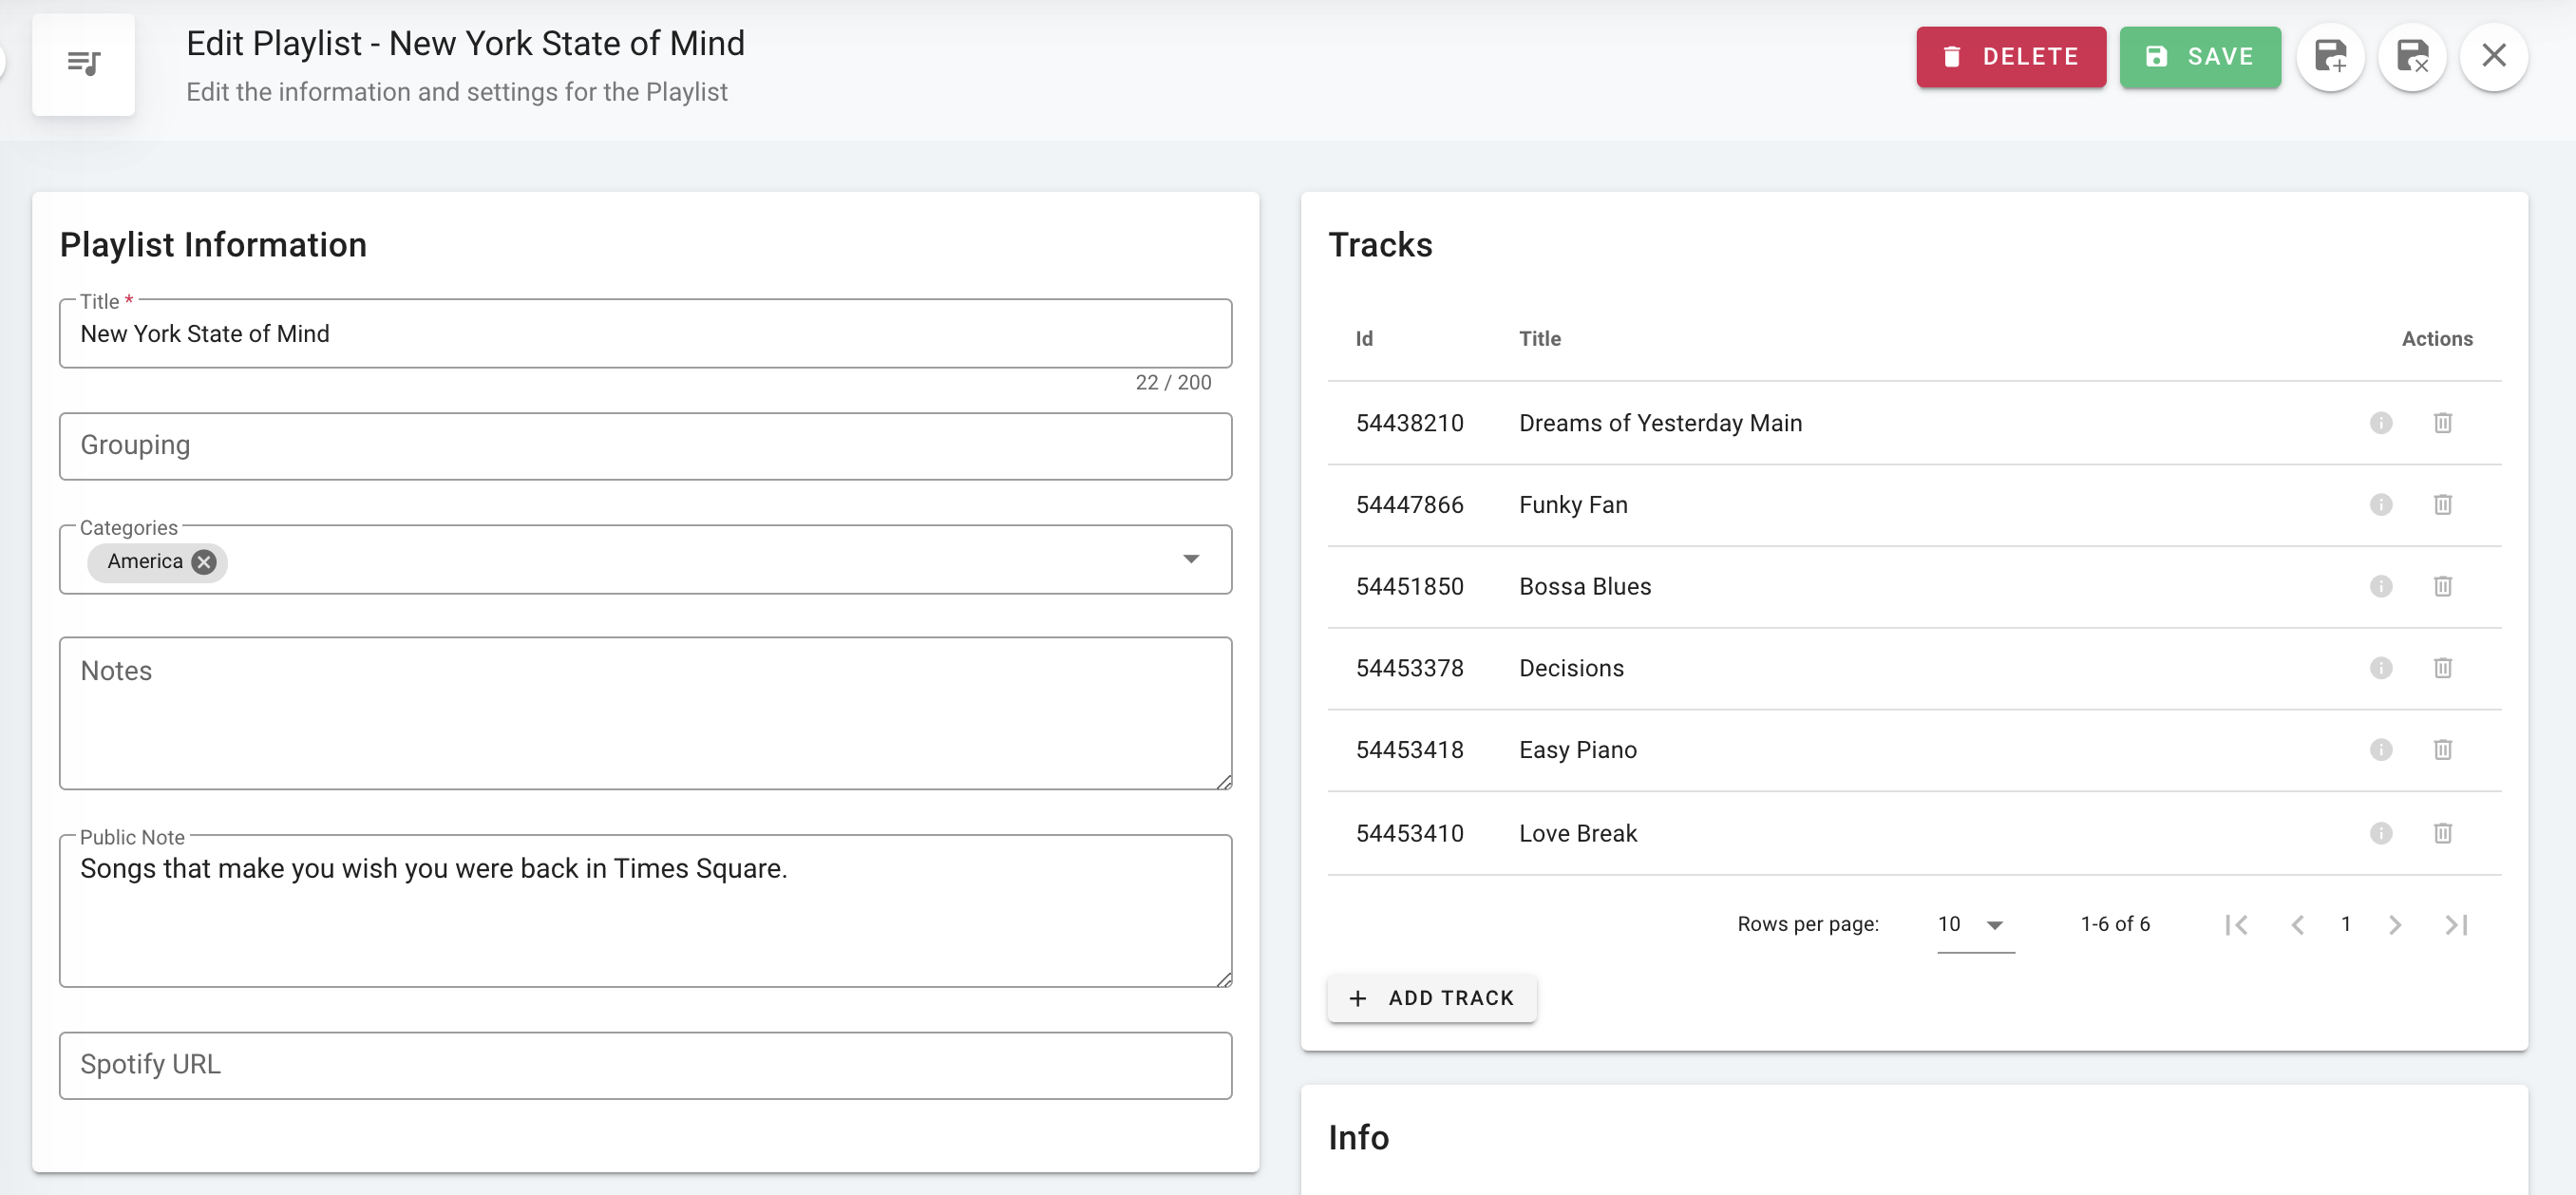
To create a new playlist, first press the 'Create' button in the top right hand side of the screen. You will be taken to the New Playlist page where you can enter a name for your playlists and other information such as notes, artwork, or external links to Spotify.
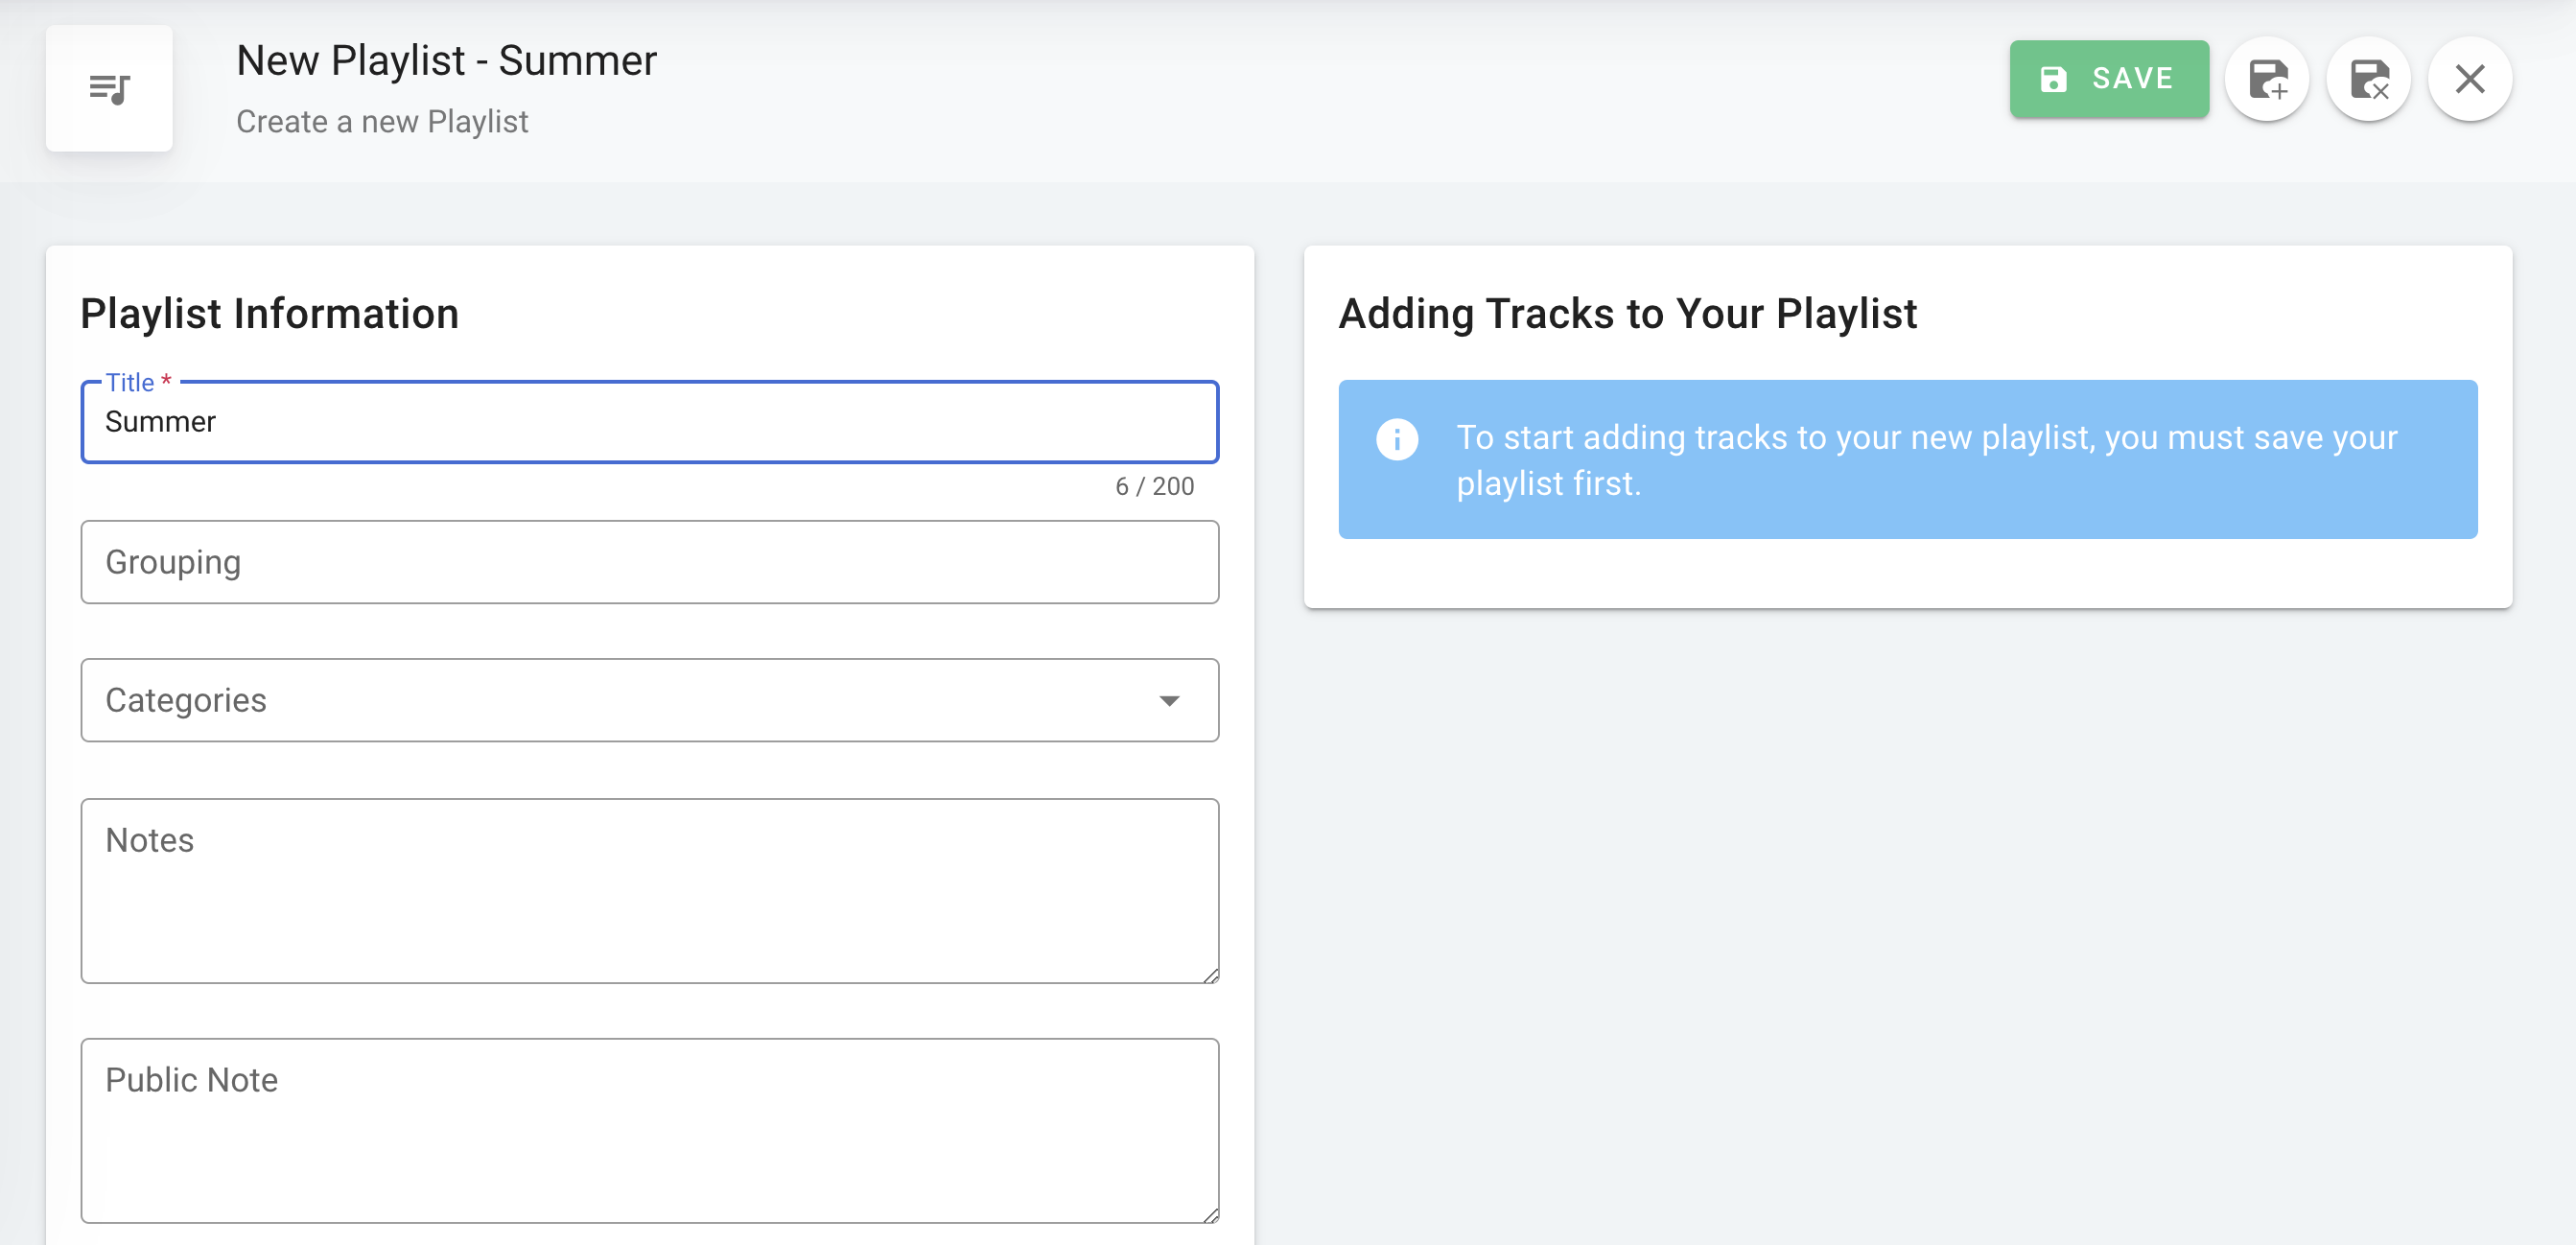
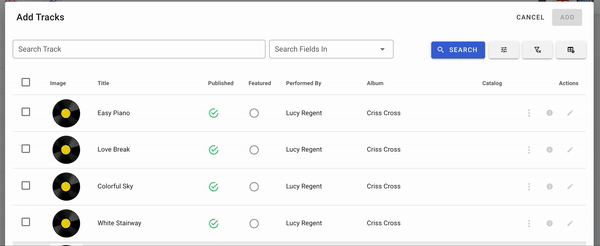
Once you've given your playlist a name, press the save button to be which will redirect you to the Edit Playlist Page, where you can easily search and add tracks from your system using the 'Add Track' Button.
Updating and Managing Existing Playlists
Using Synchtank Admin, you can also easily update and manage any existing playlists in your systems. To edit a playlist, choose the playlist you would like to edit and press the edit button. You will then be able to edit the tracks within the playlist, change the playlist title, and add the playlist to a category.