SyncUP is a sync licensing workflow tool that allows you to quickly create and manage your Sound Recording and Composition Quotes, Licenses and Invoices using automation and pre-defined templates.
All SyncUP activity starts with an Opportunity, which acts as the ‘container’ for Quotes, Licenses and Invoices.
Quotes and Licenses can be created quickly using data brought in from your assets. Licenses and Invoices can be copied from Quotes and PDFs are generated using templates.
If your system does not currently include SyncUP and you'd like to learn more about upgrading your system to include it, please email enquiries@synchtank.com or reach out to your Account Manager.
- Sync Opportunities
- Quotes and Licenses
- Adding a Sound Recording and/or a Composition
- Adding Term(s) and Option(s)
- Generating Quotes and Licenses
- Creating Licenses from Quotes
- Invoice
- Synchtank Admin Settings
- Definitions
Video
Here if a full end-to-end video of how to set up SyncUp and how the flow from pitch to invoice works.
Sync Opportunities
The Opportunity is the core of all licensing activity, with Pitches, Quotes, Licenses and Invoices all being the workflow that sits within it.
To create a new Opportunity:
- Click on Opportunities within the SyncUP menu
- Then press ‘Create’
- A new Opportunity will open with fields to capture the key data relating to the Opportunity.
- See definitions here
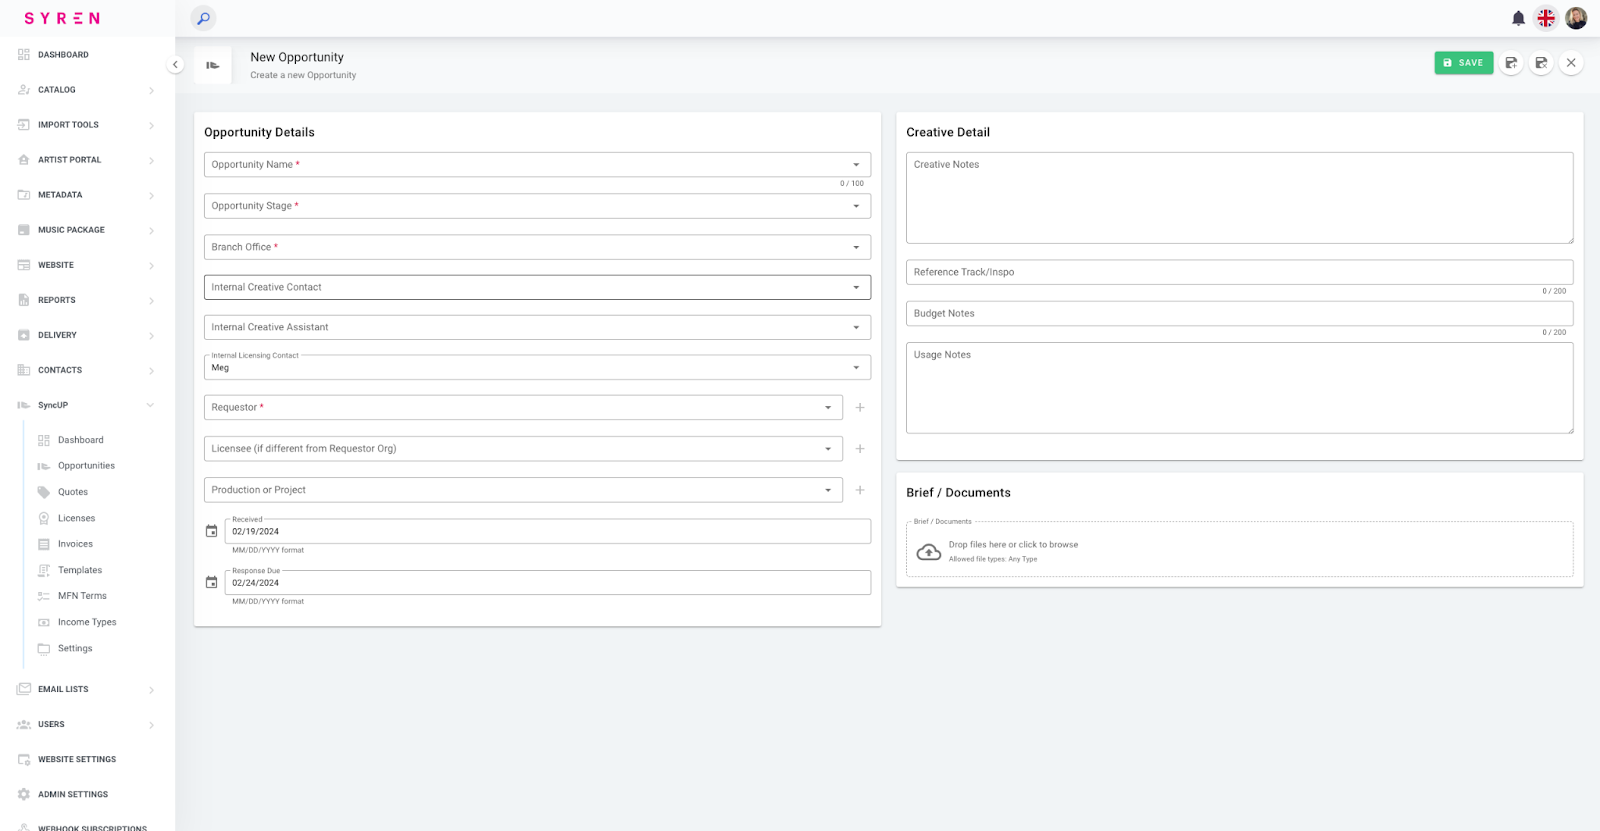
3. Once you have entered all your Opportunity details, hit ‘Save’.
- The details are saved and sections are now visible for Quotes, Licenses and Invoices (showing ‘Records not found’ as these have not yet been created).
- The standard workflow would be to create a Quote and copy a License from it, but Licenses can also be created directly.
Quotes and Licenses
The process and information required for creating Quotes and Licenses are the same and use the same data entry form. Once a Quote has been created, the same details can be copied to create a License based on that Quote. A License can also be created without having to create a Quote first.
The details that are entered on the following forms will be used in conjunction with the Templates to create Quotes and Licenses to send to your clients. See the Synchtank Admin Settings for setting up your templates.
To create a Quote or License:
- Press ‘+ Create New Quote’ or ‘+ Create New License’.
- The Edit Quote screen will appear with the Opportunity Summary details at the top. The first step is to add the Sound Recordings and/or Compositions.
- Note that if you control both sides and they are linked in your system, adding the Sound Recording will give you the automatic option to include the Composition details.
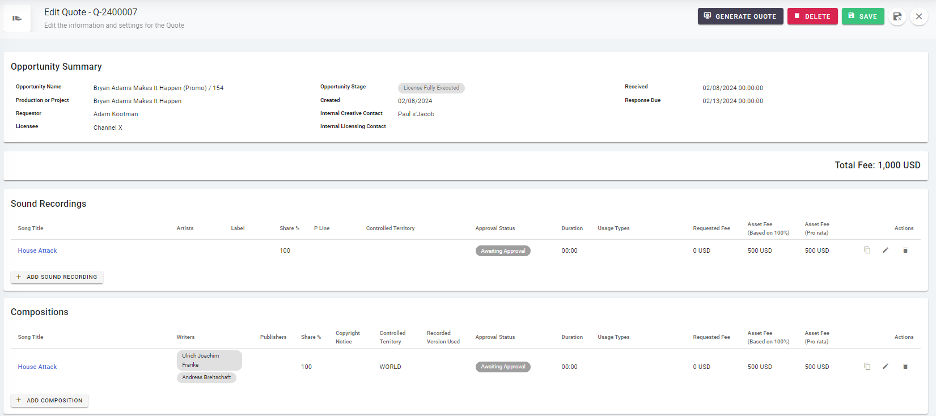
Adding a Sound Recording and/or a Composition
- Press ‘+ Add Sound Recording’ or ‘+ Add Composition’. A popup will appear where you can search for the Sound Recording or Composition you wish to add. Select the asset using the checkbox and press ‘Add’ in the top right. If you have added a Sound Recording, you will be given the option to add the related Composition.
- Once the asset details have been entered, select the pencil icon to add the Approval Status and Usage details for the asset. The basic details will be brought in from the asset.
- Note that in cases where the Share controlled is incorrect and can’t be corrected on the asset for any reason, the share can be overridden solely for the purposes of this Quote or License. Click the Share Override slider and enter the percentage of this asset to be licensed.
- The Approval Status and any details regarding that can be logged here. Then enter the Duration that the asset will be used and use the slider to specify whether Cutdowns will also be used.
- Select the Usage Type(s) and add a Description of Use if needed.
- On the last row, enter the Requested Fee and Asset Fee (Based on 100%). Note the Asset Fee (Pro rata) calculates automatically based on the Share % and the Asset Fee (Based on 100%).
- When all details have been entered, press ‘Save’.
- Once these details have been entered on a Sound Recording or a Composition and you also control the other side, the details can be copied from one to the other. Press the Copy icon.
- Note that if you have already entered details, you will be asked to confirm you wish to overwrite the current details.
Adding Further Quote/License Information
Once the asset details have been completed, scroll down to add the Effective Date of the Quote or License and the Date it was sent to the client.
You can also add the Licensor and Licensee. If they are already in your system they should appear with the typeahead and their addresses will be brought in. If they don’t already exist, you can add them with the + button.
On the right hand part of the page, add the Production information. Again, this can be created on the fly using the + button.
If your Quote or License is for an advertisement/commercial, you can open the Advertising Info section using the chevron to add the Brand, Product and Campaign.
If you wish to add MFN details, open the MFN section using the chevron and switch the MFN slider to On. If you have MFN Terms that you use regularly, you can select and add them here and add any details as required.
If you need to output your synchronization invoices to your royalty system, you can also specify the Income Type here, using the dropdown.
Adding Term(s) and Option(s)
- Finally, the actual Term(s) and Option(s) of the Quote or License need to be defined. Enter the Effective Date, Territory (using the include/exclude picker), Term (Unit and Type) or slide the Perpetuity slider to On if applicable.
- Then enter one or more Media types that will be applicable.
- If you wish to add another Term or an Option, press the ‘+ Add Term’ or ‘+ Add Option’ button.
- You can also copy a Term or Option by pressing the ‘Copy’ button then ‘Paste’ to a new Term.
- Once all details have been entered, scroll back up to the top and click ‘Save’.
If your Quote or License has variations in Territory, Term or Media, you can add those as separate Terms, and if you are offering your client the option to extend the Term, Territory or Media, you can also add one or more options.
Generating Quotes and Licenses
- Click ‘Generate Quote’ or ‘Generate License’ and select the Template you wish to use. A preview of the Quote or License will appear in the popup. You can make further changes to the details as required. If you are happy with the preview, press ‘Generate’ to create a PDF. The system will ask if you want to automatically update the Opportunity Stage – select Yes or No as needed.
- If you need to further modify the details, the preview can also be copied (Ctrl-A, Ctrl-C) and pasted into an email or text editor for further modification.
- If the PDF is generated, there will be a new button marked ‘Download’ which can be used to download the PDF to send to a client.
Creating Licenses from Quotes
If you have created a Quote and it has been accepted by the client, you can create a License based on the same details. Return to the Quotes section of the Opportunity and press ‘Create License from Quote’. A License form will open with the same details as the Quote; they can be amended and saved separately without affecting the original Quote.
Invoices
Once you have created your License for sending to the client, you can create an Invoice to go with the License. Return to the License section of the Opportunity and press ‘Create Invoice from License’ and select the Invoice Template you wish to use. You also add the Income Type and Country of Sale and if the Invoice has a Commission element. These details will be included in reports that can be output to your royalty system.
Once you have entered the details, hit ‘Create’. An Invoice row will be created in the Invoices section of the Opportunity. Note the Invoice ID ties back to the License ID. Using the icons on the right hand side, you can download the PDF of the invoice, view the details, or amend the Income Type or Country of Sale.
You can also log payments against the Invoices.
- Click the More icon (three dots) and select Payment Status and Payments.
- Select the status of the Invoice payment.
- If you select Paid or Partially Paid, you can also enter the Amount, the Date of Payment, the Payment Method, Payment Reference and Payor (party that paid the Invoice). Again, these details will appear on reports for your royalty system.
Synchtank Admin Settings
This section describes the changes made to the Admin area of your Synchtank system to set up basic SyncUP functionality.
Navigation Bar: Your Synchtank navigation bar will include a new section called SyncUP.
Setting up reference data: To get started, you’ll first need to set up some of the system values, settings, and templates which can be customized to your own needs.
Default Licensor: Here is where you can define the default licensor that will be used when creating Quotes and Invoices.
Within the SyncUP navigation menu, press ‘Settings’. In the Default Values box, start typing the name of the Organization you want to use as your default licensor. If the Organization already exists in your system, it will appear in the dropdown. If the Organization does not exist, press the ‘+’ button to create a new Organization. Once the Organization has been added, press Save in the top right corner of the screen.
Income Types: If you wish to track invoice payments using a specific set of income types for ingestion into a royalty system, the Income Types can be entered here. The Income Types are included in the SyncUP reports that can be ingested into your royalty system.
Within the SyncUP navigation menu, press ‘Income Types’. Click on ‘Create’ in the top right, enter your income type in the ‘Income Type Information’ box and click on ‘Save’, ‘Save and Create’ (if you want to enter another Income Type) or ‘Save and Close’ if you have finished entering.
MFN Types: Many sync licenses include a Most Favored Nations (MFN) clause, whereby Quotes will be matched with other quotes that may be being used in the same production, for example. As many of the MFN types are commonly used, you can define them for use as a dropdown list when defining your Quotes and Licenses.
Within the SyncUP navigation menu, click ‘MFN Terms’. Click on ‘Create’ in the top right, enter your MFN Type in the ‘MFN Term Information’ box and click on ‘Save’, ‘Save and Create’ (if you want to enter another MFN Term) or ‘Save and Close’ if you have finished entering.
Setting up Templates: You can create Templates using pre-defined text and images that will bring in the asset data variables to quickly create Quotes, Licenses and Invoices to send to your clients. Separate Templates can be set up to cater for different types of Quote, License or Invoice so you can have different Templates per License type, Branch Office or Licensee, for example. Once a Template has been set up, it can be used to create consistent yet flexible documents without having to re-key information.
Setting up a Template: Within the SyncUP navigation menu, click ‘Templates’. Click on ‘Create’ in the top right corner. In the Title box, give your Template a name – you will use this name later to find the right Template, so use a name that will help describe what the Template does, e.g. ‘Basic Film Quote (Sound Recording & Composition)’ or ‘Full TV License (Composition Only)’.
Each Template can only be used for a Quote, a License or an Invoice, so add the Template Type and some further details in the Description box if needed.
If you have multiple Branches or many Licensees and want to have specific templates for those (e.g. you have specific wording for Netflix licenses), select the Branch or Licensee you want this template to be available for (under ‘Settings’).
Don’t forget to make the Template ‘Active’ under Settings. If for any reason you wish to stop making a Template available, you can always set the ‘Active’ slider off.
Once the basic set-up is complete, you can add the Template text and images that will be used when generating the documents. If you already have standard wording, you can cut and paste it in the Main Template Body text box or just type it in if it’s not readily available. You can format the text and positioning using the formatting header at the top of the box.
The power of using the Template is the ability to enter the Quote and License variables into the Template, which will automatically bring in the data into the generated document. Where you want to use a variable, use the dropdown titled ‘Template Values’ in the header. For example, if you want to enter the Production Title, you would scroll down the dropdown and click on ‘Production Title’, which would enter the field as: {document.productionTitle}.
So for example you could enter this in the Template:
- Production Title: {document.productionTitle}
And the result when generating the document would be:
- Production Title: Saturday Night Live
Template Blocks: You can add specific Quote/License info into blocks, particularly when those fields are likely to repeat within the form data, e.g. Songs or Terms. Add and edit the relevant text and data fields in the Composition, Sound Recording, Term or Option Blocks in the same way as in the Main Template Body. That block can be referenced in the Main Template Block by selecting Composition Blocks, Sound Recording Blocks, Term Blocks or Option Blocks as needed in the Main Template Block.
Once you have finished editing your Template, press ‘Save’ in the top right corner.
Template Page Settings: You can include a header and/or a footer to your template, allowing the same image or text to appear at the top or bottom of each page of your generated document.
Navigate to the ‘Page Settings’ section. If you want to add an image (company logo, etc) drag and drop a file into the Header Image box or click on it to select a file from your computer. Once the file has been uploaded, you can select whether you would like it on the left, center or right of your page (Header Image Alignment) and how big you want it to be (Header Image Width).
You can also enter text in the Header Text box and adjust the alignment (Header Text Alignment) and font size (Header Font Size).
If you want to disable the Header, set the slider to off.
The same principles apply to the Footer section, with the addition of the slider to set page numbers on or off.
You can also make further adjustments to how the text appears on the page using the Page Format and Margin Settings in the Paper Size and Margin sections on the right hand side of the form.
Don’t forget to Save when you have finished editing your Template.
You are now ready to start creating your Opportunities, Quotes and Licenses!
Definitions:
- Opportunity Name: This is the name and basic description of the Opportunity that you are working on, such as the TV show, Film or advertisement.
- Opportunity Stage: This is the stage at which the Opportunity currently sits. Creating Quotes and Invoices will automatically update the status as needed.
- Branch Office: If you have multiple offices or branches within your company, you can specify which branch is handling this Opportunity.
- Internal Creative Contact: The member of the creative team that is handling this Opportunity. If the person you want to add doesn’t exist, add from the Contacts menu.
- Internal Creative Assistant: The member of the creative team that is assisting the main Internal Creative Contact for this Opportunity. Select from the dropdown.
- Requestor: The person making the request. If the person is not already in the system, press the + button to add a new Requestor.
- Licensee: The company to which the Quotes and Licenses will be granted. Hit + to add a new one if it doesn’t already exist in the system.
- Production or Project: The name of the TV programme, Film, etc. Press + to add if it doesn’t already exist.
- Received: The date the request was received.
- Response Due: The date by which you need to respond. Defaults to 5 days from the Request Date.
- Creative Notes: Add any notes that will be helpful in reviewing the request.
- Reference Track/Inspo: If the client has provided the name of a track or artist that they would like something similar to, add that here.
- Budget Notes: If the client has provided an idea of their budget for the project or the track(s) requested, add it here.
- Usage Notes: Other notes that may be helpful in describing how the music will be used.
- Brief/Documents: If the client has provided a brief or any other documentation, it can be uploaded or drag and dropped here. Once a file has been added, you can define whether it is an initial request, approval or cue sheet.