
Within you Website section in the Synchtank Admin you are able to edit the pages that aren't linked to your music catalog.
You can create news articles if you have a news page on your site, set up your slides if your home page has that (if you would like slides switch on please speak to your Account Manager), and also manage the order of your pages within Item Groups such as your Featured Playlists page.
This article walks you through everything you need to know within this section.
News
The News section allows admins to create news articles that appear on the website outside of the music catalog. These articles can be shown on the News page or optionally on the Homepage (if enabled).
Path: Admin → Website → News
When you open the News area, you land on a dashboard-style view that shows all existing news items in the system.
From this page, admins can:
- View the list of all news articles
- See key info at a glance (title, dates, visibility status)
- Open an existing news item to edit it
- Delete news items that are no longer needed
- Create a new news item
This page acts as the central place to manage all website news content.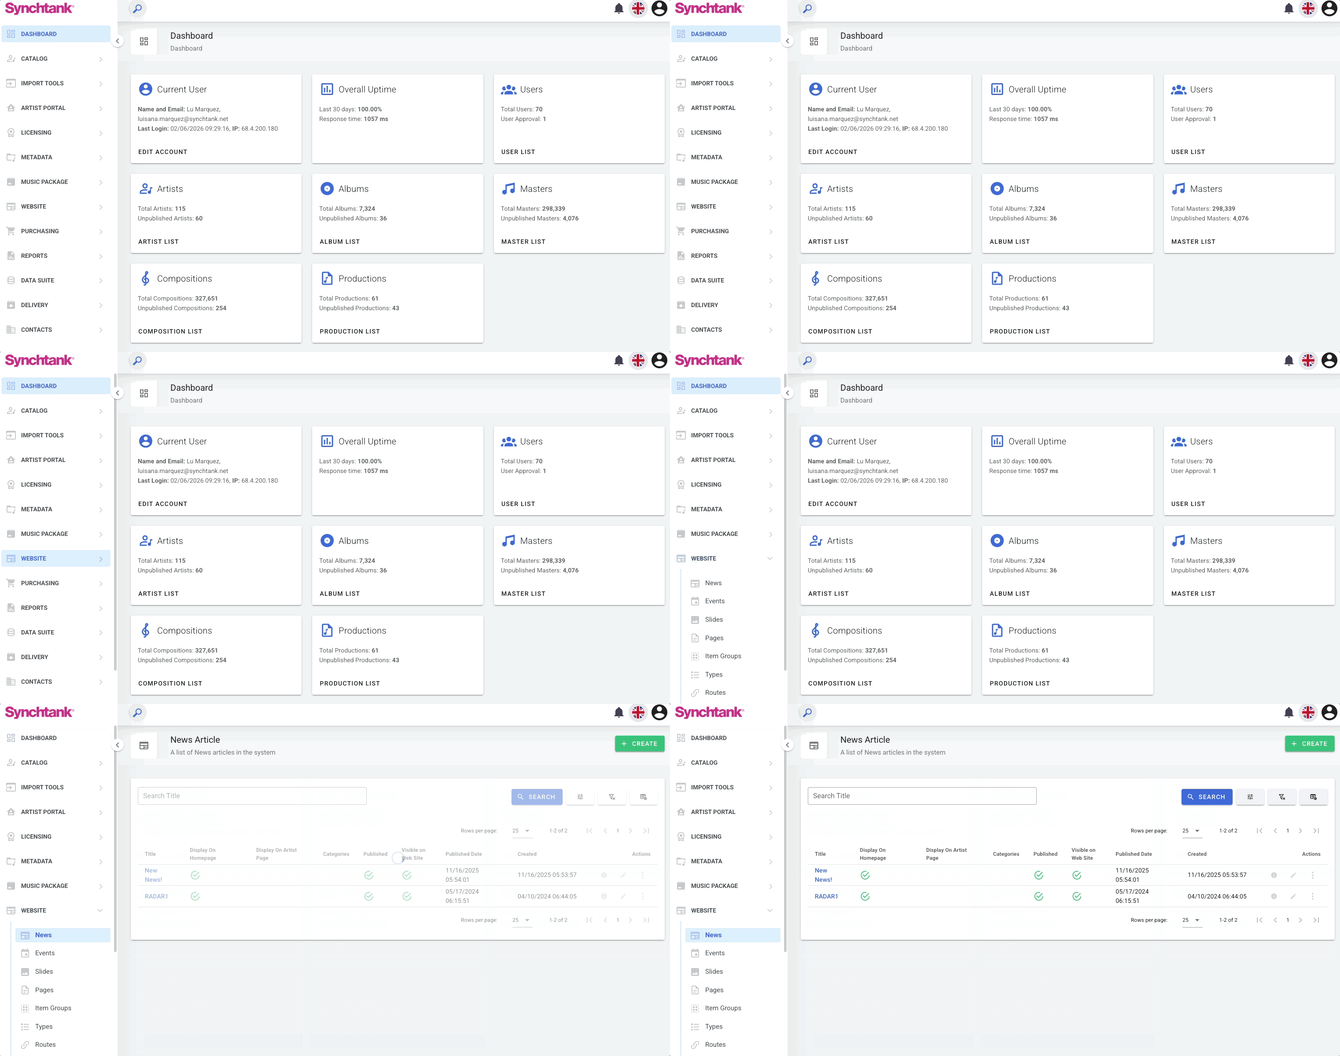
How to create a News item:
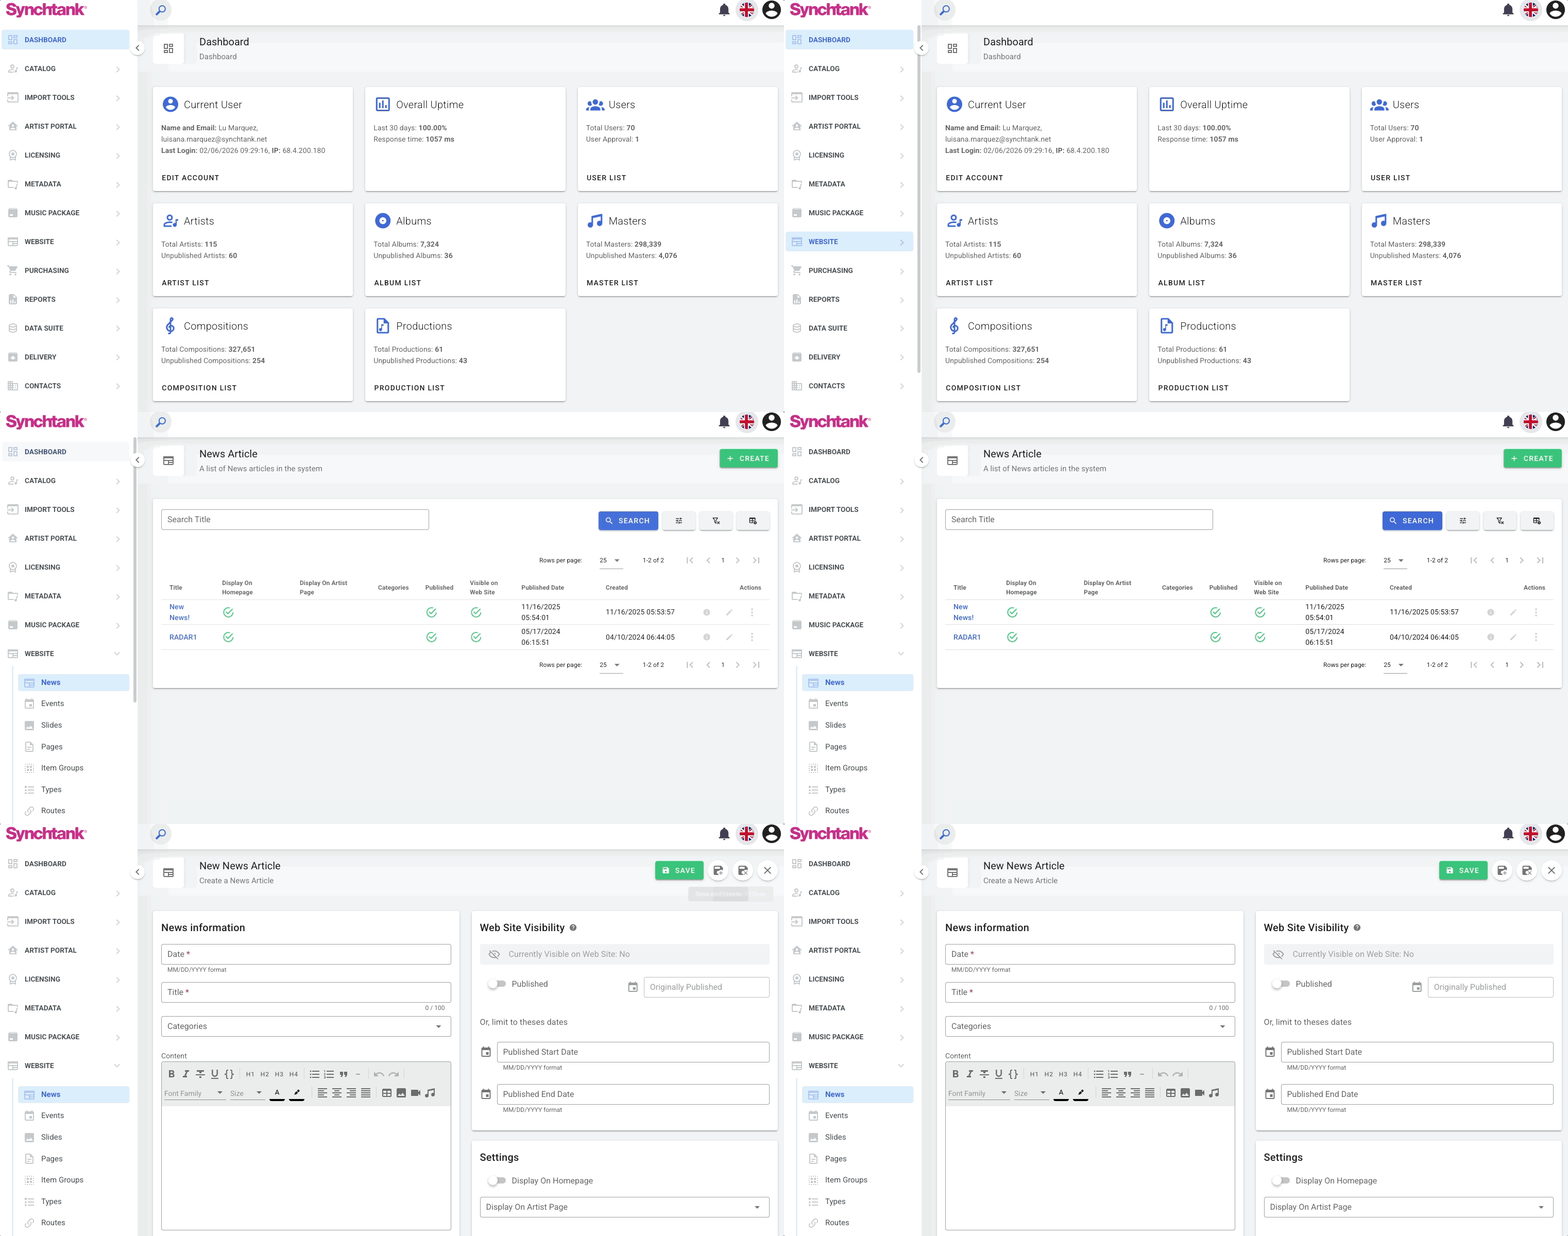
Firstly navigate to the Admin part of your Synchtank System then to Website on the left hand side, where a drop down will appear with News. Once you're within the news section, select the green 'Create' button which will open the template for a new page.
Here you will see some fields and options:
-
Date: Required date picker used for ordering and display of your news article.
-
Title: Required free-text field used as the news headline.
- Categories: If you have categories linked to your news, then you can select the appropriate option here.
-
Content: Rich text editor for the main article body (supports formatting and HTML).
To the right of the creation page you will see 'Website Visibility':
-
Published Toggle: Control whether the news is visible to users.
-
Originally Published: Date shown as the official publish date.
-
Limit to These Dates: Optional start and end dates that restrict when the news is visible.
-
Settings - Display on Homepage: Controls whether the news appears in the homepage news section (slider/preview). If disabled, the news is still visible on the News page (if website visibility is on).
- Files: Upload images (JPG, PNG) or documents (PDF) to use in the article.
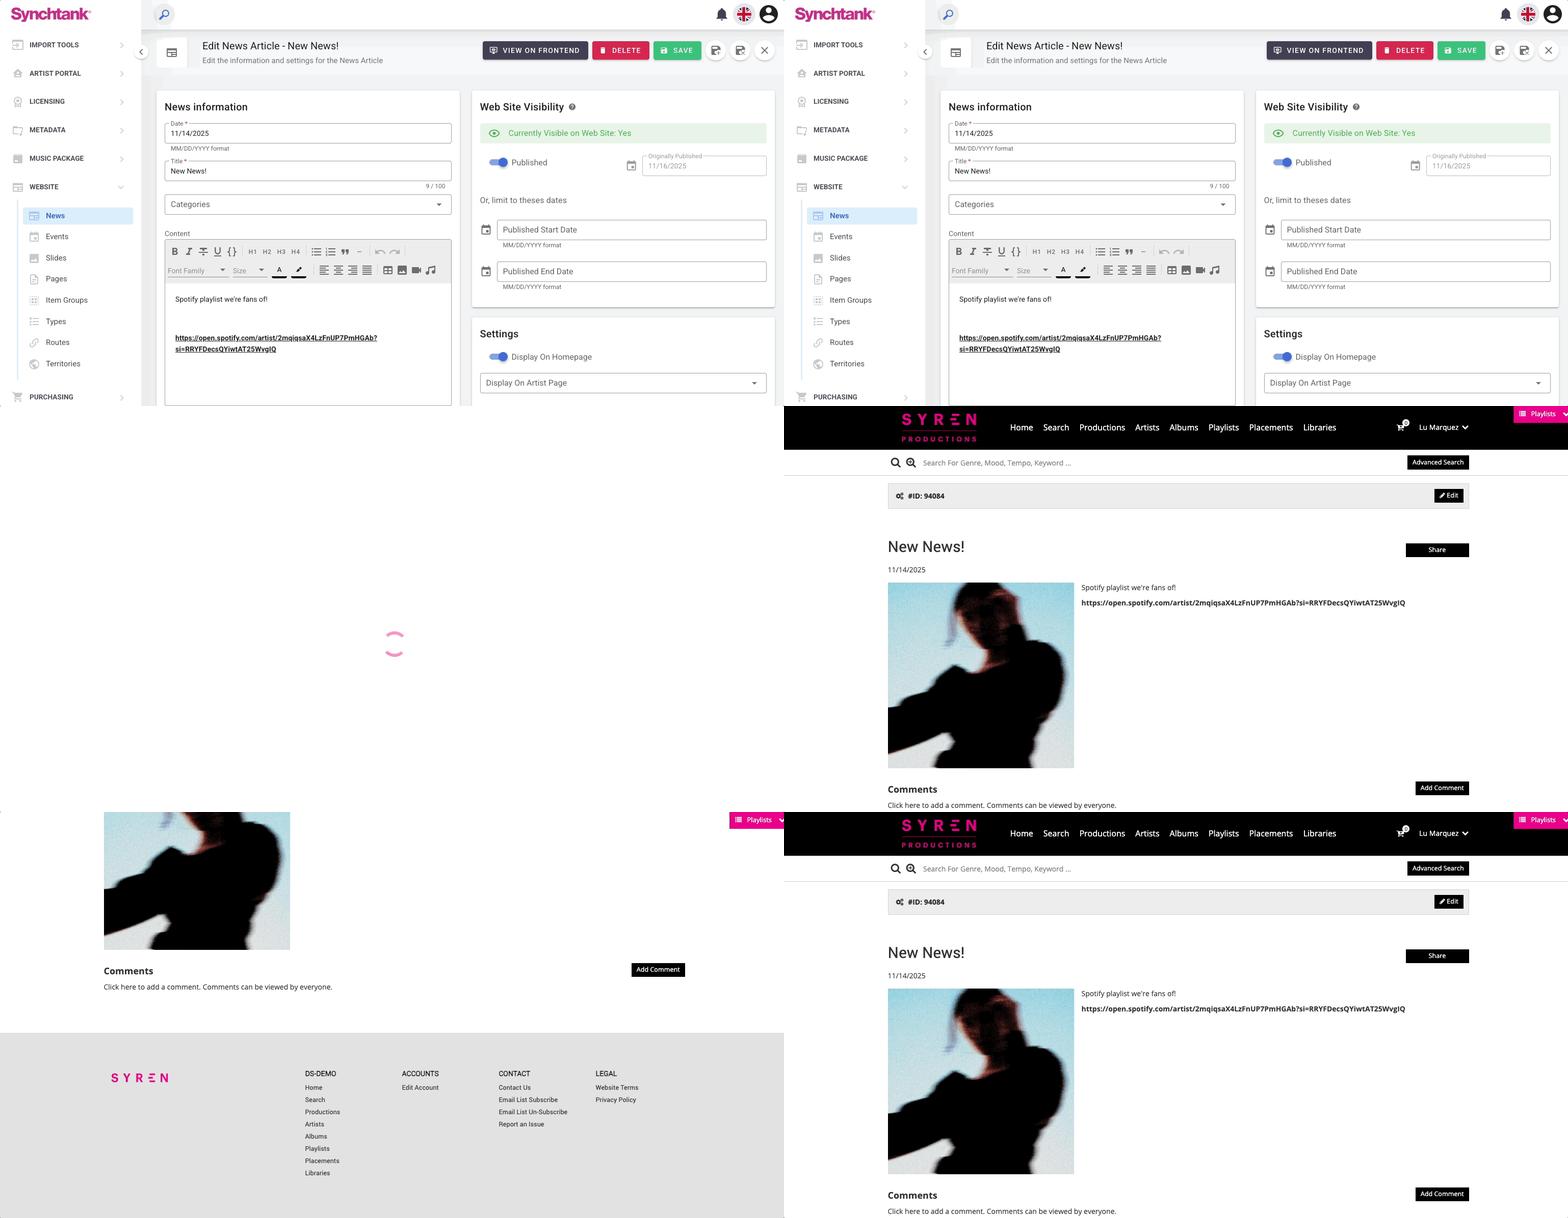
Once you have created or started your draft of a new article a preview button will become available for you to see how your article will look. Each News will have its own URL.
Events
The Events page allows you to create event pages that appear on the website outside of the music catalog. You are able to:
- Generate your own standalone page
- Can be shown on the Events page
- Can optionally appear on the Homepage (if featured)
- Can optionally appear on an Artist page
Path: Admin → Website → Events
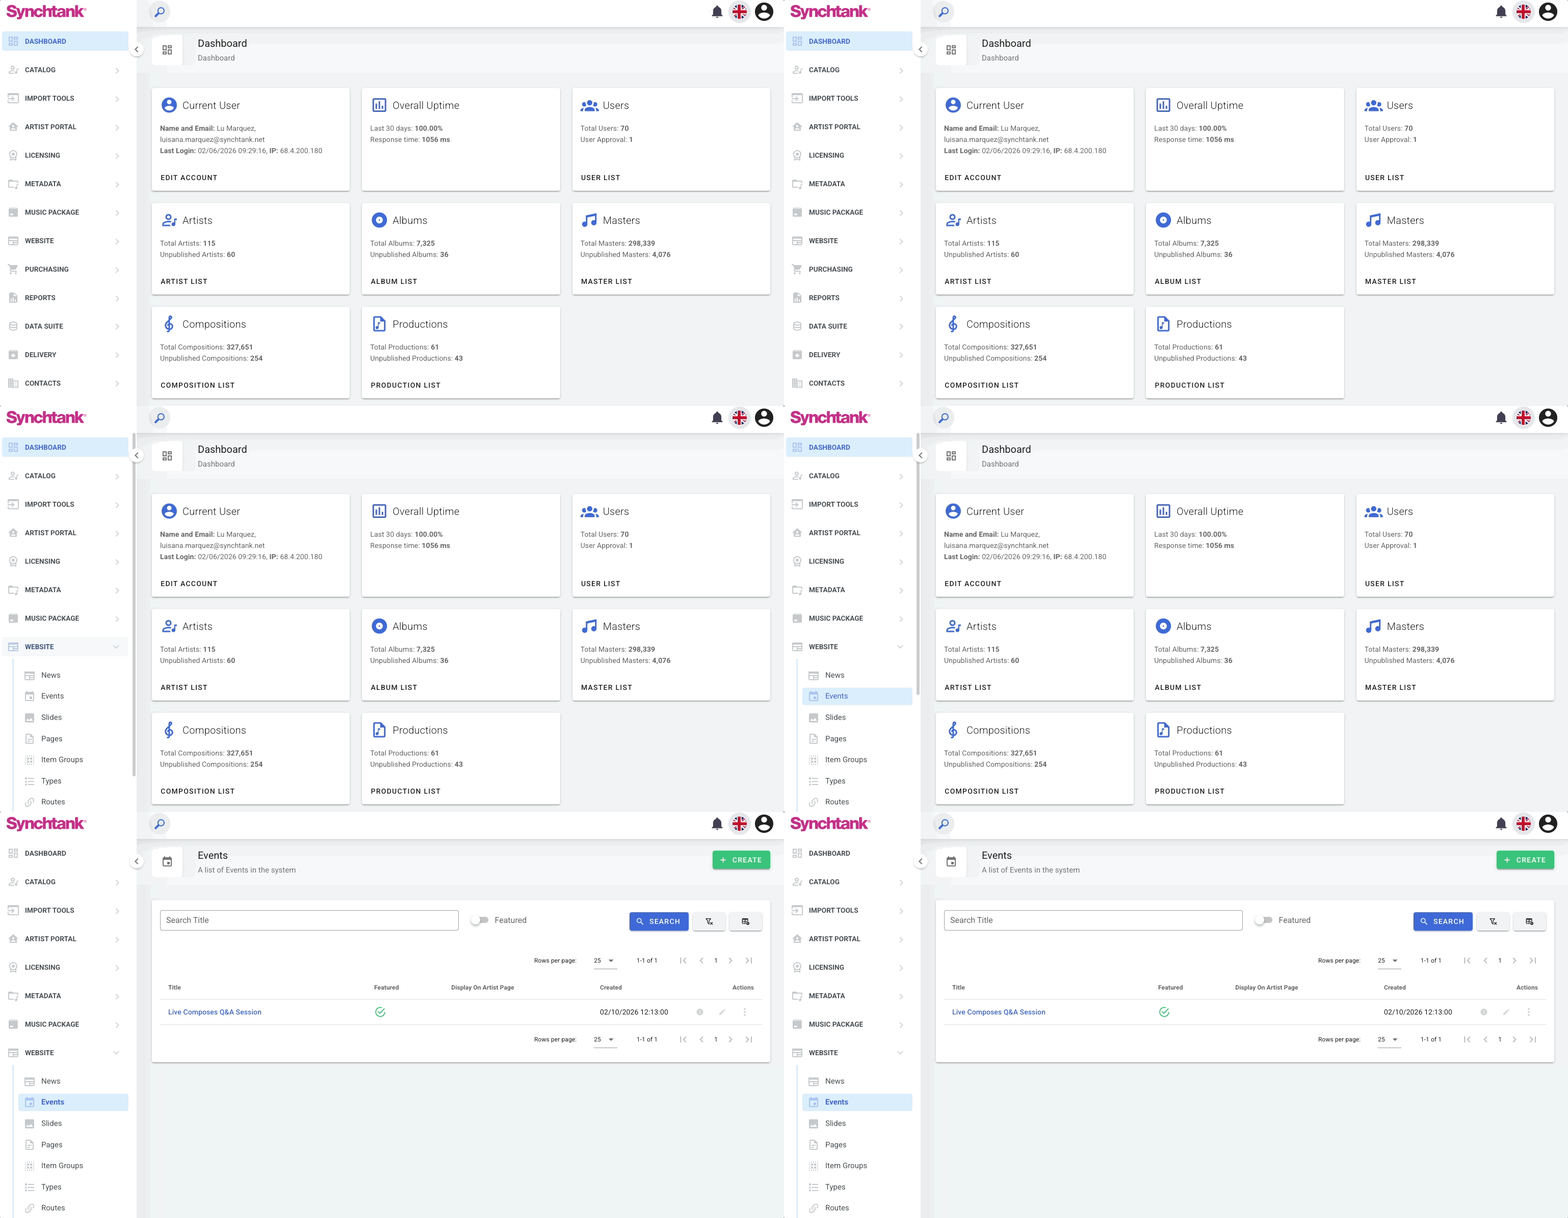
In the admin, navigate to the Website section and select Events, you will land on a dashboard-style view that shows all existing events in the system.
From this page, you are able to:
- View the list of all events
- See key info at a glance (title, date, featured status)
- Open an existing event to edit it
- Delete events that are no longer needed
- Create a new event
This page acts as the central place to manage all website event content.
How to create an Event
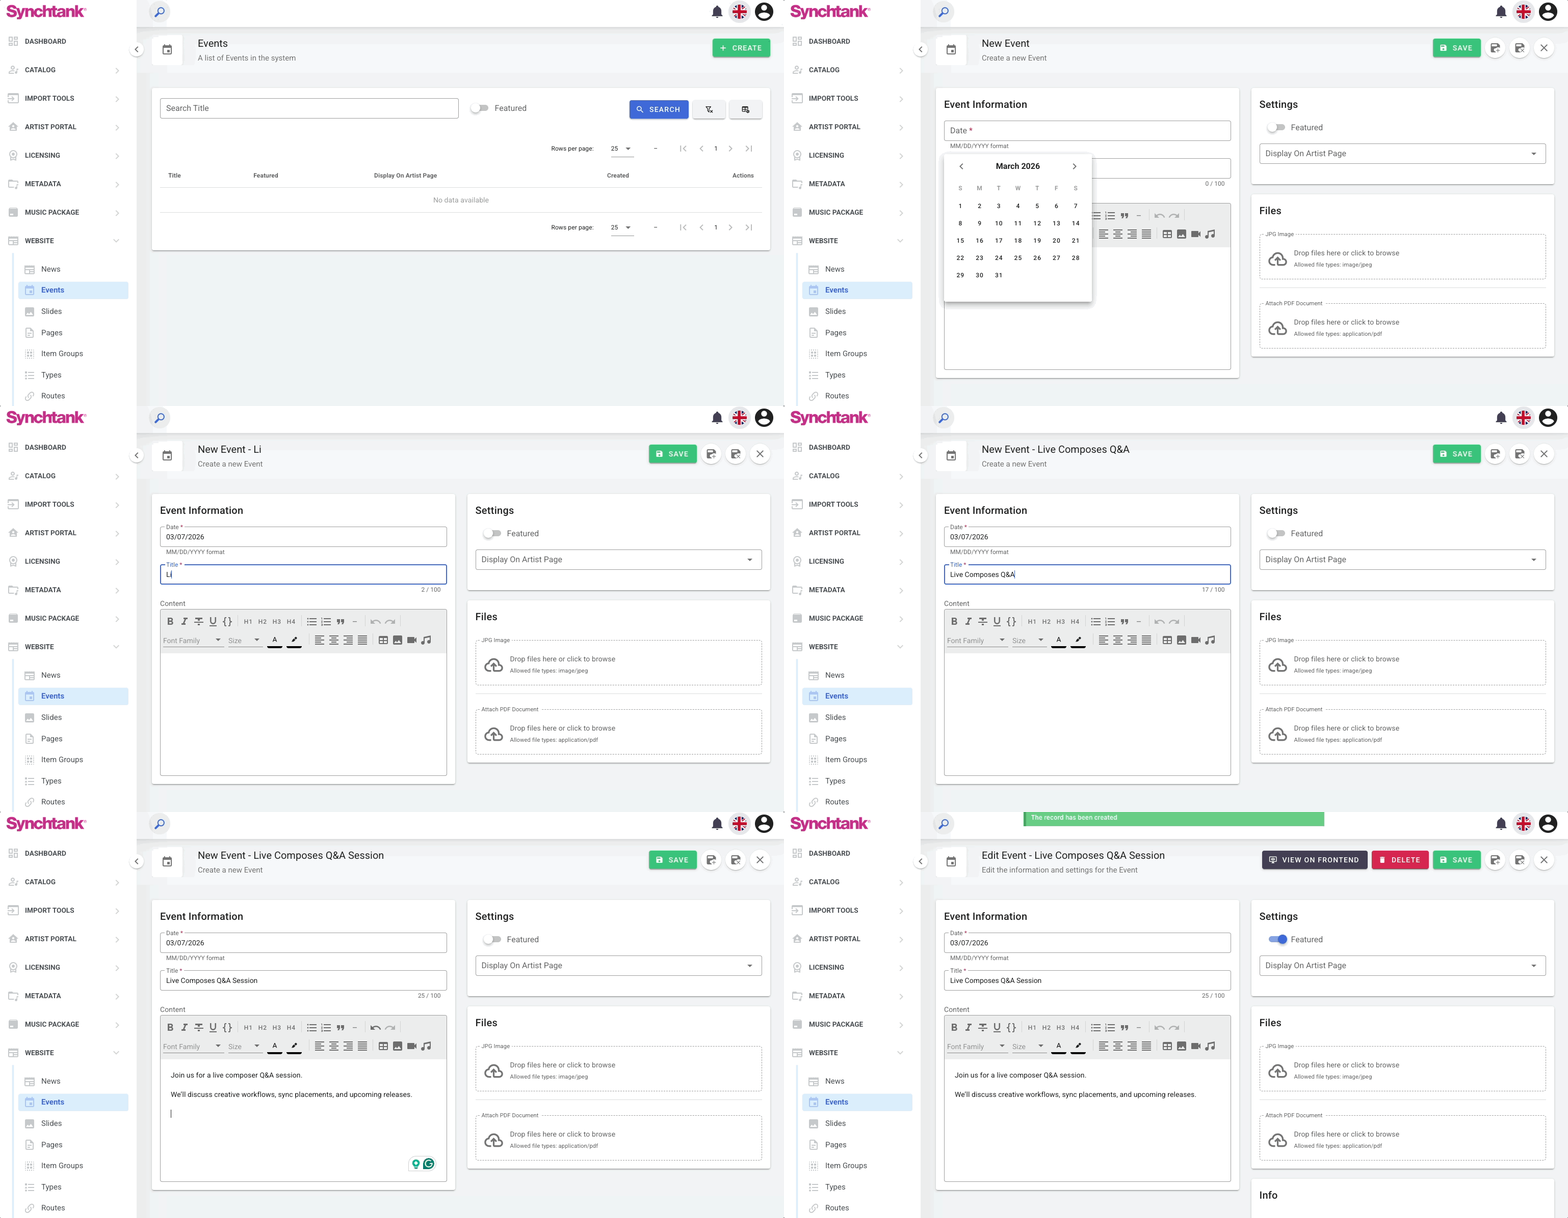
Once you're in the Event sections, select the green 'Create' button in the top right. This will open up the Event creation page, here you will have a few fields and options that you can fill out:
-
Date:Required date picker for the event.
-
Title: Required free-text field used as the event headline.
-
Content: Rich text editor for event details (formatting available, no source/HTML view).
-
Settings:
- Featured: Toggle that controls whether the event appears on the homepage.
- Display on Artist Page: Searchable dropdown that controls whether the event appears on a specific artist’s page.
- Files: Upload images (JPG, PNG) or documents (PDF) to use in the article.
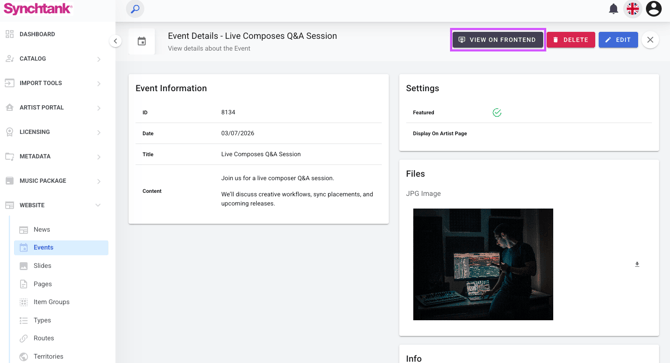
Once you have created your Event a Preview button is available, this allows you to see how the event will appear on the website before publishing. Please note, the event does not need to be visible on the site to be previewed.
Each Event generates its own standalone page with a unique URL.
Slides
Path: Admin → Website → Slides
The Slides section allows you to manage slider content that is displayed on your front-end website.
The slider functionality is configured during the website implementation process. If the feature is enabled for a specific site, slides can be created and managed directly from the Admin area. If the slider is not part of the site configuration, it will not appear on the frontend. The overall layout and placement of the slider are determined by the website design configuration.
If your site does not currently display a slider, please contact your Account Manager or Support team for assistance.
Once enabled, you are able to:
- Create multiple slides
- Upload images or videos
- Edit captions/content
- Set redirect URLs
- Control display location
- Define slide order
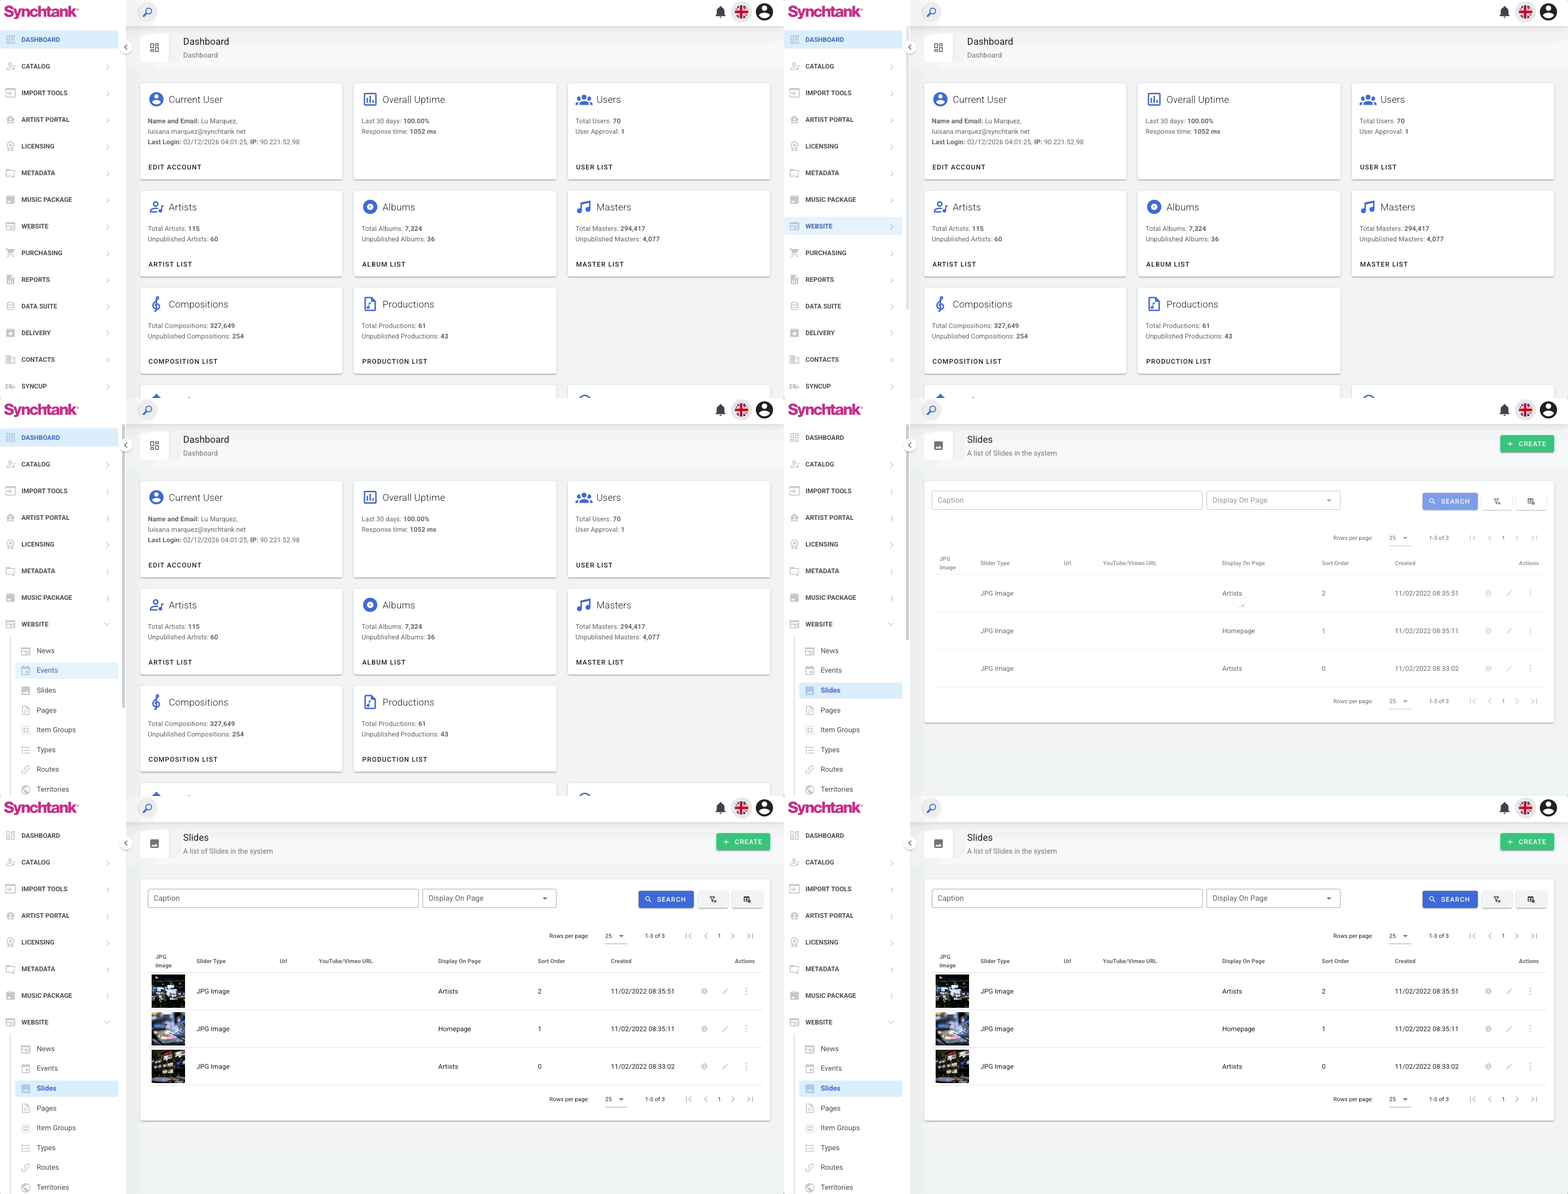
From this dashboard, you will see can:
- View all existing slides
- Edit slides
- Delete slides
- Adjust sort order
- Create new slides
How to create a Slide
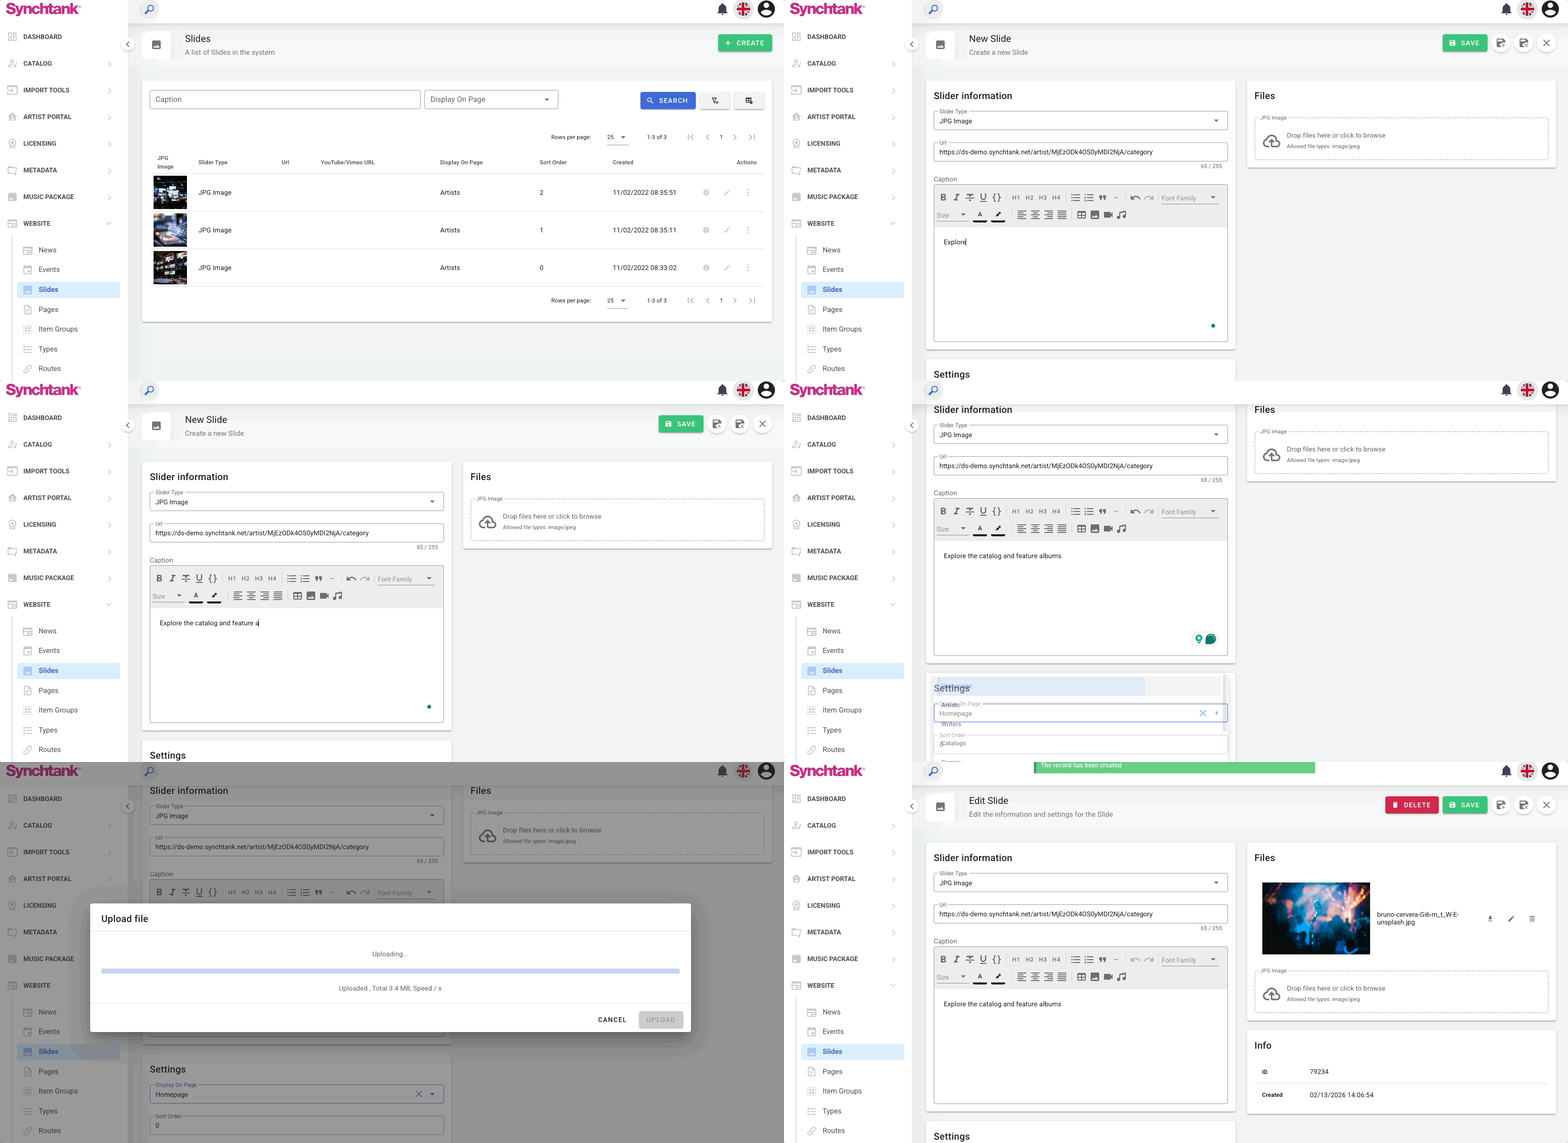
Firstly, navigate to the Website section and select Slide, one you're in the section you will see a green 'Create' button. Once you have selected the create button you will see fields and options to assist in creating your slide:
- Slide Type: Select media type (Image, YouTube/Vimeo, or HTML5 video).
- URL: Optional link that the slide redirects to when clicked.
- Caption / Content: Text displayed within the slide.
- Settings:
-
- Display on Page: Controls where the slide appears (depending on site configuration).
- Sort Order: Numeric value that determines slide position within the slider.
- Files: Upload image files (JPG) for image-based slides.
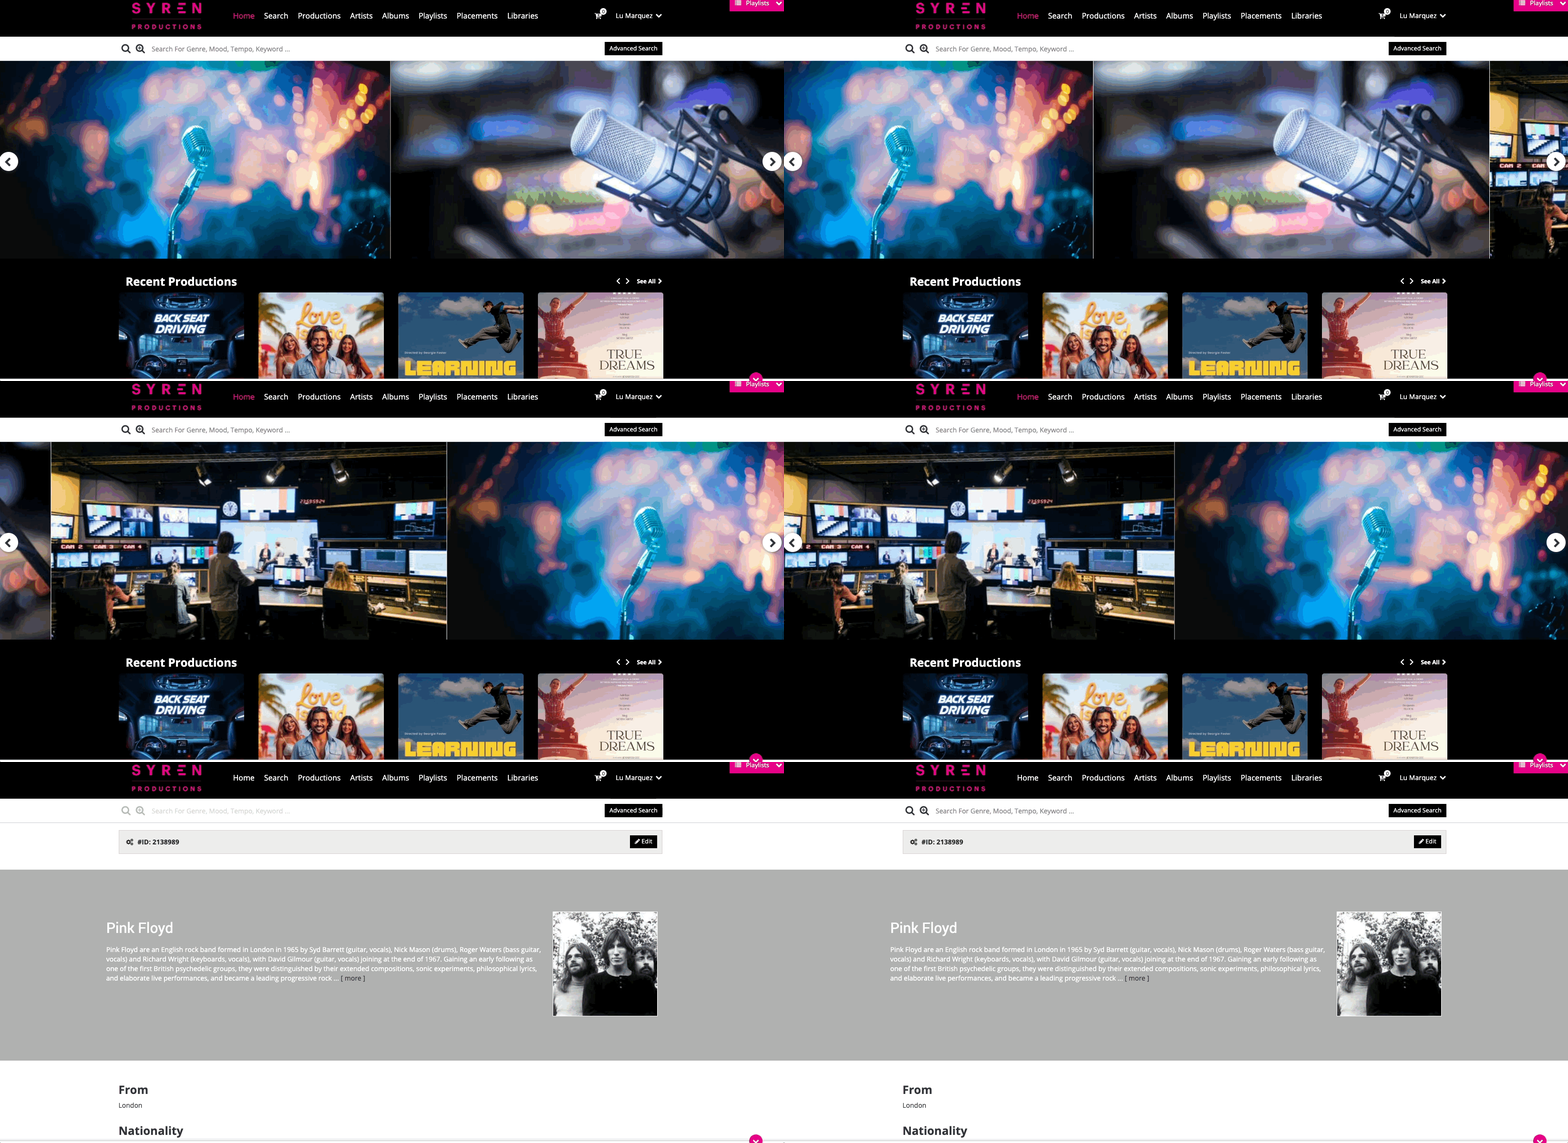
Once you have created your slide, you will see the finished result on your front-end, like this:
Pages
Path: Admin → Website → Pages
The Pages section allows you to create and manage static content pages on your website (outside of the music catalog).
These pages are typically used for informational content such as:
- About Us
- Contact
- FAQs
Each page generates its own dedicated URL once created.
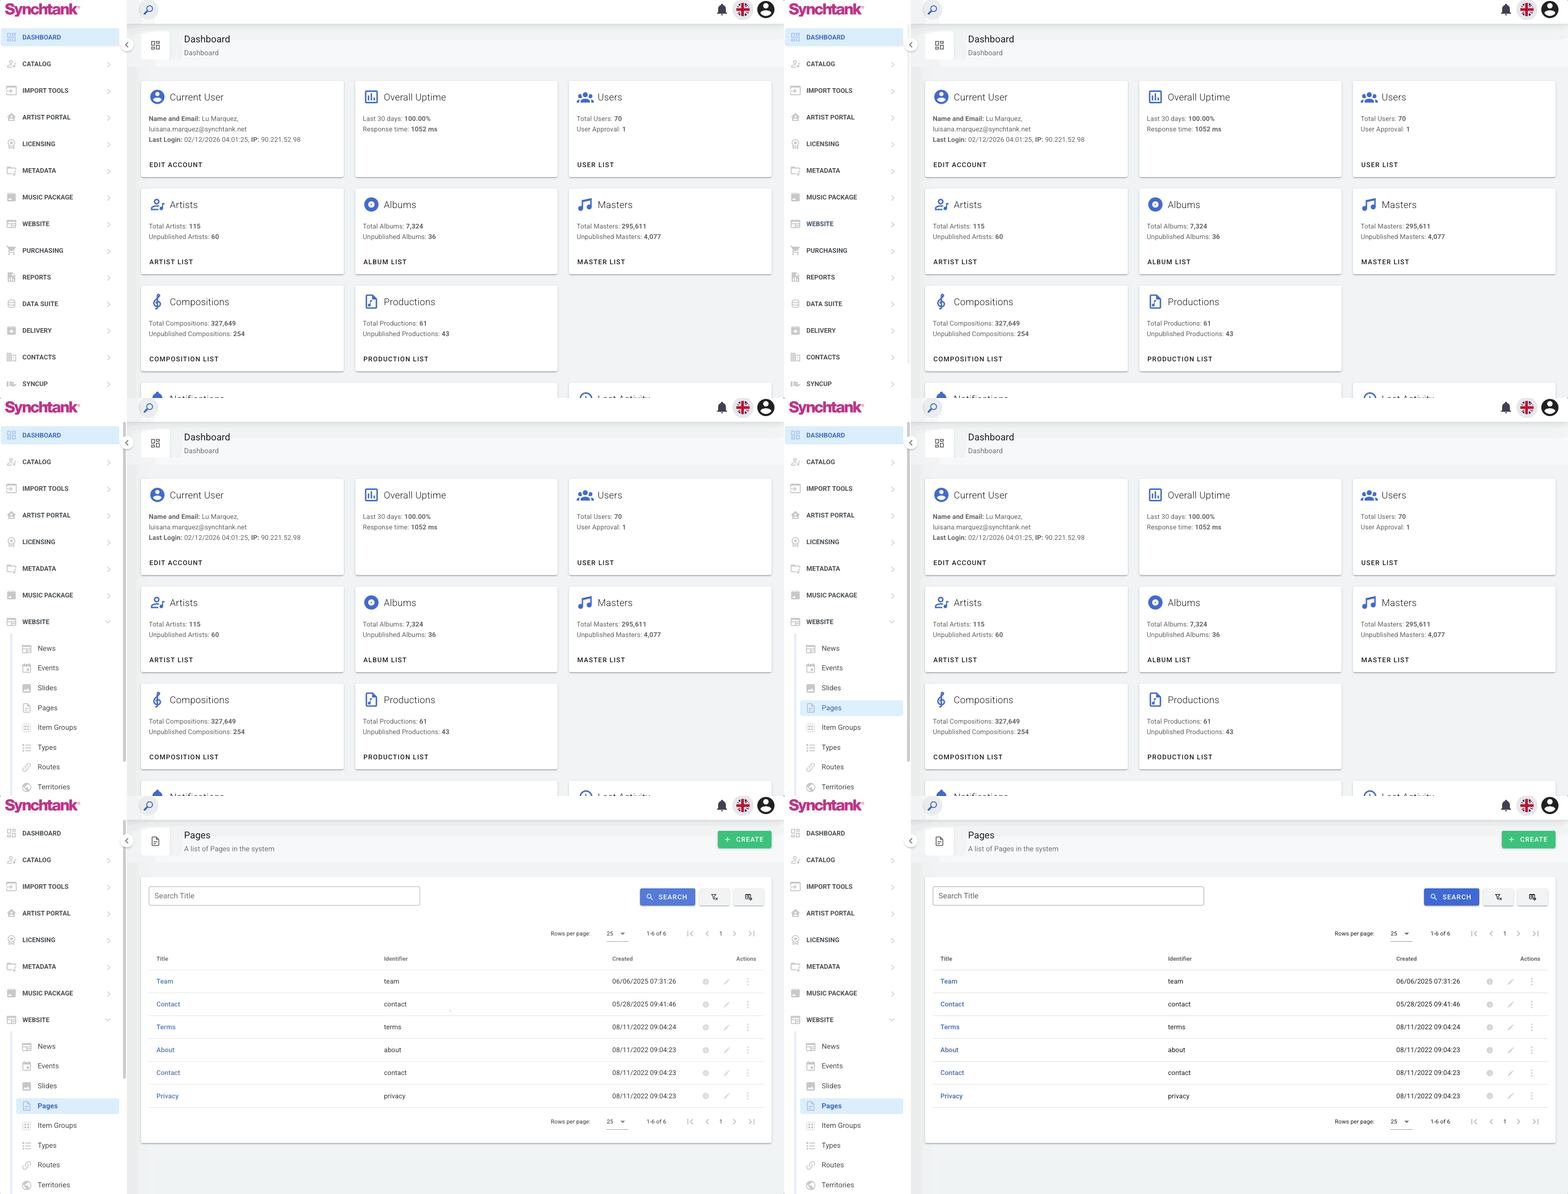
When you open Pages, you land on a dashboard-style view that shows all existing pages in the system. From this page, you can:
- View all existing pages
- Search for specific pages
- Edit existing pages
- Delete pages
- Create a new page
This acts as the central place to manage static website content.
How to create a Page
Navigate to Website and then Pages and select the green 'Create' button on the top right which opens up all the features and options for you to create a page.
- Title: Required free-text field used as the page name and heading.
- Tab: Field used to define how the page is grouped or organized within the website structure (depending on site configuration).
- Content: Rich text editor for the page body (supports formatting and HTML via “Show Source”).
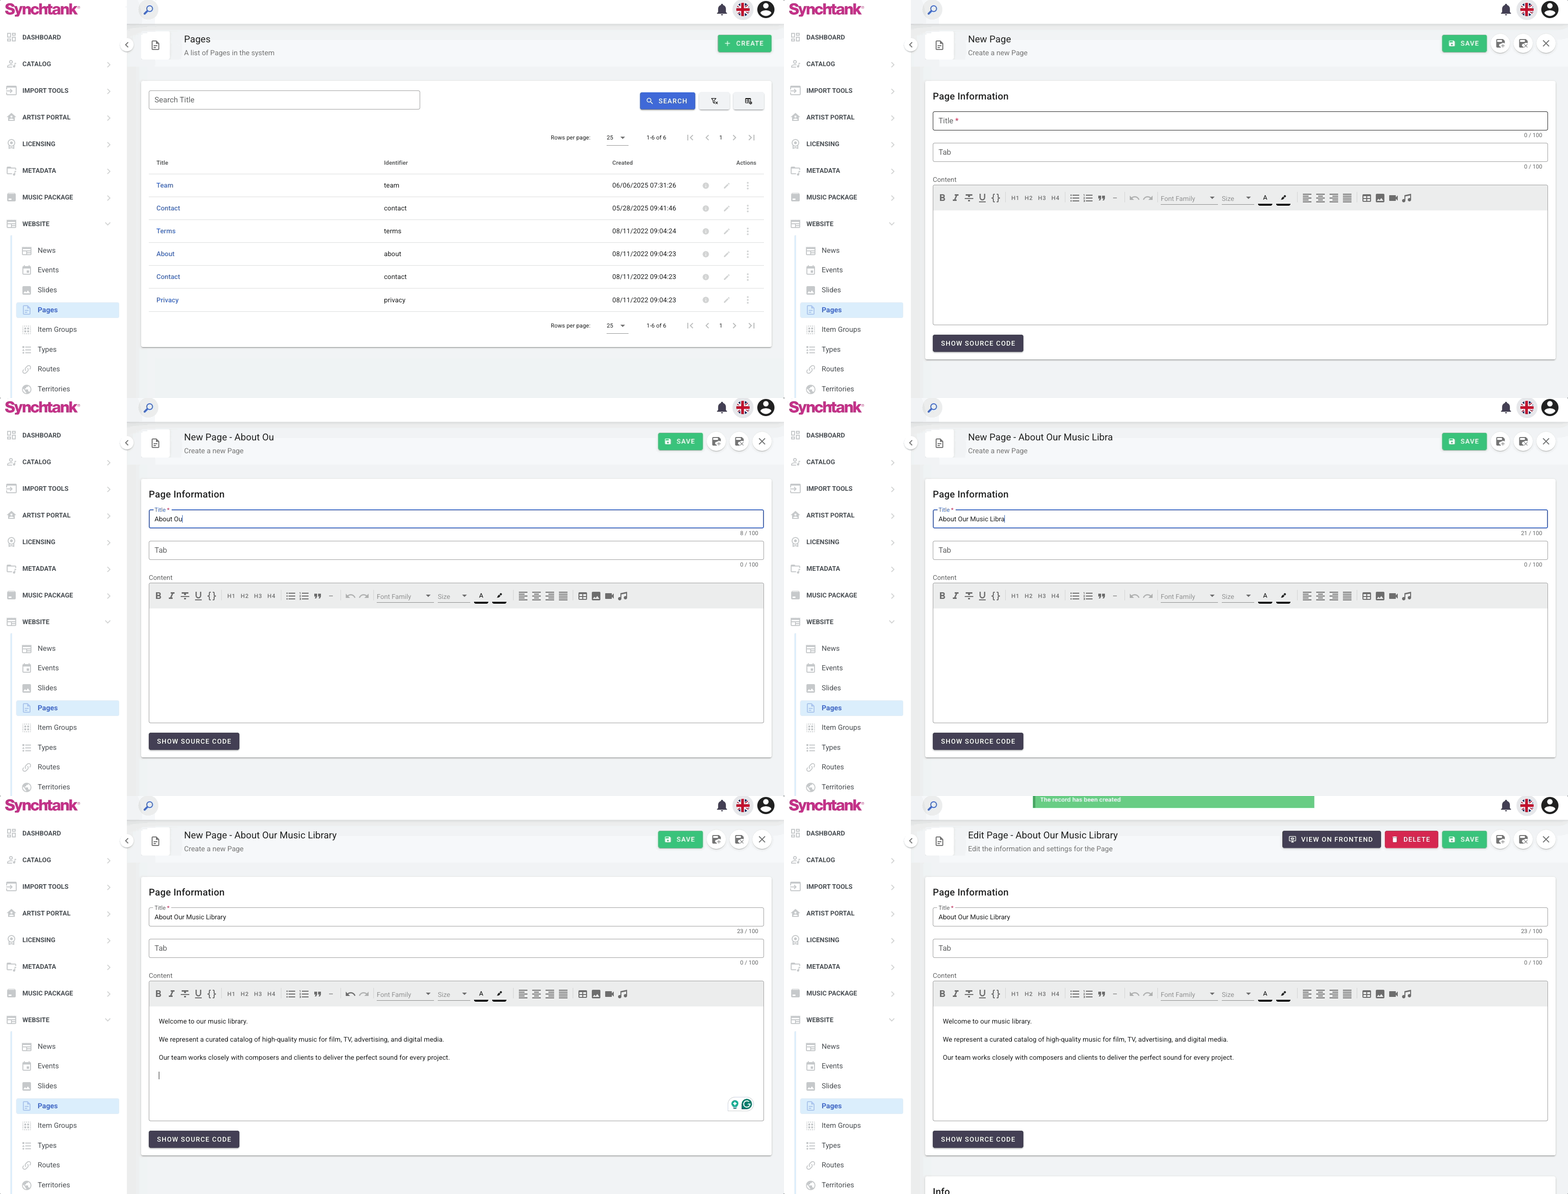
Once you have drafted your page you can preview it to review layout and formatting. Each page generates its own standalone URL and your Pages can be linked in site navigation depending on overall website configuration.
Item Groups
Path: Admin → Website → Item Groups
The Item Groups section allows you to curate and control the display and order of specific content types (such as artists, albums, playlists, and other entities) on designated website pages.
This feature is configured during the website implementation process. Depending on the site setup, certain pages may be connected to specific Item Groups.
If your site does not currently display Item Groups, please contact your Account Manager or Support team for assistance.
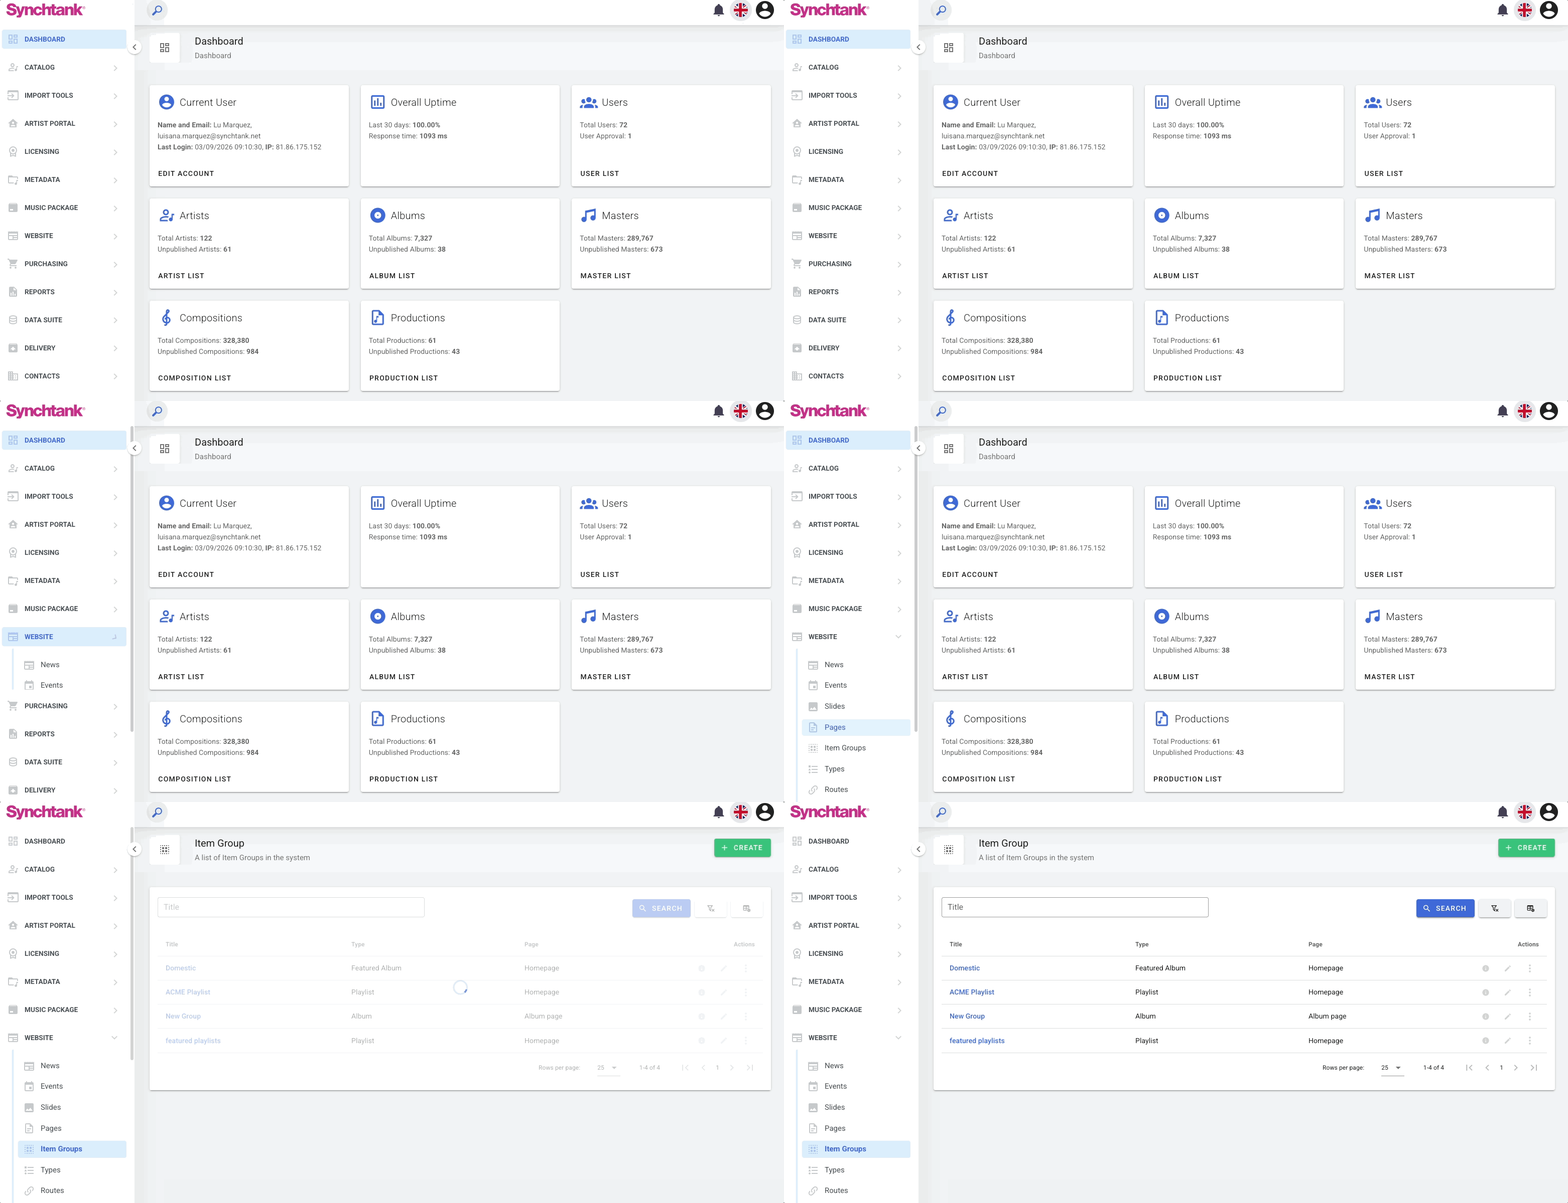
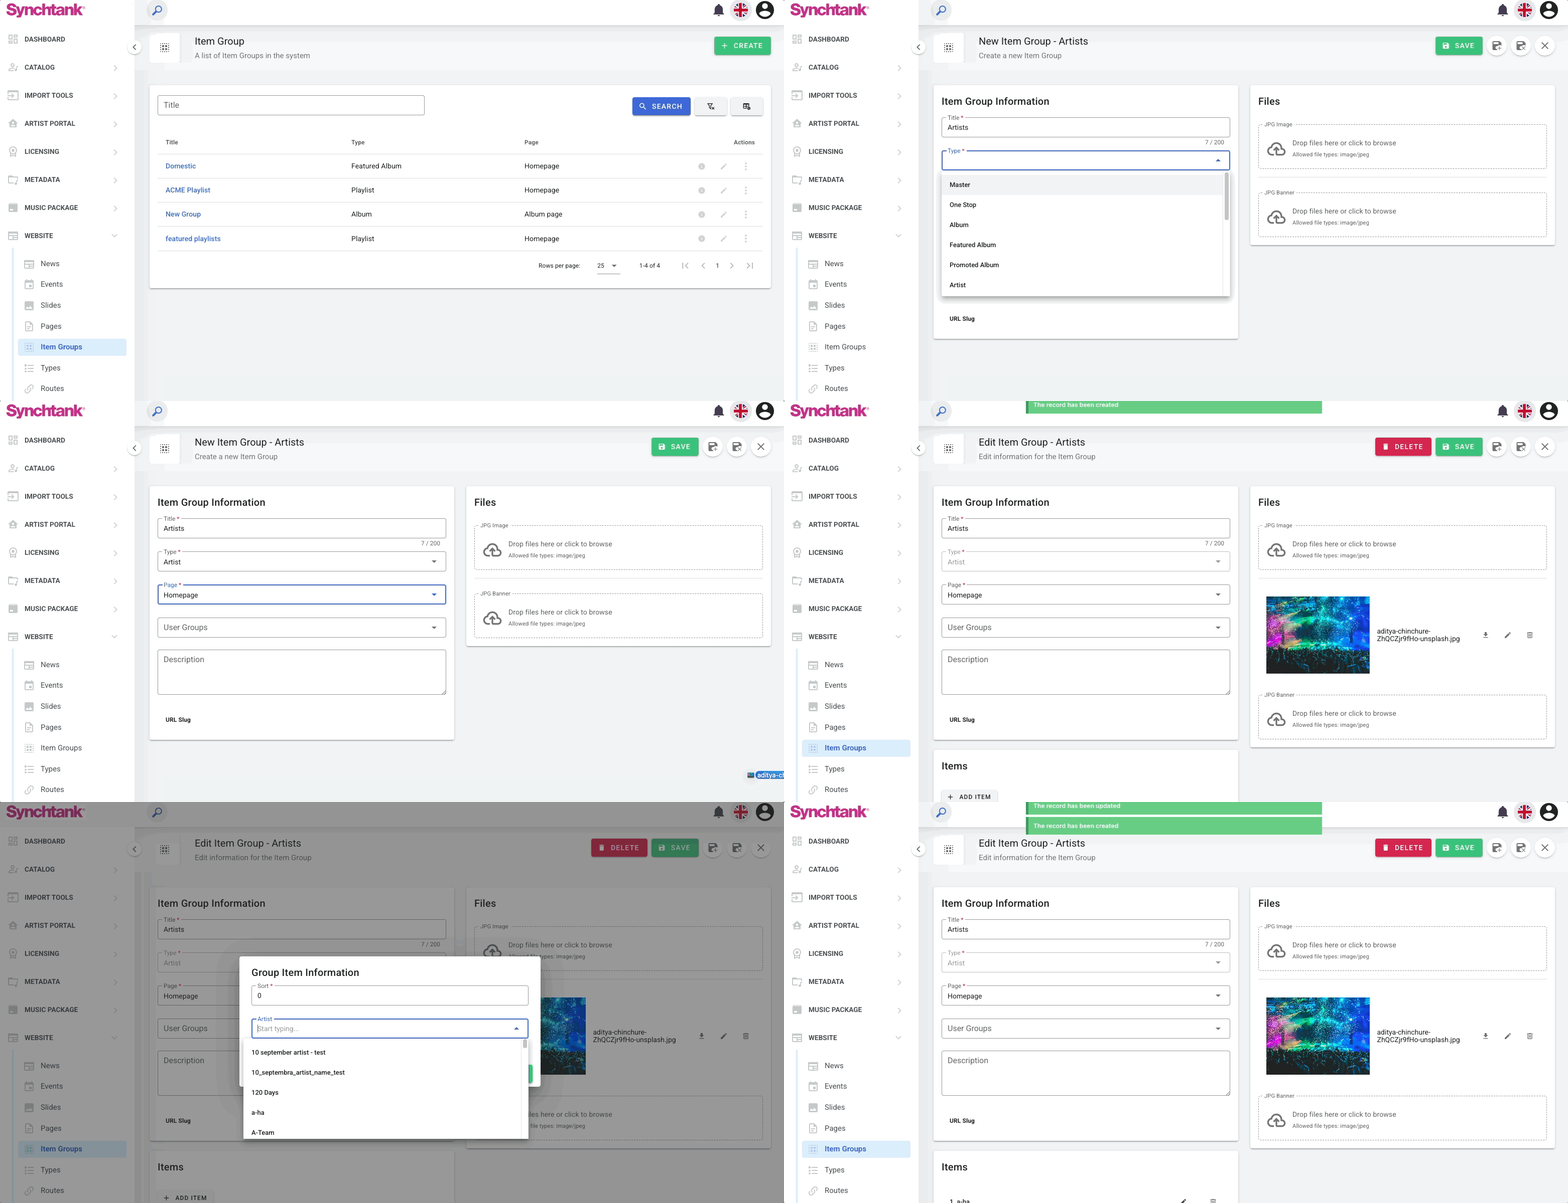
When you navigate to the Item Groups section with Websites, a dashboard-style view displays all existing groups in the system. From this page, administrators can:
- View the list of all Item Groups
- See key information at a glance (Title, Type, Page)
- Open an existing group to edit it
- Delete groups that are no longer needed
- Create a new Item Group
This page acts as the central place to manage curated content groupings for the website.
How to Create an Item Group
Within Item Groups select the green 'Create' button, here you will see a few fields and options:
- Title: Internal name used to identify the group in the Admin area.
- Type: Defines the content entity associated with the group (e.g., Master, Album, Artist, Playlist, etc.).
- This field cannot be changed after the group is saved.
- Page: Specifies the frontend page template where the group may be used (e.g., Homepage, Artist List Page, Album Page, etc.).
- User Groups: Controls visibility based on permission groups (if configured).
- Description: Optional internal description field.
- Files: Optional file upload field.
After completing the required fields, click Save.
- The Type of an Item Group cannot be changed after creation.
Adding Items to an Item Group
After saving the Item Group, a new section labeled Items becomes available.
Within the Items section:
- Use the searchable dropdown to select items that match the selected Type.
- Add one or multiple items.
- Save changes after selection.
Only items matching the selected Type can be added (e.g., only Artists can be added to an Artist-type group).
The order defined within the Item Group determines how content appears on the associated frontend page (if that page is configured to use the group).
Types
Path: Admin → Website → Types
The Types section allows administrators to create classification values used across different records in the system.
Types define standardized dropdown values that help categorize records such as productions, contacts, contracts, and other internal objects.
These values are used internally within the platform and are not related to website content customization.
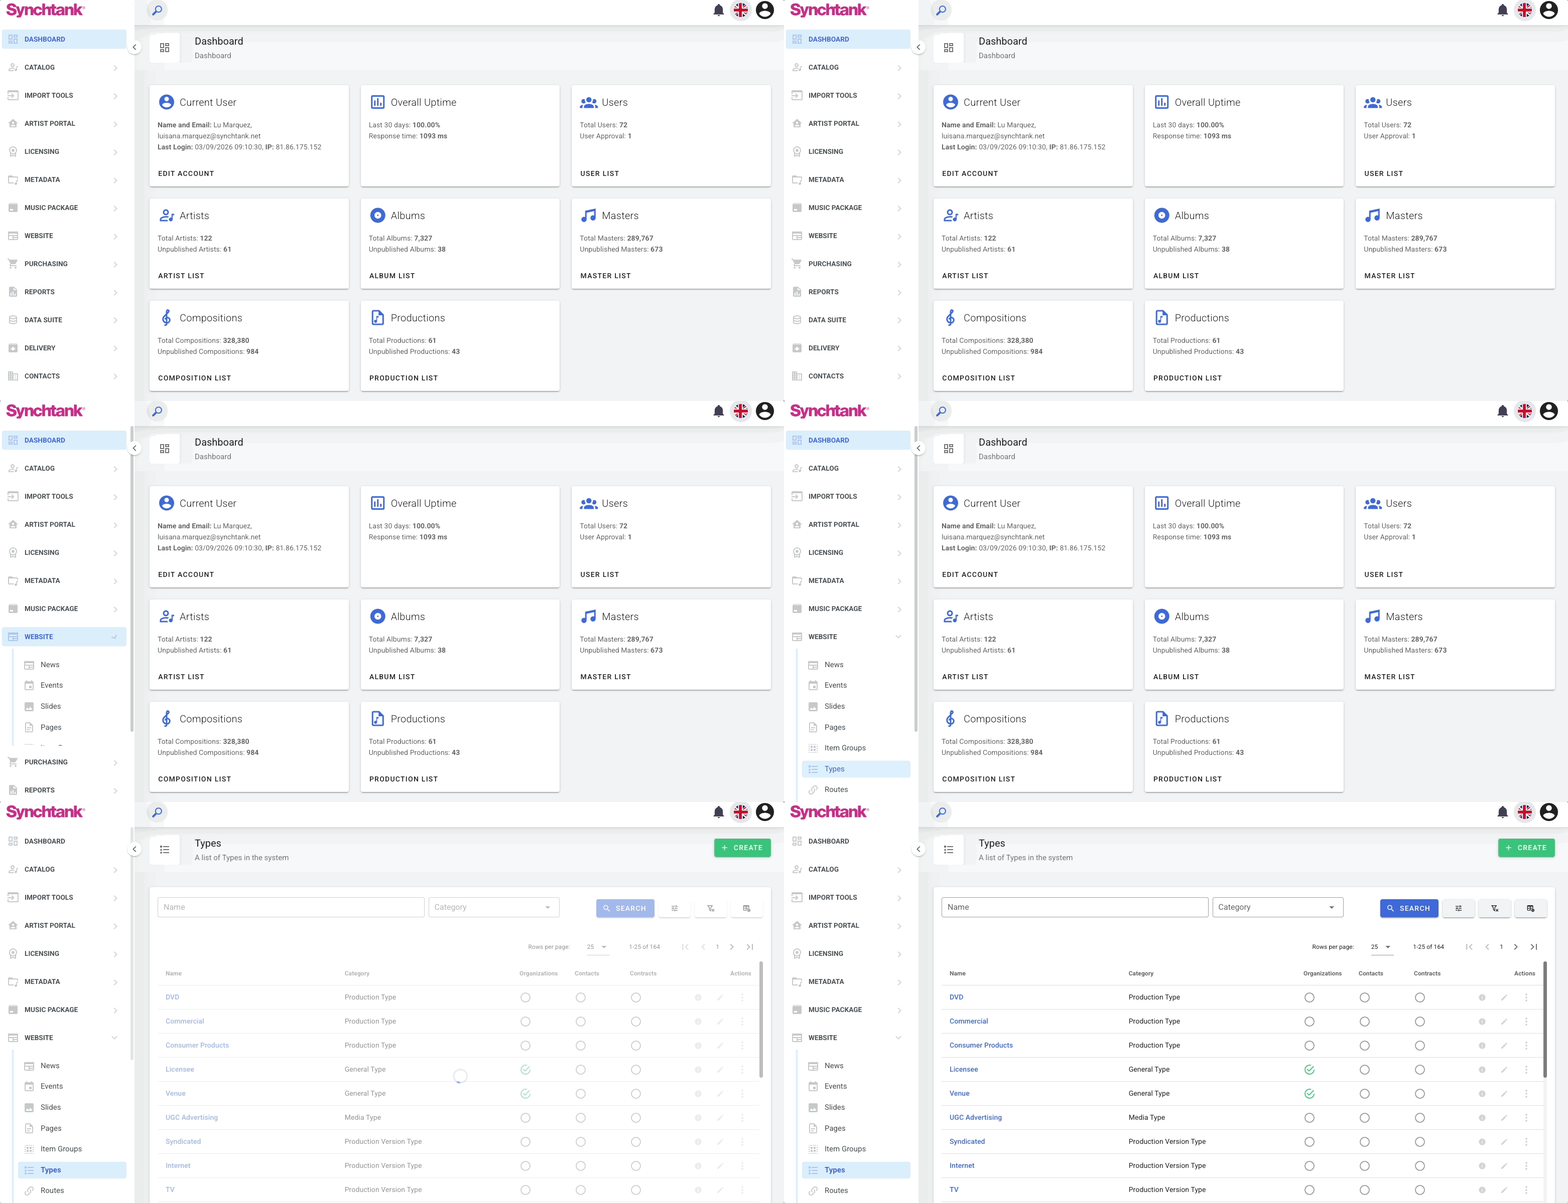
When you open Types, you land on a dashboard-style view showing all existing type entries. From this page, you can:
- View the list of all existing types
- See the type name and category
- Open an existing type to edit it
- Delete types that are no longer needed
- Create a new type
This page acts as the central place to manage classification values used throughout the system.
How to Create a Type
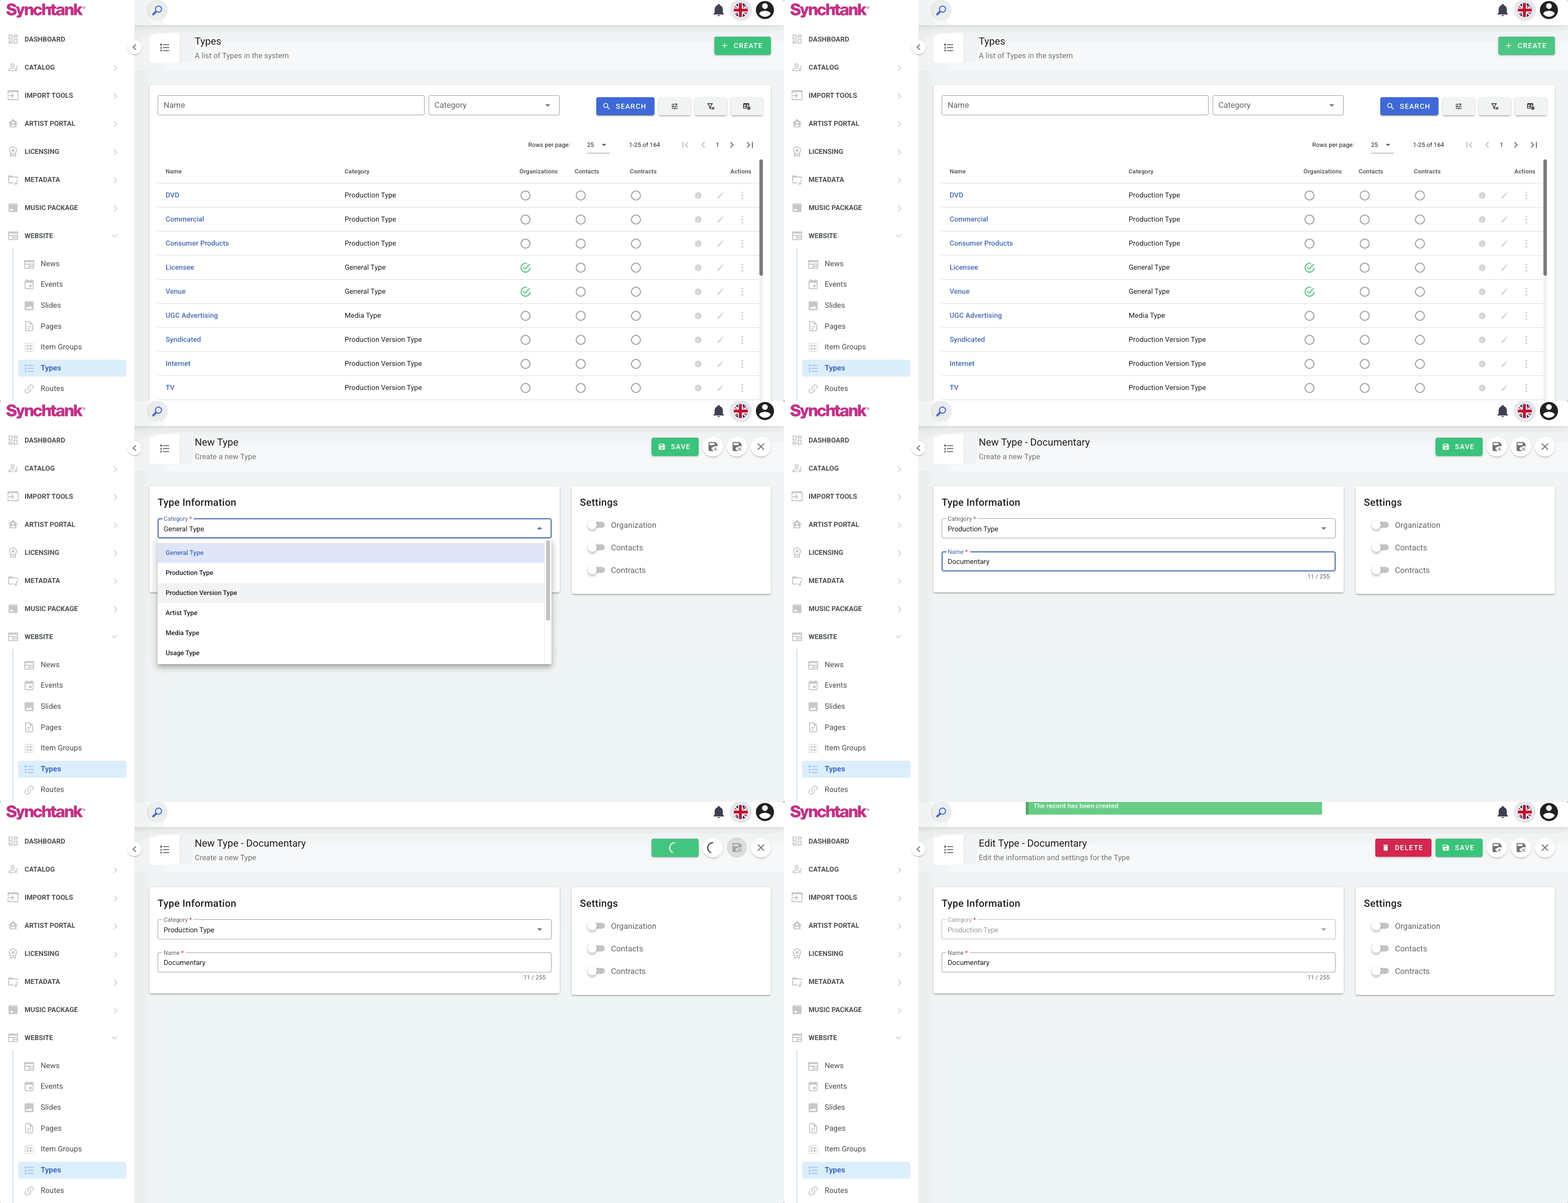
Navigate to Websites within the Admin and select Types and then the green 'create' button. Here you will see fields and options:
- Category: Defines which system object the type will classify. Examples include:
- General Type
- Production Type
- Production Version Type
- Artist Type
- Media Type
- Usage Type
- Quote Type
- User Type
- Contract Type
Note: Selecting a category determines where the type will appear in the system.
- Name: Free-text field used to define the label of the type.
This value becomes a dropdown option when editing records associated with the selected category.- Example:
- Category: Production Type
- Name: Documentary
- Example:
- Settings: The Settings section determines where the type can be assigned. Available toggles may include:
- Organizations
- Contacts
- Contracts
Note: When enabled, the type becomes available as a selectable value when editing those records.
Where Types Appear in the System
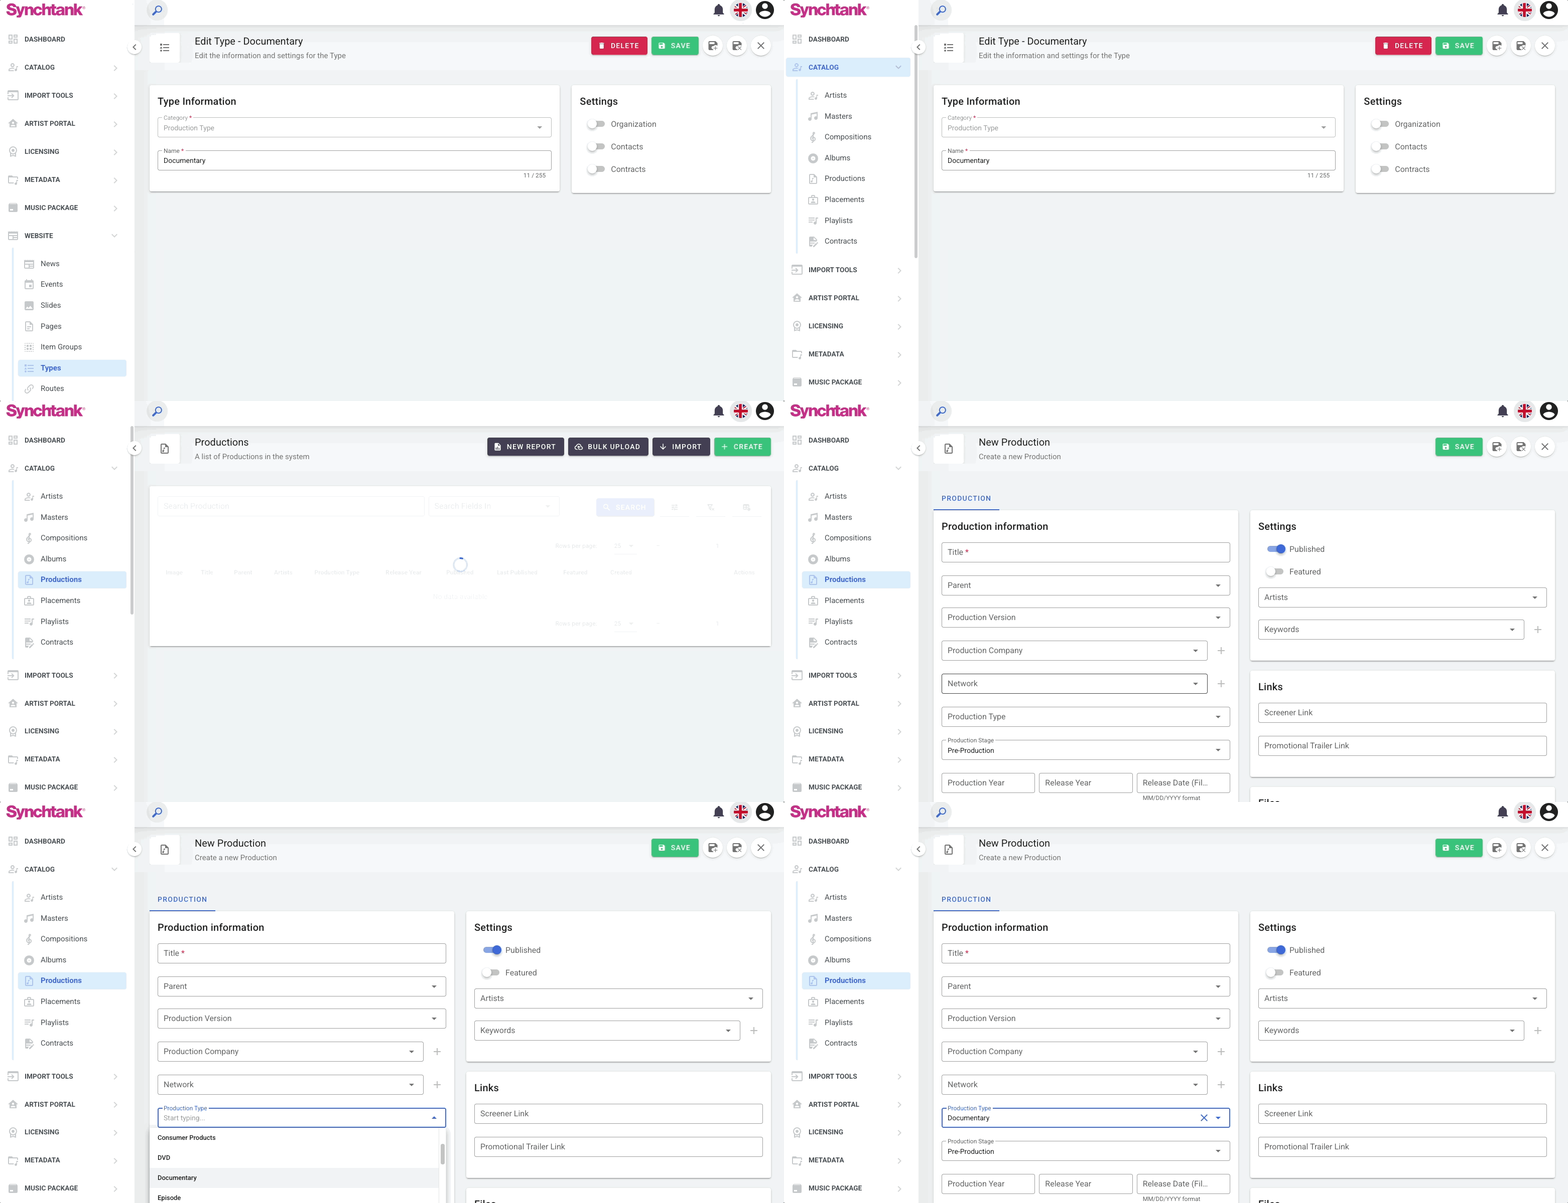
Types appear as dropdown options when editing records associated with their category.
Example: If a type is created with:
- Category: Production Type
- Name: Documentary
It will appear in the Production Type field when editing productions.
Routes
Path: Admin → Website → Routes
The Routes section allows administrators to configure how specific website URLs behave.
Routes are typically used to redirect or override URLs, ensuring that visitors and search engines are sent to the correct page when URLs change.
Routes are generally configured by the product or technical team when customers request URL redirects or structural changes to their website.
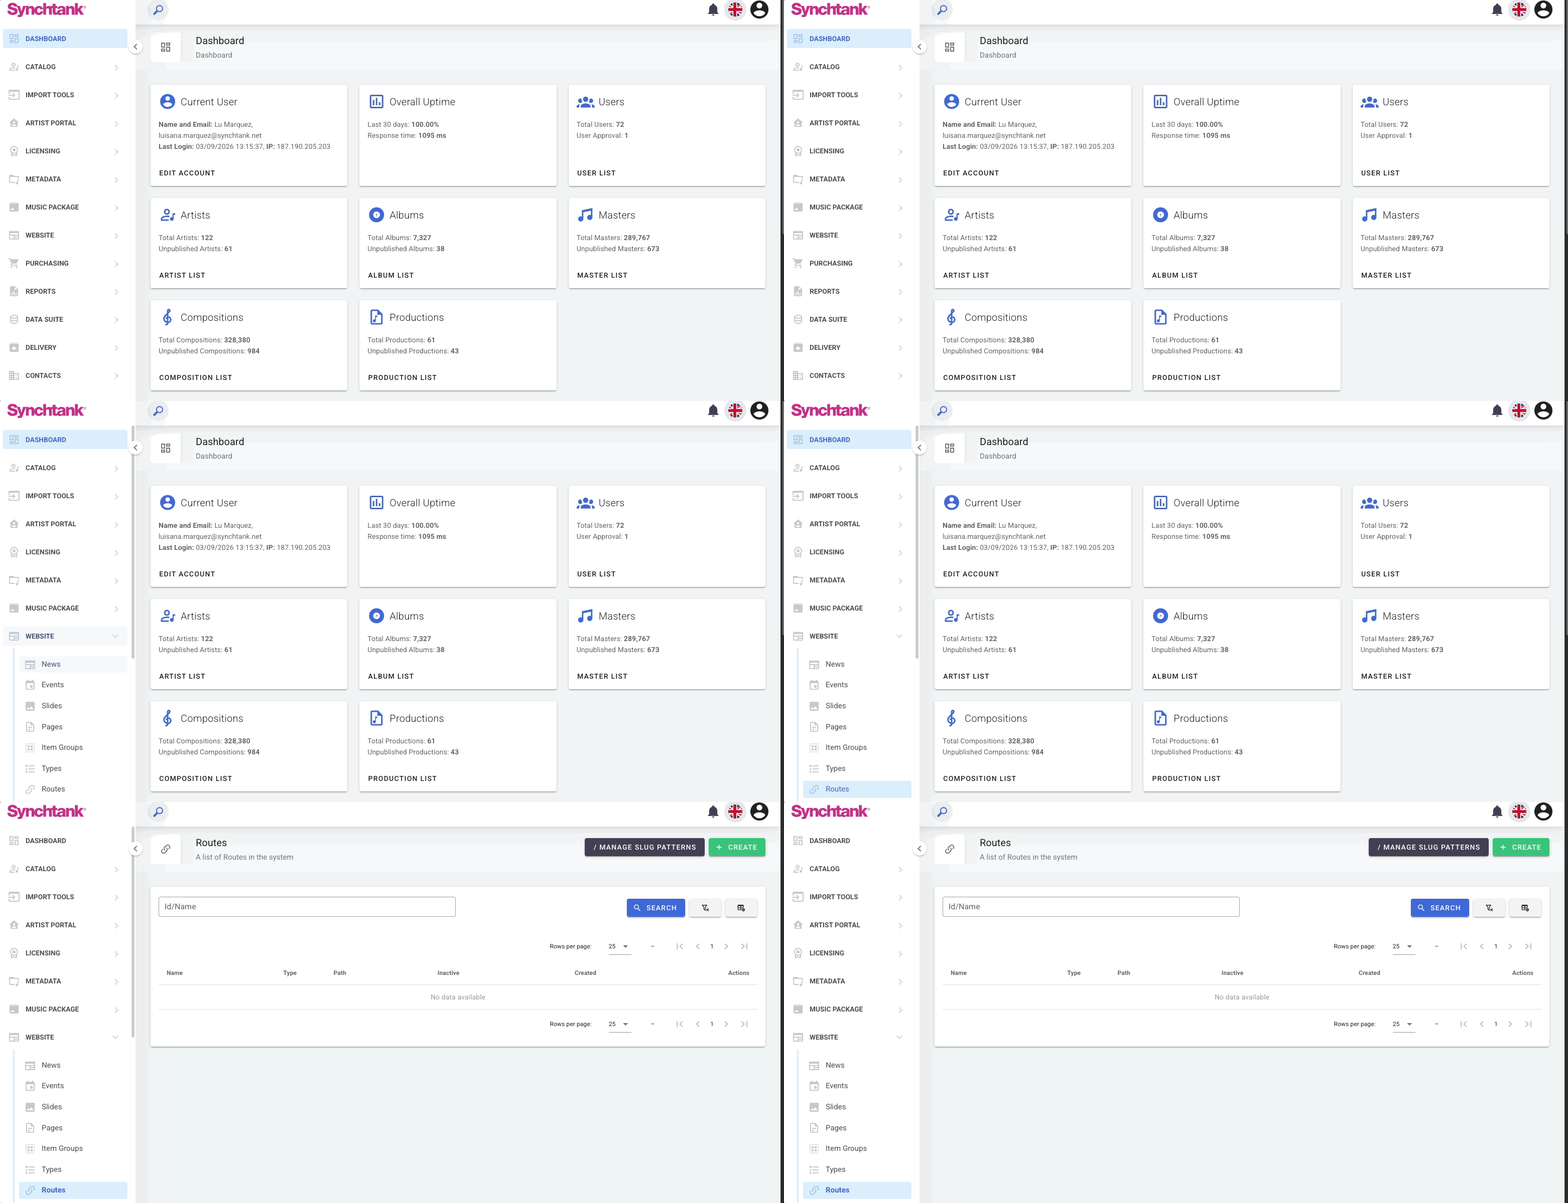
When you open Website → Routes, you land on a dashboard-style view showing all configured routes. From this page, you can:
- View the list of existing routes
- Open routes to review or edit their configuration
- Delete routes that are no longer needed
- Create a new route
- Access Manage Slug Patterns
This page acts as the central place to manage URL routing behavior across the website.
Manage Slug Patterns
Path: Admin → Website → Routes → Manage Slug Patterns
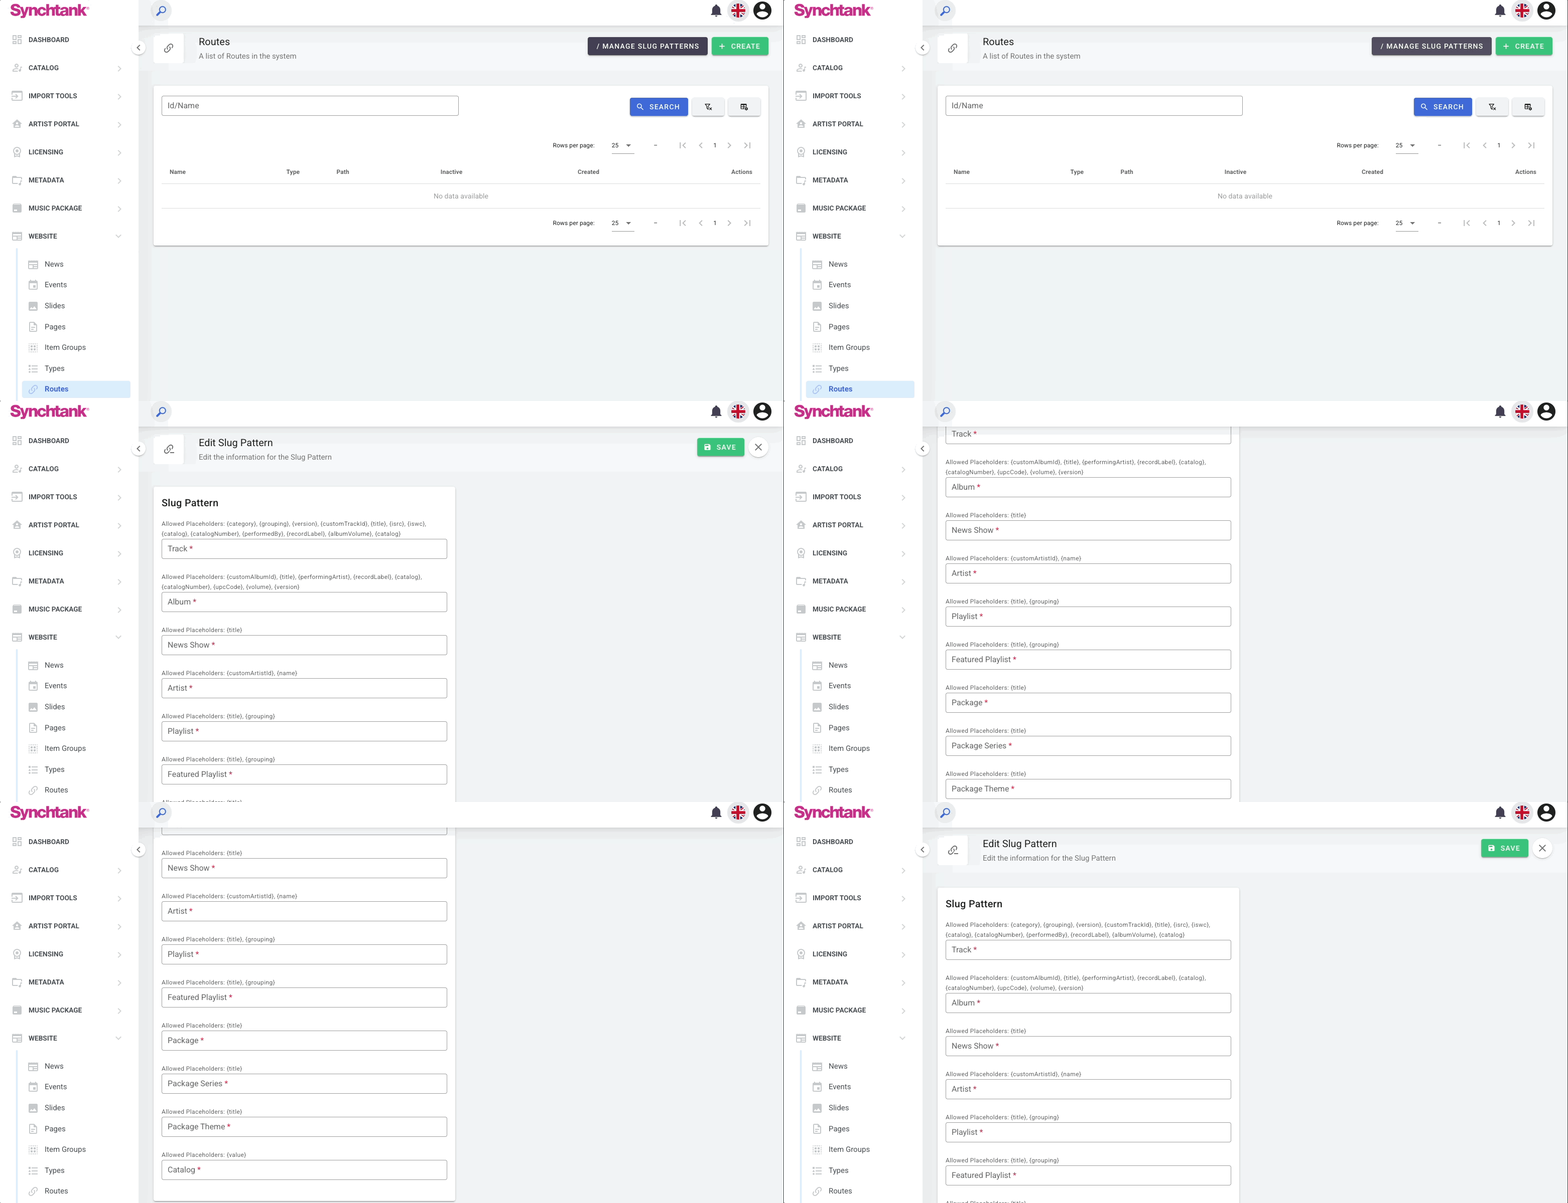
Slug Patterns define how website URLs are automatically generated for different types of content.
Instead of manually creating URLs for each record, the system builds them automatically using predefined templates called slug patterns.
These patterns use placeholders that are replaced with real data from the record.
Example:
-
{title} - If the title of a track is: Summer Nights
-
The generated URL slug becomes: /summer-nights
Available Slug Pattern Types
Slug patterns can be configured for several content types. Each type has a text field where the URL structure can be defined.
|
Content Type |
Purpose |
|
Track |
Defines URL structure for track pages |
|
Album |
Defines URL structure for album pages |
|
News Show |
Defines URL structure for news pages |
|
Artist |
Defines URL structure for artist pages |
|
Playlist |
Defines URL structure for playlist pages |
|
Featured Playlist |
Defines URL structure for featured playlists |
|
Package |
Defines URL structure for packages |
|
Package Series |
Defines URL structure for package series |
|
Package Theme |
Defines URL structure for package themes |
|
Catalog |
Defines URL structure for catalog pages |
Each field displays Allowed Placeholders, which represent values that will be dynamically replaced with actual record data.
How to Create a Route
Navigate to the Routes section with Websites and select the green 'Create' button on the top right.
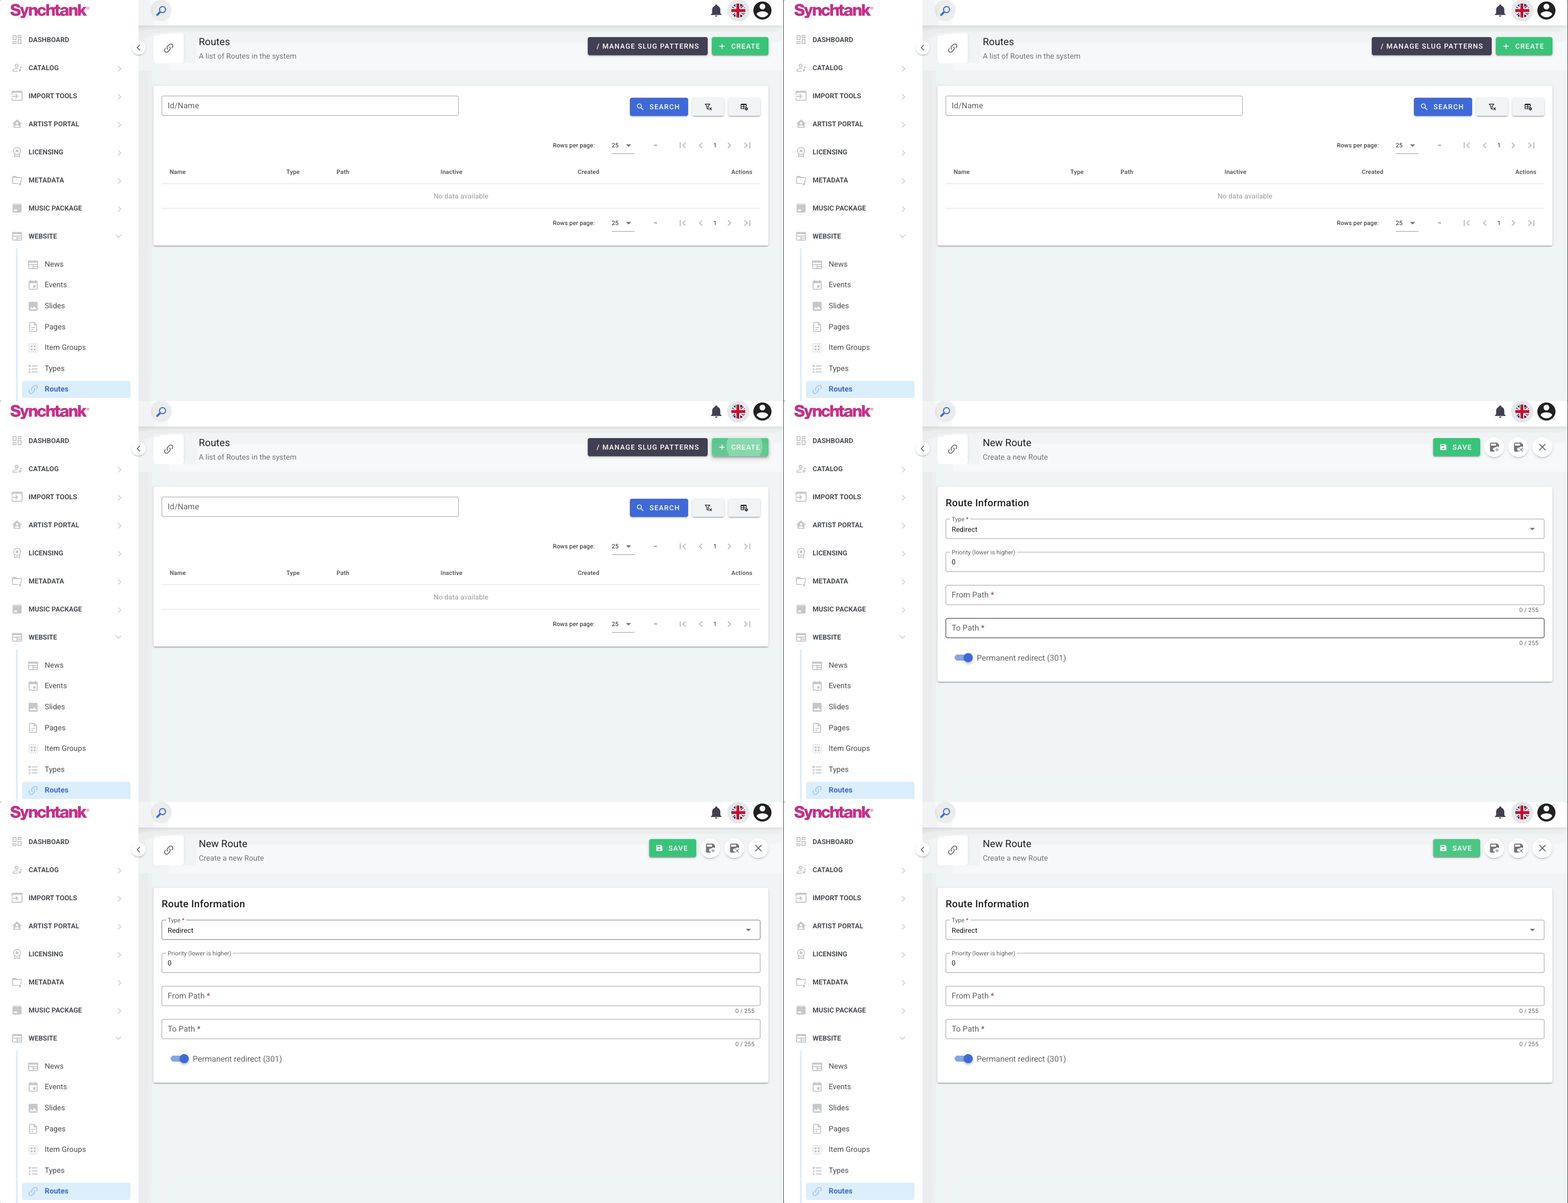
Here you will see the fields and options:
- Type: Defines how the route behaves. Available options include:
- Redirect: Redirects users from one URL to another.
- Override: Overrides an existing system route
- Alias: Creates an alternative URL that points to an existing page
- Priority: Numeric value that determines the order in which routes are processed. Lower numbers have higher priority.
- Example: Priority: 0. This route will be processed before routes with higher numbers.
- From Path: The source URL path that will trigger the route. This field is required.
- Example: /artists/category/songwriters/all
- To Path: The destination URL path where users will be redirected.
- Example: /artists/group/songwriters/all
- Permanent Redirect (301): When enabled, the route performs a 301 permanent redirect.
A 301 redirect signals to browsers and search engines that the page has permanently moved to a new location, helping preserve SEO value and update bookmarks.
Example
The following route redirects users from an old category page to a new group page:
From Path: /artists/category/songwriters/all
To Path: /artists/group/songwriters/all
With Permanent Redirect (301) enabled, visitors accessing the old URL will automatically be redirected to the new page.
Important Note
Routes affect how URLs behave across the website.
Because incorrect routes can break navigation or impact SEO, these configurations are typically created and maintained by the product or technical team based on customer requests.
Territories
Path: Admin → Website → Territories
The Territories section defines the list of geographic territories used across the platform.
These territories are used in workflows such as Release Deals, licensing data, and other metadata that requires geographic scope.
The territory list is based on the international TIS territory system, which provides standardized codes used for identifying countries and regions in rights management systems.
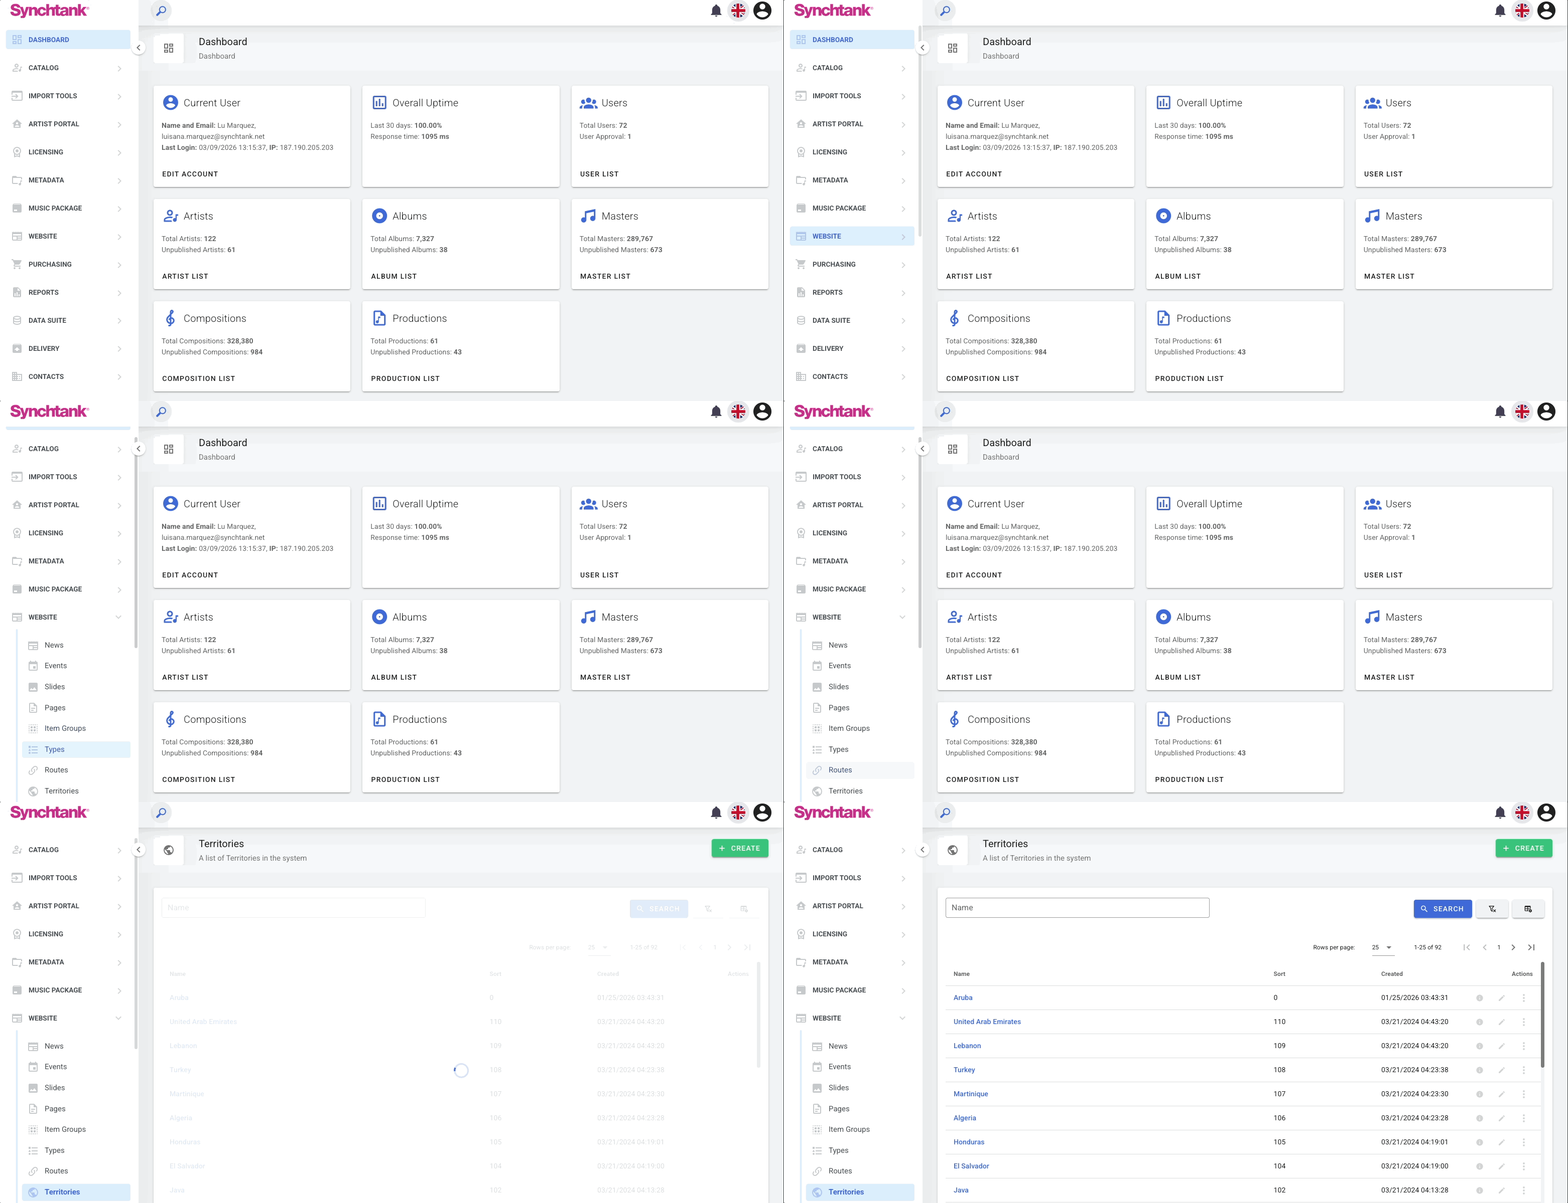
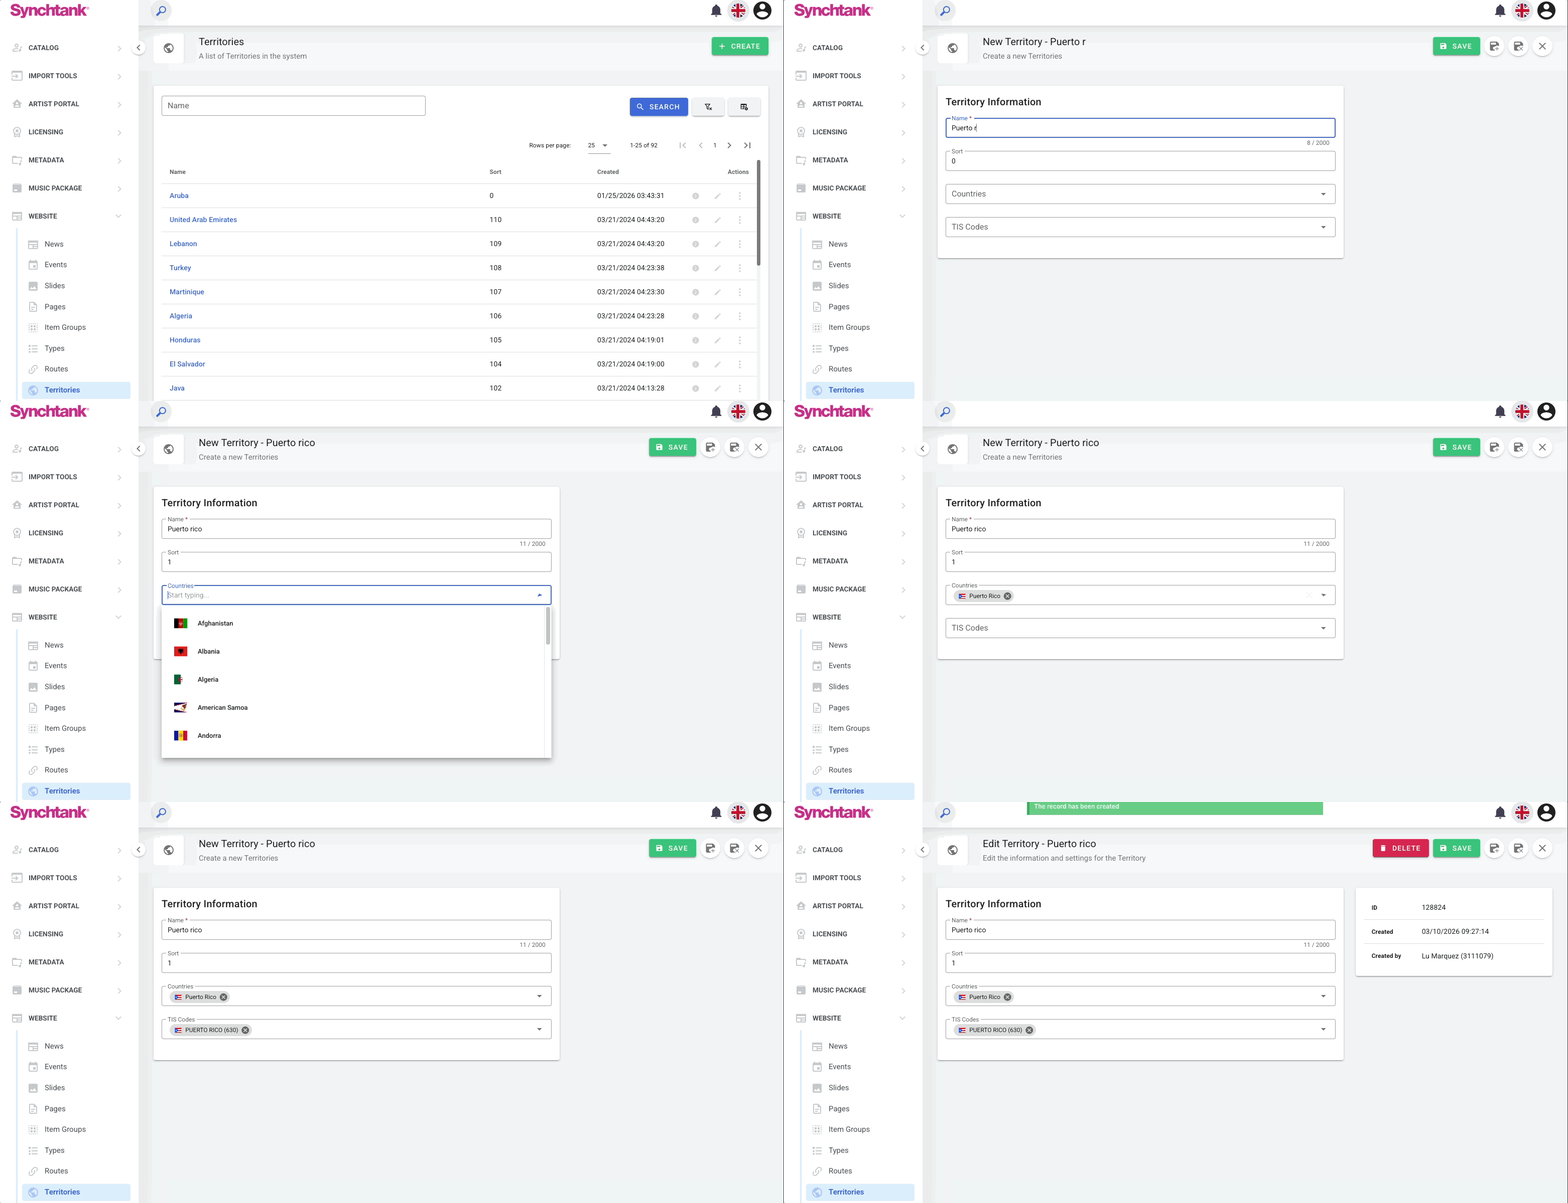
When you open Website → Territories, you land on a dashboard-style view showing all available territories configured in the system. From this page, you can:
- View the list of territories used by the platform
- Review territory names and associated codes
- Open existing territory entries
- Create new territories when supported
This page acts as the central place for managing geographic territory definitions used throughout the platform.
Territory Codes (TIS System)
Territories in the platform are tied to the TIS territory system.
TIS codes are standardized identifiers used across the music and rights management industry to represent countries and regional territories.
Because the platform relies on this standardized system, only territories that exist within the TIS list can normally be configured.
How to Create a Territory
Path: Admin → Website → Territories → Create
Territories can be created or added when needed to support geographic metadata used across the platform.
When creating a new territory, the following fields are typically required.
- Name: Free-text field used to define the territory name that will appear in dropdown selectors across the platform.
- Example: Puerto Rico
- Sort: numeric field used to control the display order of territories in dropdown lists. Lower number will typically appear higher in the list.
- Example: Sort: 1
- Countries: Searchable dropdown used to select the country.
- TIS Code: Field used to enter the standardized territory code associated with the territory.
These codes follow the international TIS territory system, which is commonly used in rights management workflows.
Because the platform relies on this system, the TIS code must correspond to a valid territory defined within the TIS standard.
Important Note
If a territory is not part of the internationally recognized TIS territory system, it will not appear in the standard territory lists used by the platform.
Supporting additional territories outside the TIS system may require changes to the platform’s territory mapping and is typically handled by the product or technical team.
Customers who need additional territories should contact support for assistance.