Search
Managing your users is essential to the success of your system and within the Synchtank Admin we have a Users section dedicated to support you with this.
Note: Throughout this article and within your Synchtank admin system you may see the word “FE” which stands for “Front-End” and links to what your user can do on the front-end of your site.
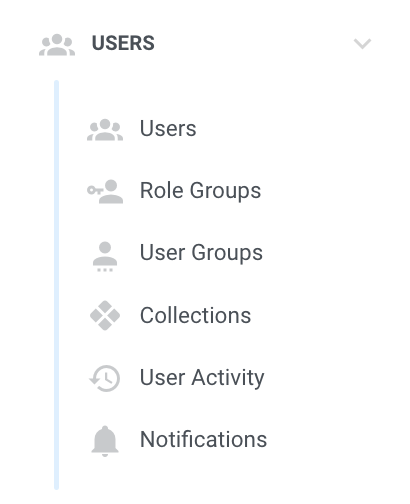
- Users
- Role Groups - functionality permissions
- User Groups - track view permissions
- Collections
- User Activity
- Notifications
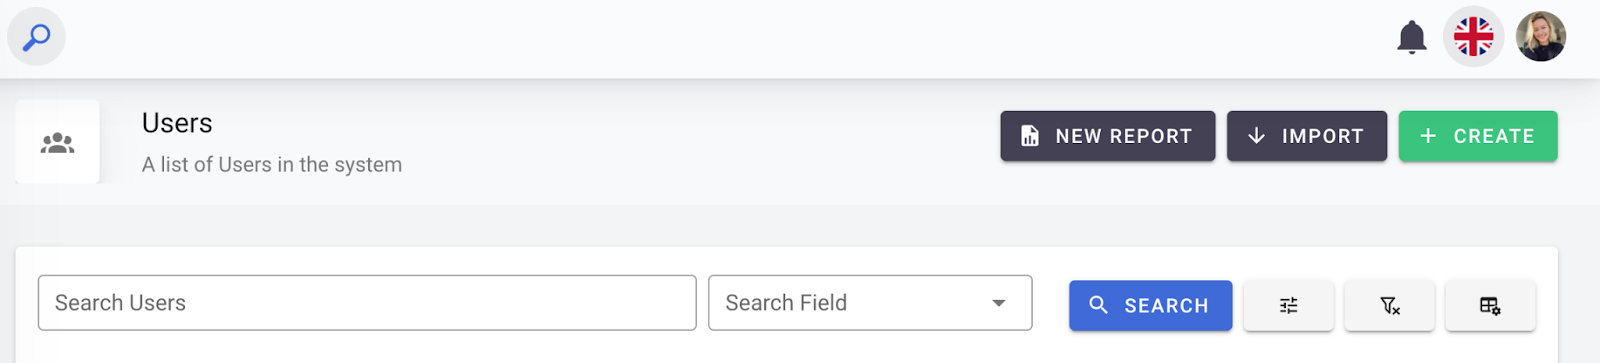
Users
Within the Users subsection you can review your users in the system, create new users, and also edit and delete in bulk.
- For creating grouped permissions on a functionality level - jump to the Role Groups section.
- To create a grouped permission set for what tracks or libraries you want your users to see - jump to the User Groups section.
Firstly, we will explain in this step-by-step guide for creating an individual user, for bulk upload and edit jump to the Users Import section.
Creating a New User:
1. Click the "Create" button within the "Users" menu.
2. Next you need to fill out all the information to ensure the user has the right access to your system.
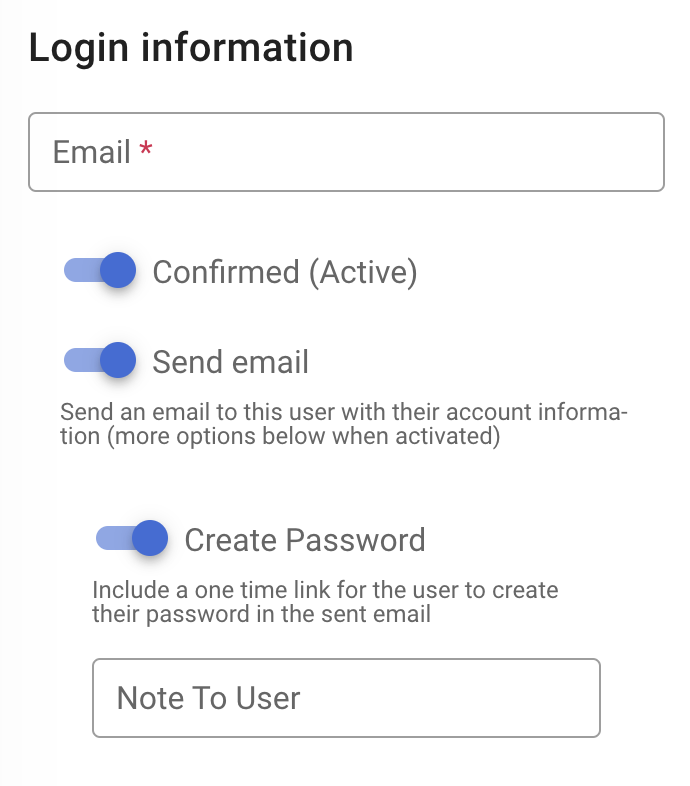
Login Information
On the left you’ll see the login information for your user. Type the user's email address in and then make sure you toggle on the ‘Send Email’ and ‘Create Password’ option to allow the user to create their own password.
User Information & Links
Further down the left hand side there is extra information to include about your user ie. any personal information like the users Address, Company contact details etc and any helpful links like their social media.
Website Settings
In the middle you have Website Settings which allows you to control what the users can do on the front-end of your site.
For Download Settings you are able to manage the download permissions for each User such as:
- Stream Only: Users can only stream tracks, with no download option available.
- Low Quality (MP3): Users can download tracks in MP3 format, if available.
- High Quality (WAV + Stems ZIP): Users can download tracks in WAV format and stems ZIP files, if available.
Below the drop-down you also have a few more options with toggles:
- Writer Access: Writer access allows users to see the writer metadata on some systems that include writer restrictions
- Download Data: Download Data gives the user access to download playlist metadata in accordance with their assigned data template
- Restricted Tracks: This gives the user access to tracks marked as restricted
- Initiate Collaborations: This gives the user the ability to collaborate on playlists with other users. Collaboration is the ability to jointly edit a playlist.
- Receive scheduled reports: If the system has any scheduled reports set up, this marks the user as a recipient
SyncUP
Next, we have the SyncUP settings, if you have this module on your Synchtank system you can configure your settings here for the type of role they play, i.e. internal creative or internal licensing and also their location. If you don’t have SyncUP you can learn more about it here.
Sent Email Settings
Below this we also have the sent email option, this toggle, when switched on, will hide the Users own actions for the Email Sent section in Admin. Meaning only other users sent email will appear.
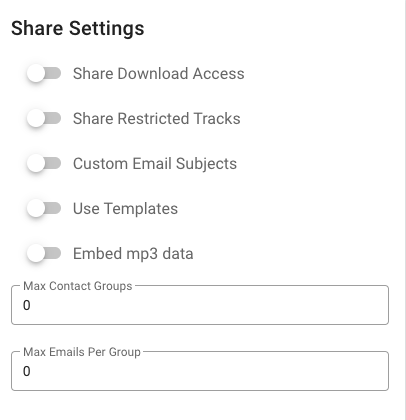
Share Settings
You also have the ability to control their share settings, allowing you to manage what they can and cannot share from your system, such as:
- Share Download Access: Allow users to share download access when sending tracks or playlists.
- Share Restricted Tracks: Permit sharing of tracks marked as "Restricted."
- Custom Email Subjects: Enable personalized email subjects for sharing tracks/playlists.
- Use templates: This will allow users to select from email templates when drafting emails to share tracks/albums/playlists
- Embed MP3 Data: Allow embedding MP3 data within shared tracks.
- Max Contact Groups: This means the Max number of groups you can have in the system Templates ability to use custom email templates if the system has any
- Max Emails Per Group: Last this option allows you to control how many emails your User can send to a group
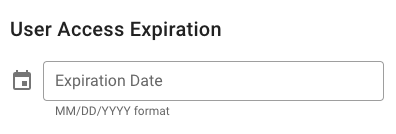
User Access Expiration
In the middle you also have a ‘User Access Expiration’ option which allows you to set an expiration date for when your user can no longer access your system.
CMS and Web Permissions
The CMS and Web Permissions section allows you to control what the users can do in the Admin and on the Website.
On the right-hand side, the system offers four distinct user roles under the ‘CMS and Web Permissions’ tab - each with specific permissions:
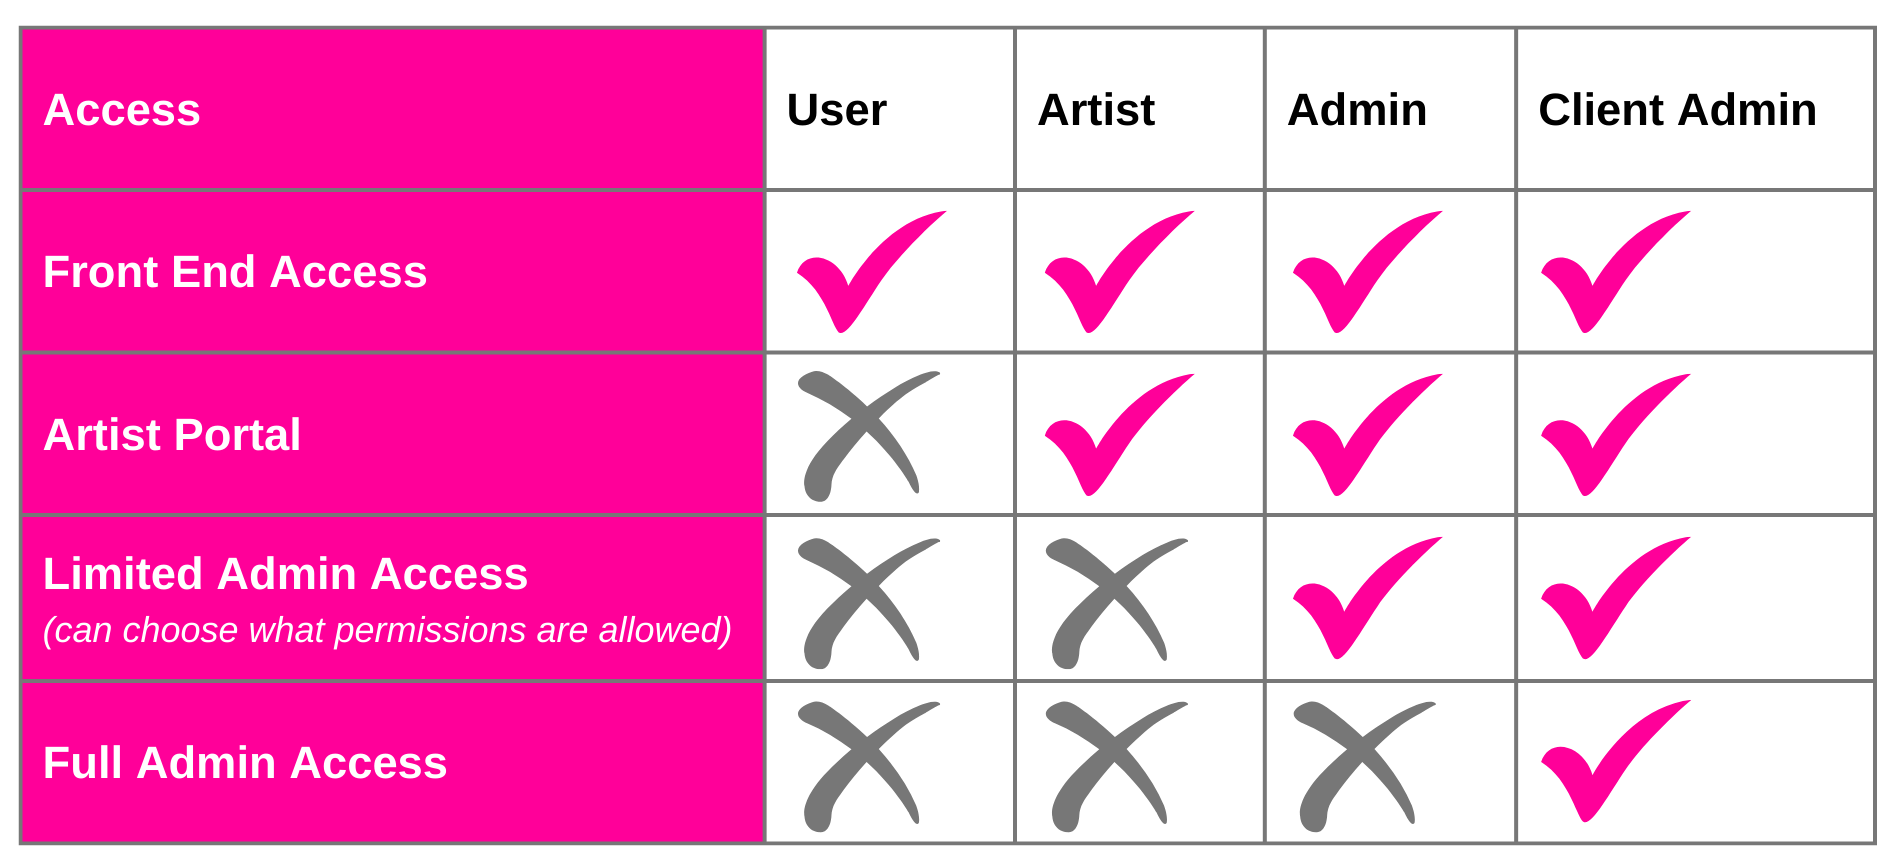
- User
- Limited to the front-end of the system.
- No access to administrative areas, such as the Admin tool (Synchtank Admin).
- Artist
- Same permissions as User role.
- Additional access to the Artist Admin section for managing their tracks, albums, and other artists.
- Content and updates require review and approval by an Admin user.
- Admin
- Same permissions as User role.
- Granted access to specific parts of the Admin tool based on assigned permissions. Examples include: Reporting pages, Metadata pages.
- Other front-end permissions can also be granted to Admin users such as the ability to create public playlists.
- This user will have access to anything they are granted to as part of the CMS role group permissions.
- Client Admin
- Full access to both the front-end and the entire Synchtank Admin, including all administrative areas and tools.
Below that option but still within the ‘CMS and Web Permissions’ tab there are Public Role Groups which consist of a few toggles to allow your user to see playlists, share tracks/playlists or become a ‘Default - User FE Access’.
The ‘Default - User FE Access’ is a Role Group and something you can set up to make it easier to create users - jump to Role Groups to learn more - but this essentially allows you to select this option without having to think about the other settings within this section.
User Groups
Next you also have a tab called ‘User Groups’ and this is different to your Role Group. Your User Groups allow you to control which tracks / libraries you wish your user to see on the front-end of your site - learn more below.
Avatar
And lastly, before you save, you can add an Avatar image for your user to help identify them if you require.
3. Finally, click "Save" to finalize the user creation process - the user will receive a notification about their new account and to set up their password.
Bulk Import
If you would like to upload your users in bulk we recommend first pulling a report which will give you the correct fields to add your user data into and ensure the upload is successful. This next section will also explain the different types of reports you can pull to analyze your Users activity.
Firstly, head to the Users section within the admin navigation and select ‘New Report’.

Here you have a few options for the different types of reports you can pull:
- User Actions: This report will show you the different actions your users have made whilst in your Synchtank system.
- User All Data: This report will show you all the data against your users.
- User Changes: This report will show you any changes made to your users.
- User Logins: This report will show you all the login details for your users.
- User Shares: This report will show you what your users have shared from your Synchtank system.
- Users: This report will show you a list of all of your users.
Notes: Reports may take anywhere from a minute to several hours to process, depending on the size of your report and the number of reports in the processing queue. You will receive a notification when your report has been processed and is ready for download. See the Notifications below for more on that.
The report we will want for a bulk upload of Users is the ‘Users’ report. In this section you are able to select the date range and see the fields that are within your download. Once completed you will have a spreadsheet that you can fill out and then re-upload to the system. However, we do recommend that you individually upload people to the system to ensure they have the right role and user group associated with it.
Bulk Edit
For bulk edit you have two options, one is via a spreadsheet and the other is using our bulk edit tool. For spreadsheet edits follow the same steps as above, download your report, edit in your spreadsheet then re-upload it.
Note: For bulk editing within the system, you can do this within the Users section but also for Masters, Compositions, Albums and the process below will be the same.
So, to bulk edit your users within the admin, head to your Users list and select those that you wish to edit, then select the pencil icon at the top of the list to enter the editing section.
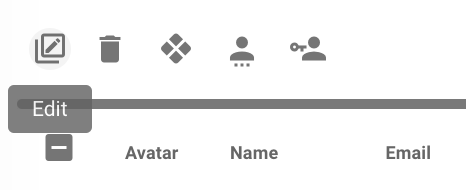
You also have the ability to perform a couple more actions as well as editing here through the other icons:
- Bulk delete via the trash can icon
- Add selected users to a Collection via the four squares icon
- Add selected users to a User Group via the person icon with 3 dots underneath
- Add selected users to a Role Group via the person icon with the key next to it
Once you select the edit option a new page will open with the users listed on the left and in the middle their individual user permissions and associated Collection, User Group, and User Access Expiration.
To the right you have the global user information which you can amend for all the selected users. Once completed your edits hit the save button.
This makes it easy for you to stay within the system and complete your updates without the hassle of exporting and reimporting.
Role Groups
Within Role Groups you are able to control the permissions of your users, to enable them to have access to different functions within the Synchtank Admin.
You can create multiple “groups” with different permissions sets to allow you to group together those users that share the same functionality access i.e. allowing them to perform specific tasks within your system - just like we mentioned in the above ‘Default - User FE Access’.
How to create a role group and what the options mean
When you navigate into the ‘Role Groups’ subsection, click create and you will see a new group open up.
Give this group a clear name that will make sense to you and your internal system management team and then select the type you wish to create. There are three options
- 'cms’ which allows you to create a permission set for the admin section of your system
- ‘web’ which allows you to create a permission set for your front-end system
- ‘artist’ which allows artists to have access to the Artist Portal.
Note: Please be aware that if you have a user sign up on your front-end then they will have the default user permissions of which you can edit within your system after they have signed up.
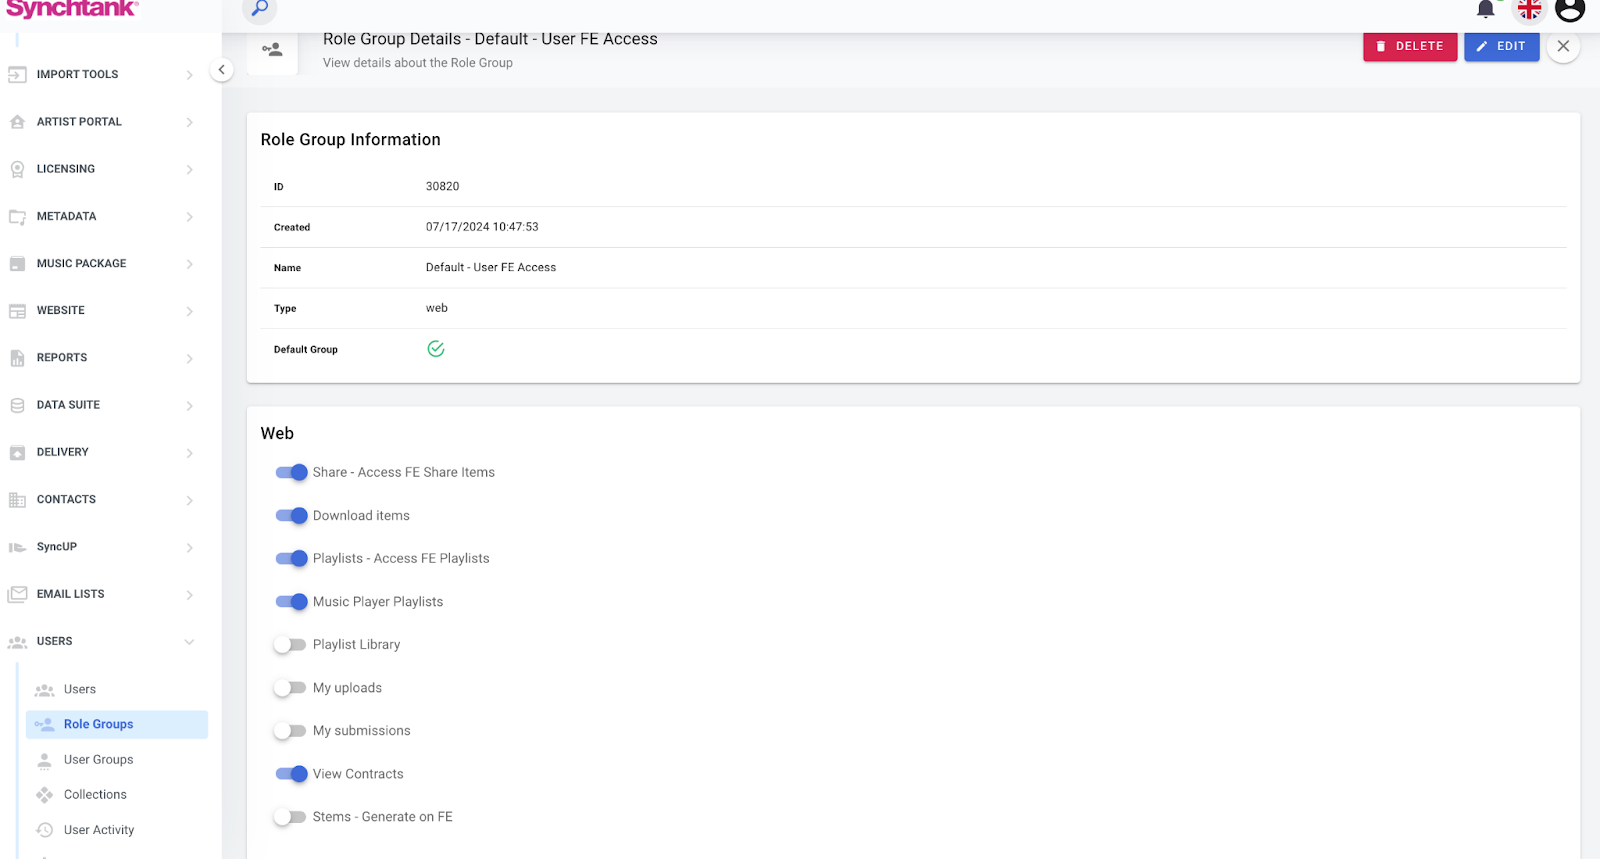
When creating a ‘Web’ Role Group - you will have a few toggle options to switch on, they are:
- Share - Access FE Share Items
- This option allows you to enable the sharing functionality on the front-end system, so your users can share tracks, playlists, or albums.
- Download Items
- This option will show a separate FE page listing all tracks/albums/playlists that the user has downloaded.
- Playlists - Access FE Playlists
- This allows users to create Playlists on the front-end. Turning this toggle on, will make the Playlist Sidebar appear.
- Playlist Library
- This toggle will add a Library checkbox on the Playlist Edit page. The users with this role group will be able to add Playlists to the Library. The Playlist Library shows a list of Playlists that are flagged as Library.
- My uploads
- This option will add the ‘My Uploads’ section to the user menu where they can see all the tracks they have uploaded.
- My submissions
- This option will add the ‘My Submissions’ section to the users menu where they can see all the tracks they have submitted from the system.
- View Contacts
- This toggle is for viewing Contracts on the front-end This is related to the Contracts module.
- Stems - Generate on FE
- This option will allow your user to generate stems on the front-end of the system.
For all systems you will have the ‘Default - User FE Access’ and as standard the below permissions will be set. To edit this, just type the above into your list of Role Groups and select edit.
User Groups
User Groups are different from Role Groups and allow you to control what your user(s) can see in your system with regards to tracks on the front-end.
Your User Group is a group that you assign a collection or multiple collections to, jump to the collections group to learn how to create those. Also, please note that an individual's user permissions will override the group permissions if that user is allowed access to a different tracks or albums for example that others in their group cannot. The same goes for denied access permissions, if you are denied a track or album that will take place over all else to ensure that track or album isn’t shown when you require.
To create a group of users with the same track permissions follow these steps:
Creating a New User Group:
1. Navigate to the User Groups subsection under the Users tab within your Synchtank Admin.
2. Select the green Create button in the top right hand corner

3. Give your User Group a clear title that will be easy to understand for all your internal administrators and an optional description to prevent your title from becoming too long.
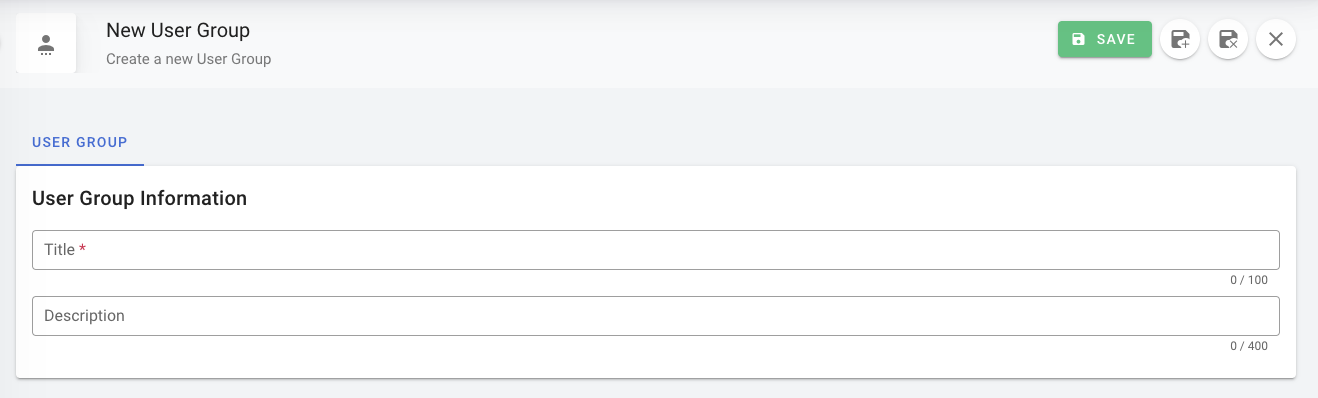
4. Before moving onto the next steps, click the green save button in the top right corner. The page will then reload for you to be able to perform the following:
- Track collections - audition
- Adding a Collection to this category will allow all users in the User Group to stream the tracks in the selected Collection
- Track collections - download
- Adding a Collection to this category will allow all users in the User Group to download the tracks in the selected Collection
- Track collections - deny
- Adding a Collection to this category will ensure the tracks are not visible to your user group
Note: You can jump to the Collections section of this article to learn more about implementing the above.
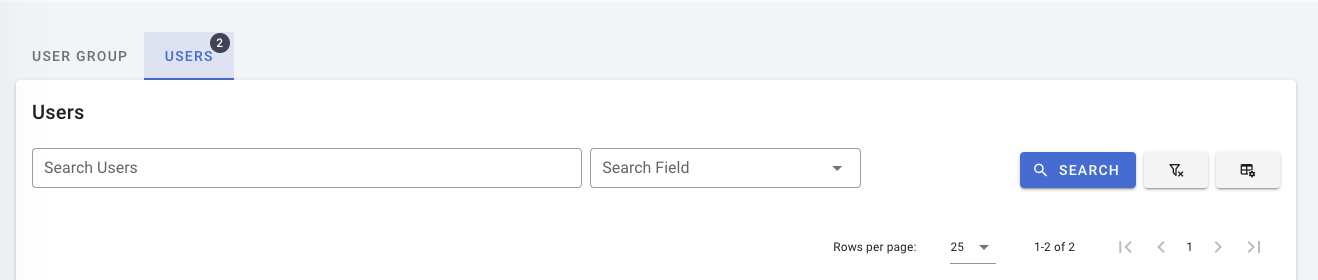
5. Once you have completed those steps, hit save and you can add your users by navigating to the ‘Users’ tab.
Users can be added to the User Group using the 'Add Users' button. Just search their names and select the user.
Users added to a User Group are listed on the page. From there clicking delete will remove a user from the User Group or clicking List will display each user's individual access permissions.
Updating your User Group:
To update a User Group, click Edit on the chosen User Group on the User Groups page. From this page the users and collections assigned to the User Group can be managed.
Anonymous User Group
As part of the Collections / User Groups setup, an Anonymous User Group can also be set up, allowing Admin Users to control which collections are visible to users viewing the front-end without logging in.
Collections
The Collections Module allows you to compartmentalize the system catalog in order to restrict what is available to users on the front-end system. For example, you may want to give certain users access to only the songs in their territory, or songs that are available for use on social media.
Collections can be assigned to both a user and a track. When viewing the front-end system, users will only be able to see those tracks that have the same collection that they do.
A track and a user can be a part of multiple collections at the same time.
Creating a Collection
Collections can be created from either the Synchtank Admin track page or using the All Tracks import.
To add a new collection to the sound recording on the sound recording page, fill in the Collection field.
To add a new Collection to the track using the All Tracks or Master import, add the new collection to the Collection field in the All Tracks or Master Spreadsheet and then re-import the data into the system. If there is already data in the field, separate the existing and new values with a comma. Multiple collections can be added to a track.
Assigning a Collection to a Track
Collections can be assigned to tracks within the admin track page or the All Tracks.
- To add a Collection to a track on the track page, select the Collection from the Collection dropdown.
- To add a new Collection to the track using the All Tracks import, add the new collection to the Collection field in the All Tracks Spreadsheet and then re import the data into the system. If there is already data in the field, separate the existing and new values with a comma. . Multiple collections can be added to a track.
Deleting a Collection
Collections can be deleted from the Collection listing page under Admin > Users > Collection and clicking delete on any of the collections listed, to remove the collection. You can also do this in bulk by selecting the collections you wish to delete and clicking the trash can icon at the top.
The tracks and users restricted by this collection, will no longer be restricted in the system.
Module Options
The Collections module offers a wide range of flexible options. The main setup choice will determine the restriction setup as below:
- Users only have access to tracks in their assigned collections. Users with no collections will not have access to any tracks.
- Users will only have access to tracks in their assigned collections AND access to tracks with no collections. Users with no collections will only have access to tracks with no collections.
This can be chosen during module setup and configuration.
User Activity
Within the User Activity section, you have the ability to track your users' journeys throughout your system, giving you valuable insight into how your system is being used.
By tracking the user activity you can review your most popular tracks, which playlists were highly viewed, or which pages your users are engaging with the most. All of this allows you to tailor your use of the system to your end users.
Below are a few ways you can track users on your system.
User Activity Page
The User Activity page is accessible via the Synchtank Admin and can be found in the Users section of the navigation sidebar.
This page allows you to:
- Get real-time insights into your users' actions with this live feed of system activity.
- Filter events to zoom in on specific actions.
- Automatically updates every 30 seconds to display the latest user activity.
- Review success of promoted/featured pages
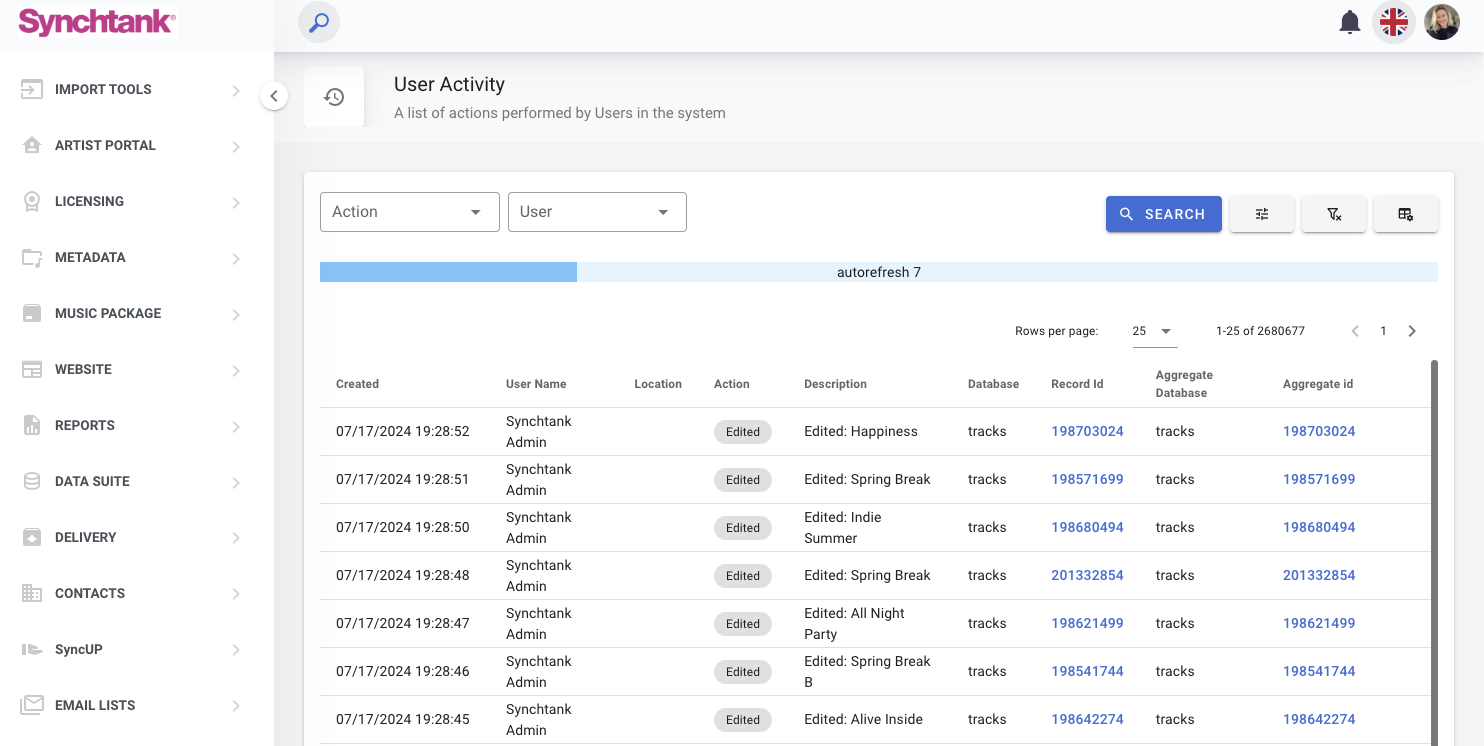
Each action will have a further set of data against it such as created date (when the user performed the activity), user name, location and, if applicable, a description of the action taken - as seen in the above screenshot.
User Reports
As well as being able to gain an overview of the user activity on the system using the User Activity page, you may want to run reports to manage this data.
There are several different reports accessible on the Reports page that allow you to export the data you need to review the system trends. These include:
- User Actions - allows you to export general system user actions over specific periods; be that viewed or edited any webpages or added/ deleted users etc.
- Downloads - allows you to track what has been downloaded by what user.
- Search Report - allows you to review what users are searching for and where on the site they are searching.
- Shares - allows you to track what users are sharing from the system and where it was sent to.
Unlock a deeper understanding of user behavior with Synchtank's flexible tracking capabilities. Go beyond the default User Activity report and tailor your analytics to your needs:
- Data Suite Module: Unleash even more powerful analytics capabilities by adding this optional module. Discuss its potential with your account manager!
- Shares Page: Review a specific user's actions relating to items that are shared with them. For example, once you have shared a playlist with a user you can track if that user has opened the playlist and has played or downloaded any of the items in it.
Notifications
Lastly within your Users section of the Synchtank Admin is your Notifications subsection, for your Admins to review all system notifications.

Related to