The Delivery Module allows you to deliver tracks and associated metadata out of the system to external partners, streaming platforms (such as Spotify and YouTube), distributors, PROs, and customers.
Please note: the Delivery Module is an additional paid feature. If you would like more information, please contact your Account Manager.
Getting Started
We recommend setting things up in the following order, but feel free to jump to the section most relevant to you:
- Packages — Select the tracks you want to deliver
- Routes — Set up where you're delivering to
- Mappings — Define the metadata format
- Paths — Control your file and folder naming
- Setups — Bring everything together and deliver
Packages
A Delivery Package is a collection of tracks that you want to deliver to a specific destination.
Creating a Delivery Package
- Go to Admin > Delivery > Packages
- Click + Create in the top right corner
- Enter a name and description
- Click Save
Adding Tracks to a Package
You can add tracks to a Delivery Package in three ways:
From Masters:
- Go to Admin > Catalog > Masters
- Search for the tracks you want to add
- Select one or more tracks
- Click the Add to Delivery Package button above the track list
- Select the relevant Package and click Save
From Albums:
- Go to Admin > Catalog > Albums
- Select the album(s) you want to add
- Click the Add to Delivery Package icon above the list
- Select the relevant Package and click Save — this will add the full album and all its tracks
From Playlists:
- Go to Admin > Catalog > Playlists
- Select the playlist(s) you want to add
- Click the Add to Delivery Package icon above the list
- Select the relevant Package and click Save
Note: If you haven't created a Delivery Package yet, you can create one on the spot by typing a name and selecting + Create Delivery Package in the pop-up.
Routes
Routes define where you're delivering to — the credentials and connection details for your endpoint (e.g., a DSP, distributor, or partner). Routes only need to be set up once per endpoint and can then be reused for multiple deliveries.
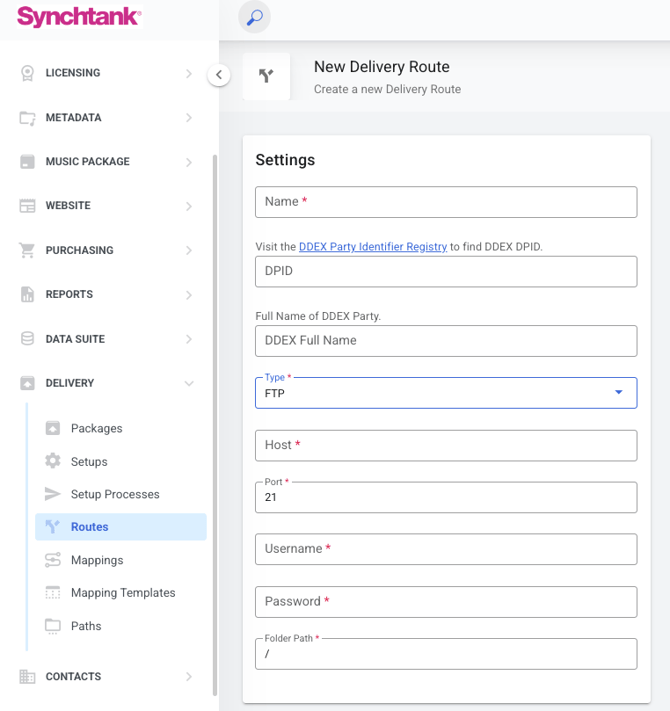
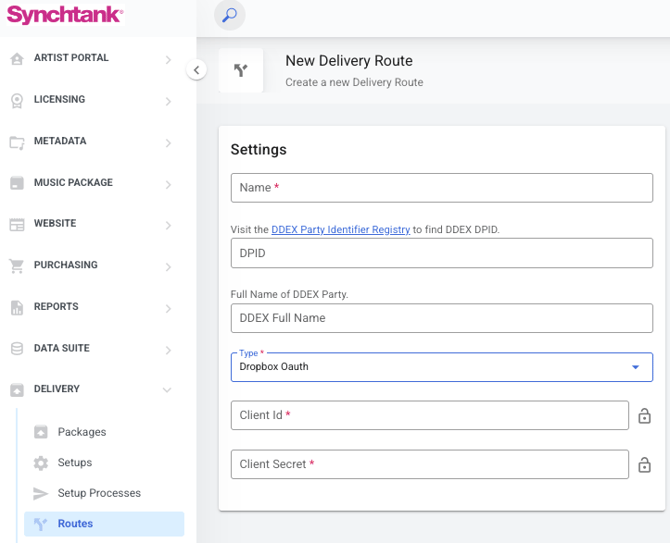
Creating a Route
- Go to Admin > Delivery > Routes
- Click + Create in the top right corner
- Enter a name for the Route (e.g., "Spotify Delivery")
- For DDEX deliveries only: Enter your DPID code
- More information can be found here: https://dpid.ddex.net/register
- Select the Type based on where you're delivering
Supported Route Types
Amazon S3: Select this if your endpoint wants delivery to an Amazon S3 bucket. You'll need to enter the Access Key ID, Secret Access Key, Bucket, Key Prefix, and Region. These credentials should be provided by your endpoint.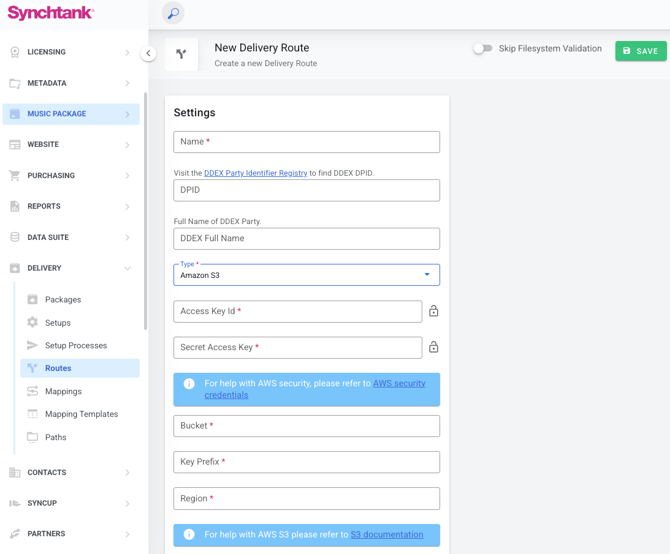
Helpful AWS documentation:
- Security credentials: https://docs.aws.amazon.com/IAM/latest/UserGuide/security-creds.html
- S3 documentation: https://docs.aws.amazon.com/s3/
FTP: Select this if your endpoint uses a standard FTP server. You'll need the Host, Port, Username, and Password — all provided by your endpoint.
SFTP (Password): Select this if your endpoint uses an SFTP server with password authentication. You'll need the Host, Port, Username, and Password — all provided by your endpoint.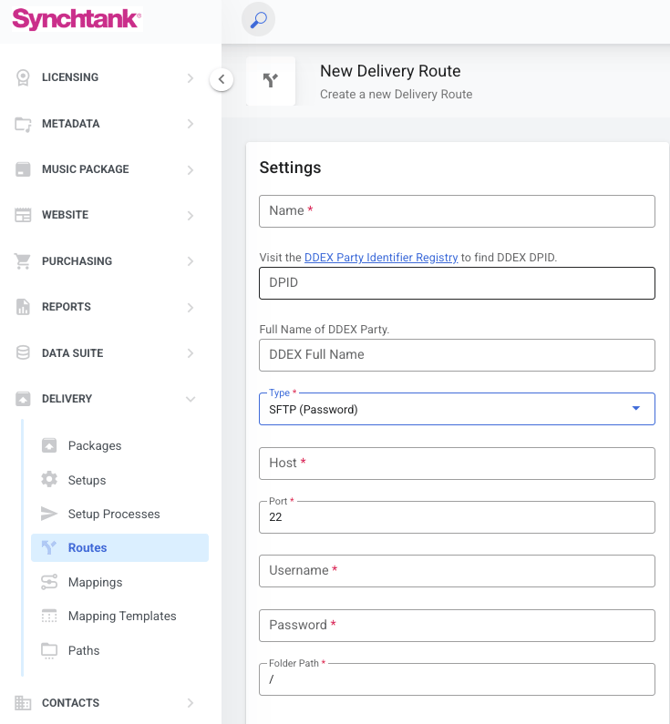
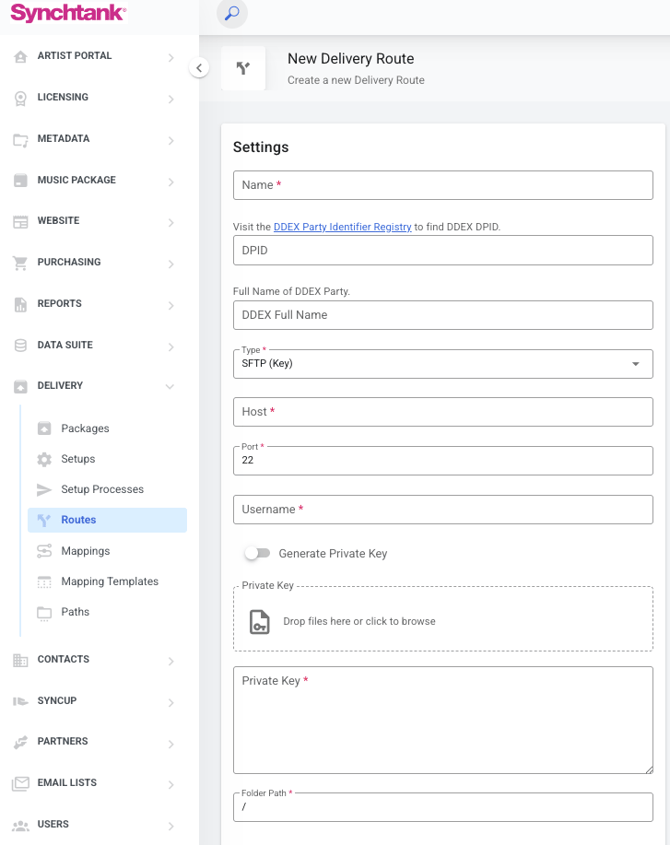
SFTP (Key): Select this if your endpoint uses an SFTP server with key-based authentication. You'll need a Private Key file. You can also use the Generate Private Key toggle to generate one for your endpoint to use.
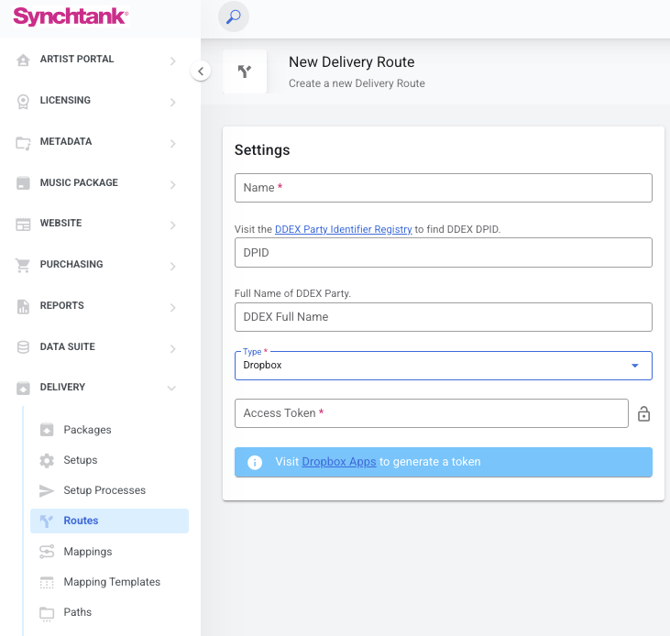
Dropbox: Select this if your endpoint wants delivery to Dropbox using an access token. You'll need to generate the token from your Dropbox app homepage.
Dropbox OAuth: Select this if your endpoint wants delivery to Dropbox using OAuth authentication.
Box (Credentials): Select this if your endpoint uses Box and wants to authenticate with username and password credentials.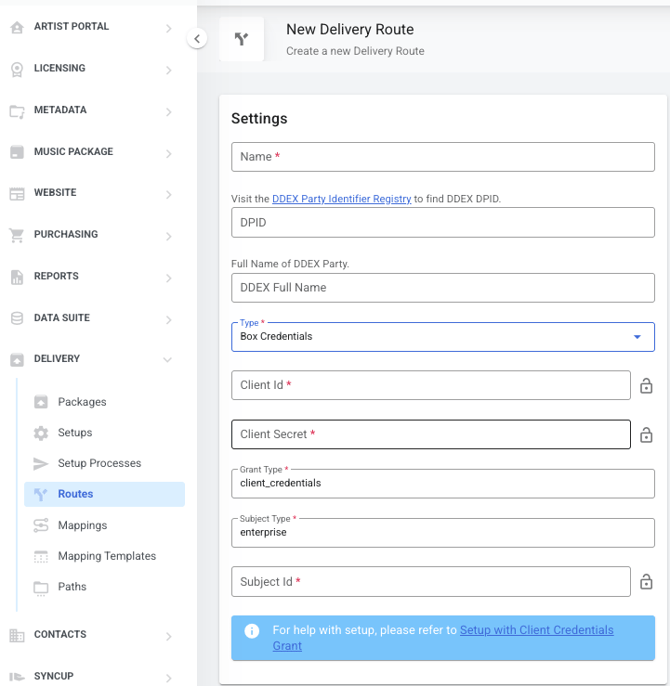
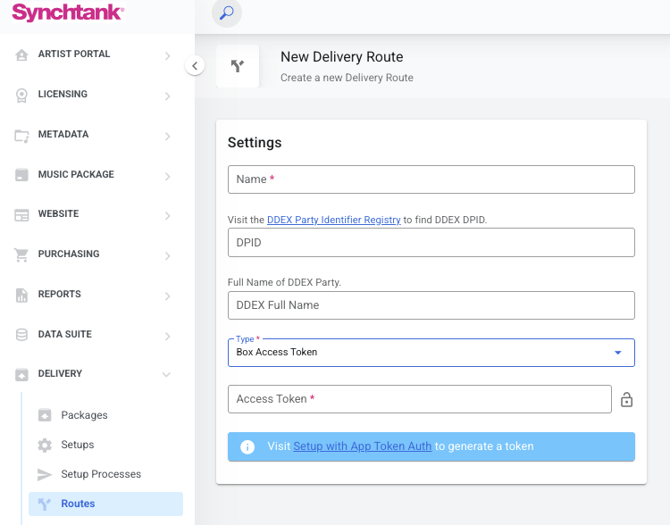
Box (Access Token): Select this if your endpoint uses Box and wants to authenticate with an access token.
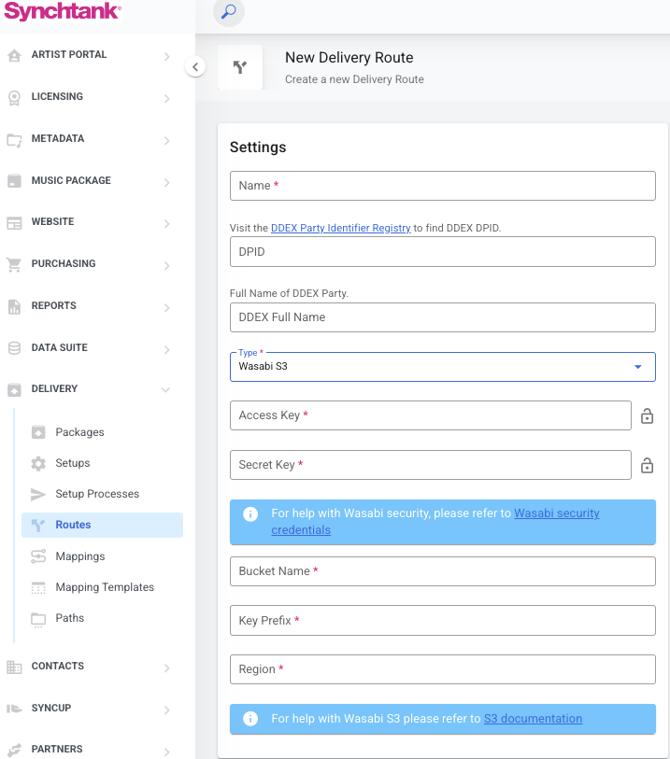
Wasabi S3: Select this if your endpoint uses Wasabi cloud storage (S3-compatible). Setup is similar to Amazon S3 — credentials should be provided by your endpoint.
Mappings
Mappings define the metadata format for your delivery — what fields are included, how they're structured, and any transformations applied to the data.
Available Formats
Standard delivery formats:
- DDEX v3.8.2 — standard DDEX format, includes Release Deals, language of performance, and contributor ID
- DDEX v4.2 — standard DDEX format, includes Release Deals
- Fuga — standard Fuga format
- Custom (CSV) — build your own custom metadata export in CSV format
- Custom (JSON) — build your own custom metadata export in JSON format
- DigAS (JSON) — deliver metadata in DigAS JSON format
Embedded metadata formats (embed metadata directly into audio files):
- MP3 Embedding (ID3) — embed metadata into MP3 files
- WAV Embedding (RIFF) — embed metadata into WAV files
- AIFF Embedding (ID3) — embed metadata into AIFF files
- FLAC Embedding (Vorbis) — embed metadata into FLAC files
Creating a Mapping
- Go to Admin > Delivery > Mappings
- Click + Create in the top right corner
- Enter a name and select the relevant Format
- Configure the Field Mapping (see below)
- Click Save
Note: You can copy an existing mapping using the Copy button on the Mappings list page — no need to start from scratch each time.
Preview
The Preview section lets you select an Album and Master to see how your mapping will look before delivering. Once you select both, a new column appears in the Field Mapping showing exactly how each field will be populated for that record. Use this to confirm everything is mapped correctly before running a delivery.
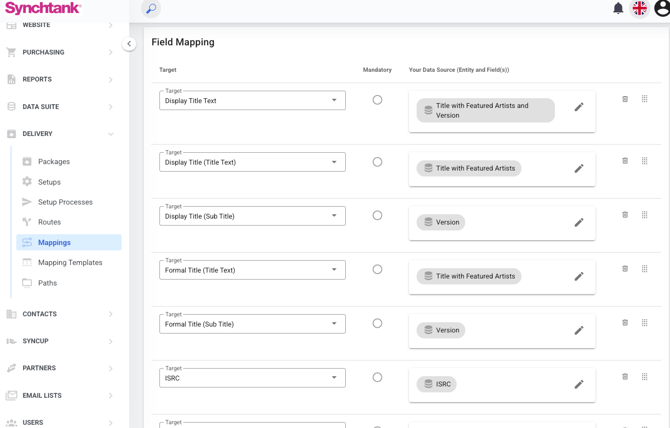
Field Mapping
The Field Mapping section is where you map your endpoint's required fields (Target) to the data in your Synchtank system (Your Data Source).
Each row has a Target field on the left — this is what your endpoint expects to receive. On the right, you assign the Synchtank data that should populate it. You can mark any field as Mandatory using the toggle between the Target and Source columns — this ensures that the field must have data before the delivery can proceed.
To configure a field, click the pencil icon to open the Sources modal. From here you can:
- Add Transform: apply one or more transformations to modify the value before it's delivered (see Per-field Transformations below)
- Add Source Field: select a Synchtank data field as the source. You can drill down through entities (Master, Album, etc.) and their available fields
- Add Fixed Value: add a static text value that will always output the same content regardless of the track data
- Output Settings: appears when you add more than one source (via Add Source Field or Add Fixed Value). Controls how the value is output when multiple sources are present (Default, First Item, or Join Items)
Per-field Transformations
Transformations let you modify a field's value at delivery time without changing the source data in your system. Click + Add Transform inside the Sources modal to apply one or more of the following:
- Translate: map specific input values to different output values using a lookup table. Add as many pairs as needed.
- Transliterate Non-Latin Characters: converts accented and non-Latin characters to their closest ASCII equivalent during delivery. This can improve compatibility with external systems that do not support special characters. No additional configuration is required.
- Note: This transformation only affects the delivered output and does not modify the source metadata stored in Synchtank.
- List to String: convert a list of values into a single string. Fields: Strategy.
- Boolean to String: convert a true/false value into custom text. Fields: True value, False value.
- Prefix and Suffix: add static text before or after a field value. Fields: Prefix, Suffix.
- Find and Replace: replace a specific character or text string with another. Fields: Find, Replace with.
- Array Filter: filter items from an array based on a comparison. Fields: Array field, Field for comparison, Operator, Value for comparison.
- Left Padding: pad a field value on the left with a specific character up to a defined length. Fields: Length, Padding character.
- Conditional Value: output different values based on a condition. Fields: Condition, Value if true, Value if false (optional).

Note: the mapping must be saved for transformations to take effect.
Translations
The Translations section sits below the Field Mapping and works at the mapping level — not per field. Use it to define global value translations that apply across the entire mapping. Click + Add Translation to create one.
![]()
Embedded Metadata Mappings
You can create mappings to embed metadata directly into audio files as part of the delivery. This gives downstream users access to track information without needing a separate metadata file.
Supported formats: MP3, WAV, FLAC, and AIFF
To create an embedded metadata mapping, select one of the embedding formats (e.g. MP3 Embedding (ID3), WAV Embedding (RIFF), or AIFF Embedding (ID3)) when creating a new mapping, and configure the field mapping as usual.
Custom CSV
This allows you to create your own metadata export format and build your own custom CSV spreadsheets tailored to your endpoint's requirements.
When creating a Custom CSV mapping, there is an optional Template File field. This lets you pull in a custom spreadsheet that has been previously uploaded to the Mapping Templates page. When a template is selected, the column names from the spreadsheet automatically populate the field mapping on the left-hand side — so you just need to map each column to the right Synchtank data source on the right.
Recommended workflow for Custom CSV:
- Ask your endpoint for their metadata template spreadsheet
- Go to Admin > Delivery > Mappings > Mapping Templates and upload the file
- Go to Admin > Delivery > Mappings and click + Create
- Select Custom (CSV) as the format
- In the Template File field, select the template you uploaded
- The column names from the spreadsheet will auto-populate on the left — map each one to the correct Synchtank data source on the right
- Click Save
Mapping Templates
If your endpoint has a specific metadata format they want to receive, they may send you a spreadsheet template. You can upload this under Admin > Delivery > Mappings > Mapping Templates, and it will be stored for use when creating new Custom CSV mappings.
Paths
Paths control how your delivered files and folders are named. Each Path has a name, a Batch By setting, and a set of File Paths — one for each file type being delivered.
Creating a Path
- Go to Admin > Delivery > Paths
- Click + Create
- Enter a Name for the Path
- Select the Batch By type — this controls how files are grouped:
- UPC — group by UPC code
- Package — group by Delivery Package
- Track — group by individual track
- Once a Batch By type is selected, the File Paths section appears
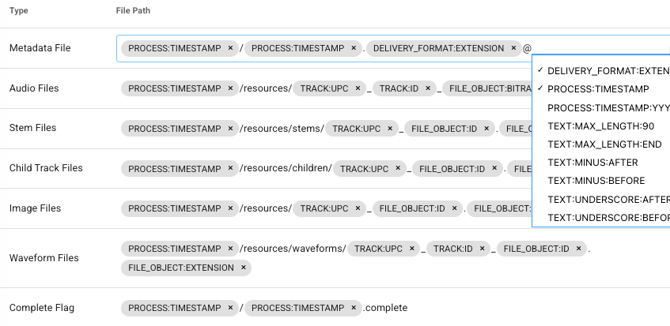
File Paths
The File Paths section lets you define the naming structure for each file type in your delivery:
- Metadata File
- Audio Files
- Stem Files
- Child Track Files
- Image Files
- Waveform Files
- Complete Flag
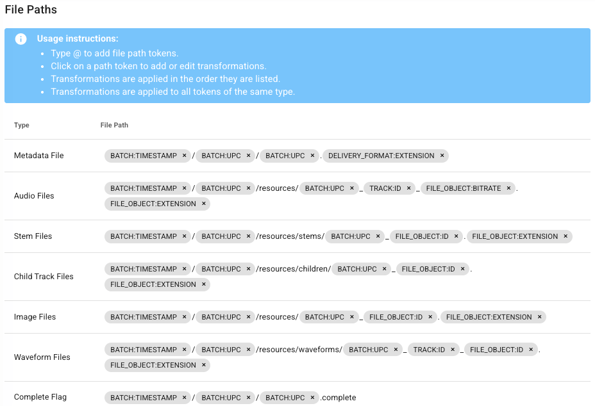
To build a file path, type @ to open a list of available dynamic tokens (e.g., TRACK:UPC, FILE_OBJECT:EXTENSION, PROCESS:TIMESTAMP) and select one to insert it. You can combine multiple tokens with static text (e.g.,/resources/) to create the exact path structure your endpoint requires.
Tips:
- Transformations are applied in the order they are listed
- Transformations are applied to all tokens of the same type
Token Transformations
Click on any token to apply transformations to its value. The following three options are available regardless of which file type row you're configuring:
- Find and Replace — replace a specific character or string within the token value. Fields: Find, Replace with.
- Convert Character Encoding — converts the token value to ASCII, replacing or removing any non-ASCII characters. Useful for endpoints that can't handle special characters.
- Left Padding — pad the token value on the left with a specific character up to a defined length. Fields: Length, Padding character.
![]()
Setups
Once you have your Package, Route, Mapping, and Path configured, you bring them all together in a Setup to create and run a delivery.
Creating a Setup
- Go to Admin > Delivery > Setups
- Click + Create
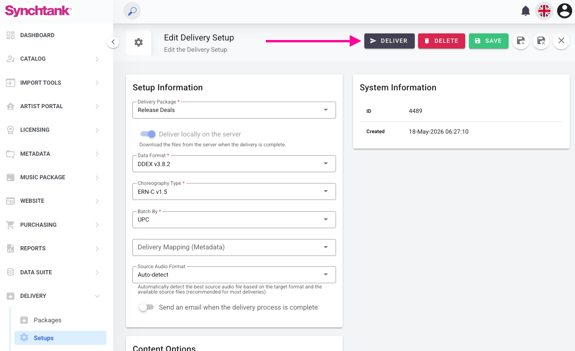
- Fill in the Setup Information fields:
- Delivery Package (mandatory)
- Deliver locally on the server (optional toggle) — when enabled, files are downloaded directly from the server when the delivery is complete. Toggling this on will hide the Delivery Route field.
- Delivery Route (mandatory, unless Deliver locally is enabled)
- Data Format (mandatory) — if you select a DDEX format, an additional Choreography Type field appears (Release by Release, ERN-C v1.2, ERN-C v1.5). If you select Custom CSV, Custom JSON, or DigAS JSON, a Delivery Path Setup field appears where you select your Path configuration.
- Batch By (mandatory)
- Delivery Mapping (Metadata) — select your mapping
- Source Audio Format — defaults to Auto-detect (recommended for most deliveries)
- Send an email when the delivery process is complete (optional toggle)
- Configure Content Options:
- Include Metadata
- Include Audio — choose one or more formats: MP3 (with Target Bitrate and Embedded Metadata Mapping options), WAV, AIFF, FLAC, ADM
- Include Peak Files/Waveforms
- Include Artwork — JPG and/or TIFF
- Include Child Tracks (versions/remixes/etc)
- Include Stems
- Include Delivery Complete File
- Click Save
Running a Delivery
Once your Setup is ready, click Deliver in the top right corner to start the delivery process. Your tracks and associated metadata will be sent to your endpoint as configured.
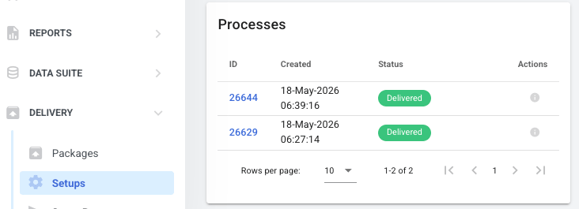
Processes
Each Setup has a Processes section at the bottom that shows the history of all deliveries run from that Setup. You can see the ID, creation date, status, and available actions for each delivery process.
Copying a Setup
You can duplicate an existing Setup using the three-dot (⋮) menu on any Setup row in the list. This is useful when you have a complex configuration you want to reuse with minor changes.
- Click the ⋮ menu on the Setup you want to copy
- A modal appears asking you to select a Delivery Package for the new copy
- Select the package and click Copy
- The new Setup opens pre-populated with all the same settings from the original — ready for you to review and adjust as needed
- Changes to the copy do not affect the original Setup